
If you’re anything like me, you know that summer and ice cream are basically best friends. That’s why I absolutely love this Buster Bar Ice Cream Cake Recipe—it’s like a nostalgic blast of chocolatey, nutty goodness packed in layers that your whole family will devour. I first tried this cake at a backyard party, and honestly, it stole the show. What makes it so special is how easy it is to throw together yet delivers a dessert that feels fancy and indulgent without fuss.
Whether you’re planning a hot day treat, a birthday surprise, or a casual weekend dessert, this Buster Bar Ice Cream Cake Recipe is a winner every time. You’ll find that the combo of crunchy fudge-covered graham crackers, silky ice cream, gooey hot fudge, and that magical chocolate shell topping with peanuts creates an irresistible texture and flavor experience. Trust me, it’ll become your go-to ice cream cake recipe before you know it.
Why You’ll Love This Recipe
- Simple No-Bake Delight: You don’t need to heat your oven—just layer, chill, and enjoy.
- Perfect Texture Combo: Crunchy, creamy, and fudgy layers keep every bite exciting.
- Make-Ahead Friendly: Prep it days ahead, making party planning stress-free.
- Family Favorite: My family goes crazy for it, and yours will too.

Ingredients You’ll Need
The magic of this Buster Bar Ice Cream Cake Recipe lies in the simple, classic ingredients that come together beautifully. Each component brings its own charm, and I’ve included some handy tips so you can shop smart and prep well.
- Fudge-covered graham crackers: Break them into smaller pieces to create that crunchy base that soaks up the ice cream just right.
- Vanilla ice cream: Use good quality vanilla ice cream—it melts smoothly and balances the chocolate perfectly.
- Hot fudge topping: Warming it slightly in the microwave makes spreading effortless and keeps the fudge ribbons even and luscious.
- Chocolate magic shell topping: This is the secret weapon for a satisfying crackly chocolate finish.
- Dry roasted peanuts: They add crunch and a salty kick to each layer—try to find unsalted or lightly salted for balance.
Variations
I love how this Buster Bar Ice Cream Cake Recipe is a great canvas for your creativity. Don’t be shy—try swapping ingredients or adding your personal twist to make it your own.
- Add a nutty twist: I once swapped peanuts with chopped almonds for a different crunch, and it was a hit with my nut-loving guests.
- Mix in chocolate chip cookies: Replace the fudge-covered graham crackers with crunchy chocolate chip cookies for an extra chocolate boost.
- Dairy-free option: Use dairy-free vanilla ice cream and a nut butter drizzle instead of peanuts to make it allergy-friendly.
- Berry boost: Try adding a layer of fresh raspberries or strawberries between the ice cream layers for a fruity surprise.
How to Make Buster Bar Ice Cream Cake Recipe
Step 1: Prep Your Pan and Graham Cracker Base
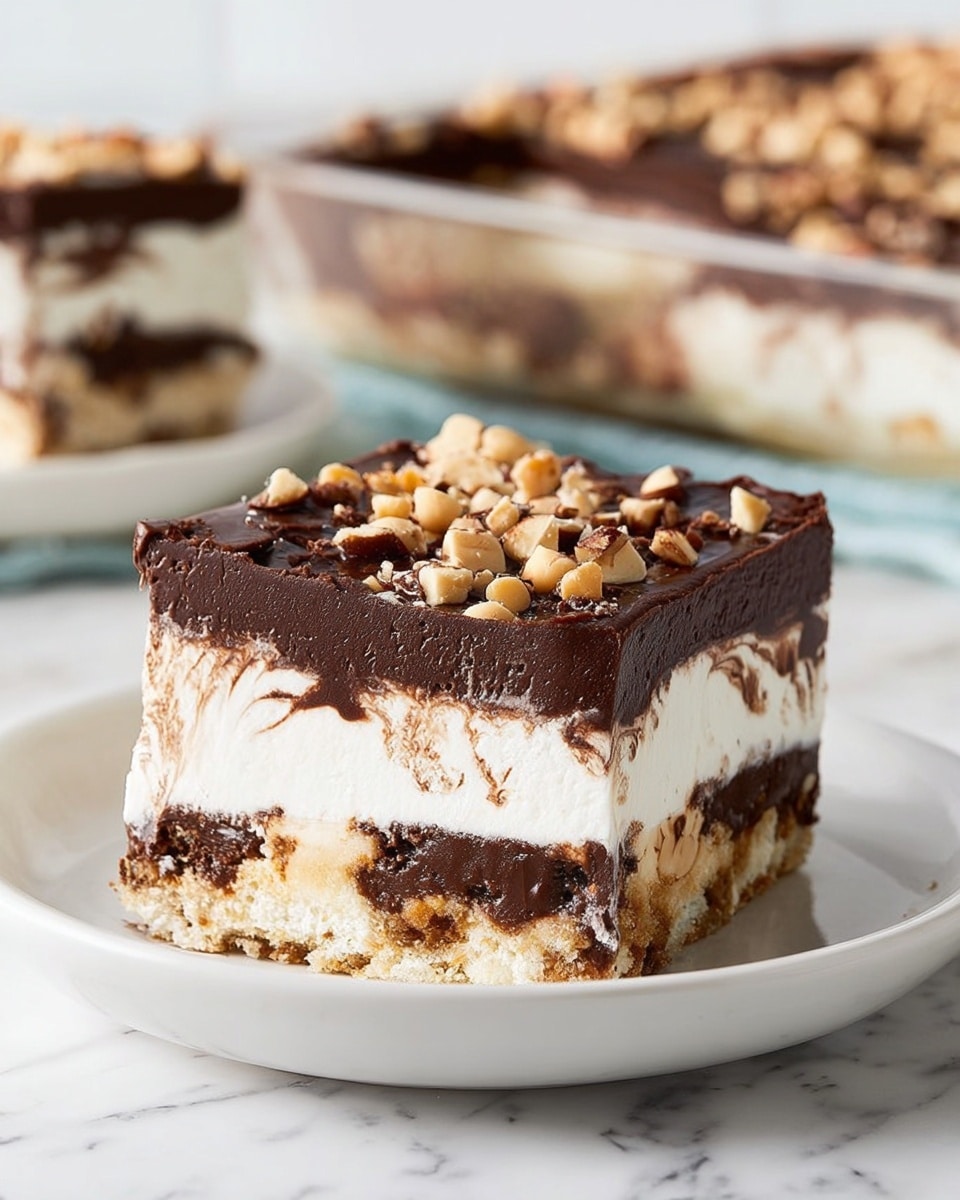
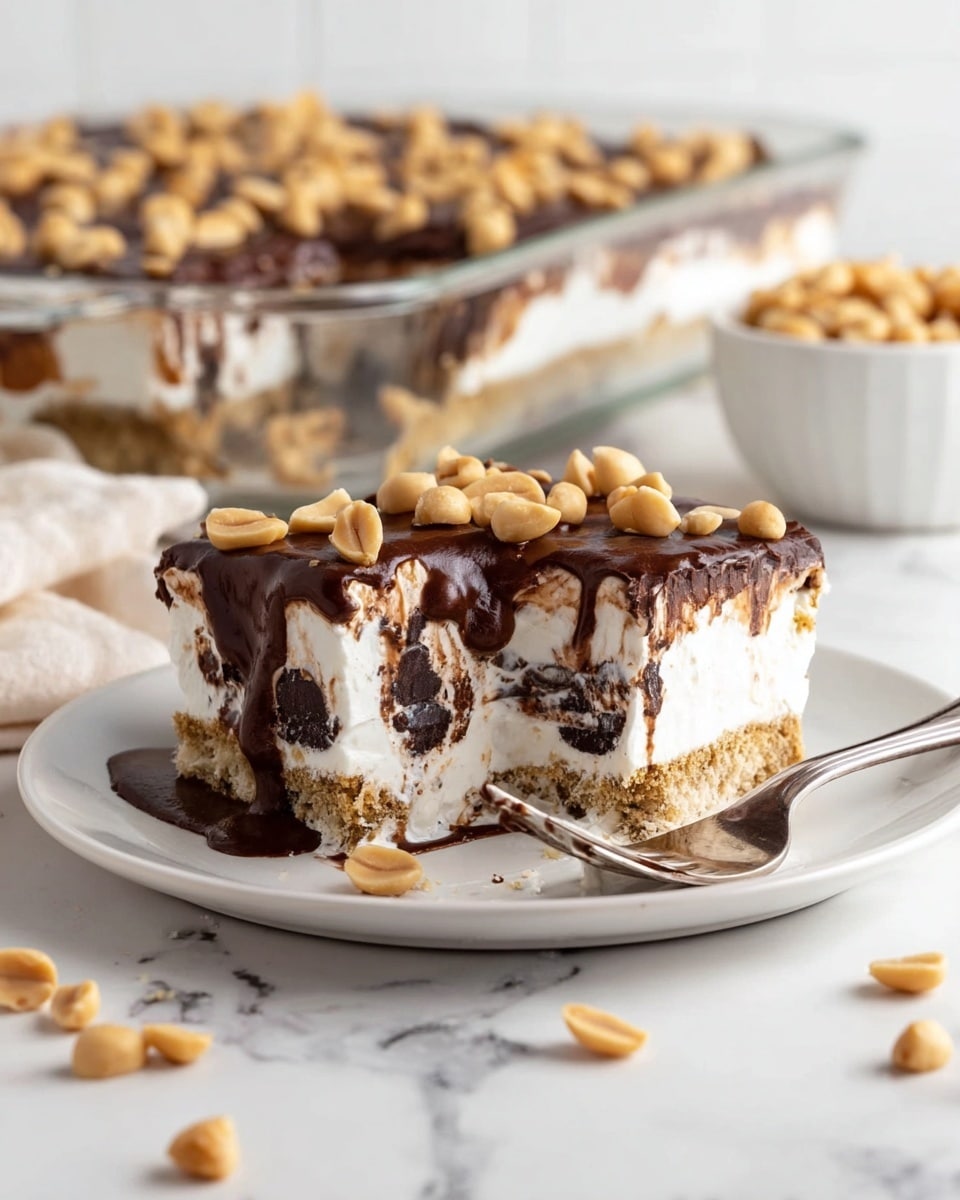
Lightly spray a 9×13 baking dish with nonstick cooking spray to make sure nothing sticks. Then, evenly spread the broken pieces of fudge-covered graham crackers on the bottom. This crunchy layer is the foundation, so don’t be shy with covering the base fully—it adds texture that contrasts perfectly with the creamy layers above.
Step 2: Scoop and Level the First Ice Cream Layer
Scoop half of your vanilla ice cream onto the cracker layer. This part is easier if you let the ice cream soften slightly—but not too much, or it’ll melt messily. Press and spread the ice cream gently in an even layer with an offset spatula or the back of a spoon. You want a smooth base for the fudge to spread on later.
Step 3: Warm and Spread the Hot Fudge
Remove the lid from your hot fudge topping and microwave it for 10-15 seconds just to warm it up and loosen it. Don’t overheat—it should be easy to spread without being runny. Quickly spread the warm fudge over the ice cream layer. This piping-hot gooey finish melts perfectly into the ice cream below.
Step 4: Sprinkle Peanuts and Repeat Layers
Sprinkle ½ cup of dry roasted peanuts over the hot fudge, then add the rest of the vanilla ice cream on top, smoothing it out evenly like before. After the ice cream layer is set, sprinkle another ½ cup of peanuts for that lovely nutty texture to pop up again in every bite.
Step 5: Shake, Pour, and Top with Magic Shell & Peanuts
Remove the lids and foil from your magic shell containers and microwave each one for 8-10 seconds to loosen the topping—make sure the lids are off here! Then screw the lids back on tightly and give them a good shake to mix everything up. Pour half of the magic shell right over half of your peanut layer, quickly add ½ of the remaining peanuts before it hardens, and repeat with the other half. This double chocolate shell with peanuts gives the cake that irresistible cracked chocolate top that makes this recipe iconic.
Step 6: Freeze and Slice
Cover the whole cake and freeze it for at least 4 hours, or until firm. When you’re ready to serve, take it out of the freezer and slice into 12 generous pieces (3 slices across by 4 slices down). Serve immediately for maximum delight—your family and friends will thank you!
Pro Tips for Making Buster Bar Ice Cream Cake Recipe
- Soften Ice Cream Slightly: Let your ice cream sit out for about 5 minutes so it’s easier to spread without melting the layers below.
- Quick Work with Magic Shell: Pour the magic shell and sprinkle peanuts fast, so the shell doesn’t harden before you finish.
- Use an Offset Spatula: This tool helps you smooth ice cream layers evenly and create nice flat surfaces for toppings.
- Store Covered in Freezer-Safe Wrap: Prevent ice crystals by wrapping the cake tightly in plastic wrap or foil before freezing.
How to Serve Buster Bar Ice Cream Cake Recipe
Garnishes
I like to keep it simple here because the layers speak for themselves—just an extra sprinkle of chopped peanuts on top for crunch, or occasionally a drizzle of warmed caramel if I’m feeling fancy. Fresh mint leaves also brighten up the presentation if you want a pop of color.
Side Dishes
This cake is a showstopper all on its own, but when I want to add something, I go for fresh berries or a light fruit salad on the side to balance the richness. A cold brew coffee or a mint tea also pairs nicely if you want a beverage alongside.
Creative Ways to Present
For birthdays or celebrations, I like to serve individual slices on colorful plates with a dollop of whipped cream and a cherry on top. Another trick is to layer it in clear glass trifle bowls for a stunning multi-layered look that showcases all the beautiful textures.
Make Ahead and Storage
Storing Leftovers
Leftovers store really well in the freezer if you wrap the cake tightly with plastic wrap or aluminum foil, or pop individual slices in airtight containers. This keeps the ice cream cake tasting fresh and prevents freezer burn.
Freezing
The great thing about this Buster Bar Ice Cream Cake Recipe is that it freezes beautifully for days or even up to a week. Just keep it covered tightly, and when you want to enjoy it, slice straight from the freezer.
Reheating
This is one dessert you definitely want to keep chilled—no reheating here! However, if the magic shell gets extra hard in the freezer, letting slices sit at room temperature for 5 minutes makes slicing easier without melting the ice cream.
FAQs
-
Can I use different ice cream flavors in the Buster Bar Ice Cream Cake Recipe?
Absolutely! While vanilla is classic here for its creamy neutral base, feel free to experiment with chocolate, caramel swirl, or even peanut butter ice cream to add your own twist. Just keep in mind that richer, chunkier ice creams may change the texture slightly.
-
How far ahead can I make this ice cream cake?
You can prepare the Buster Bar Ice Cream Cake up to 3 days in advance, as long as you keep it well wrapped and frozen. Just slice and serve straight from the freezer when ready—it holds up beautifully!
-
Can I substitute peanuts if I have allergies?
Definitely. You can swap peanuts with chopped pretzels, toasted coconut flakes, or seeds like pumpkin or sunflower to keep that crunch without the allergens. Just be sure to adjust to your family’s tastes and allergies.
-
What if I don’t have magic shell topping—can I use regular chocolate?
You can melt regular chocolate and drizzle it over the cake, but it won’t harden with the same crackly texture as magic shell. If you want that effect, you can make your own magic shell by mixing chocolate with a little coconut oil.
Final Thoughts
Honestly, this Buster Bar Ice Cream Cake Recipe has been a game changer for me when entertaining. It’s easy enough to pull together last minute, but looks and tastes like you spent hours in the kitchen. If you want a dessert that everyone remembers and talks about, this is it. I can’t recommend it enough—give it a try, and you’ll have a new favorite for sunny days and celebrations alike!
Print
Buster Bar Ice Cream Cake Recipe
- Prep Time: 15 minutes
- Cook Time: 0 minutes
- Total Time: 4 hours 15 minutes
- Yield: 12 slices
- Category: Dessert
- Method: No-Cook
- Cuisine: American
Description
The Buster Bar Ice Cream Cake is a luscious no-bake dessert that layers crunchy fudge-covered graham crackers, creamy vanilla ice cream, gooey hot fudge, crunchy dry roasted peanuts, and a magic shell chocolate topping. This frozen treat combines textures and flavors to mimic the classic candy bar in cake form, perfect for warm days or any celebration.
Ingredients
Base Layer
- 14 fudge-covered graham crackers, broken into smaller pieces
Ice Cream Layers
- 96 ounces (two 48-ounce containers) vanilla ice cream
Fudge and Toppings
- 16 ounces hot fudge topping (Mrs. Richardson’s brand recommended)
- 14.5 ounces (two 7.25-ounce bottles) chocolate magic shell topping
- 1 1/4 cups dry roasted peanuts, divided (1/2 cup, 1/2 cup, and 1/4 cup)
Instructions
- Prepare the Base: Lightly spray a 9×13 inch baking dish with nonstick cooking spray. Evenly spread the broken fudge-covered graham crackers across the bottom of the dish to create the crunchy base layer.
- Add First Ice Cream Layer: Scoop all of the vanilla ice cream onto the fudge cracker base. Press and spread the ice cream carefully and evenly over the crackers to form a smooth layer.
- Warm and Spread Hot Fudge: Remove the lid from the hot fudge topping and warm it in the microwave for 10-15 seconds to loosen it. Quickly and evenly spread the hot fudge layer over the ice cream.
- Sprinkle Peanuts: Evenly sprinkle ½ cup of the dry roasted peanuts over the hot fudge layer.
- Add Second Ice Cream Layer: Spread the remaining vanilla ice cream evenly over the peanuts layer to form the second ice cream layer.
- Sprinkle More Peanuts: Sprinkle an additional ½ cup of peanuts evenly over the second ice cream layer.
- Prepare Magic Shell: Remove lids and foil from magic shell containers. Microwave each container for 8-10 seconds, then screw lids on tightly and shake well to mix thoroughly.
- Apply Magic Shell and Peanuts: Squeeze the first magic shell container over half of the peanut layer, immediately followed by sprinkling half of the remaining peanuts before the shell hardens. Repeat with the second container and remaining peanuts on the other half.
- Freeze: Cover the prepared dish and freeze the ice cream cake for at least 4 hours to set completely.
- Serve: Remove from freezer, slice into 12 pieces (3 slices by 4 slices), and serve immediately for a refreshing frozen dessert.
Notes
- To achieve clean slices, dip the knife in warm water and wipe it dry between slices.
- Use quality vanilla ice cream for the best creamy texture and flavor.
- The magic shell should be applied quickly to allow sprinkling of peanuts before it hardens.
- Store leftover cake covered in the freezer for up to 3 days for optimal freshness.
- This dessert does not require baking and is perfect for hot weather when oven use is less desirable.
Nutrition
- Serving Size: 1 slice (1/12 of cake)
- Calories: 460 kcal
- Sugar: 35 g
- Sodium: 190 mg
- Fat: 25 g
- Saturated Fat: 15 g
- Unsaturated Fat: 8 g
- Trans Fat: 0.5 g
- Carbohydrates: 50 g
- Fiber: 2 g
- Protein: 6 g
- Cholesterol: 70 mg
