
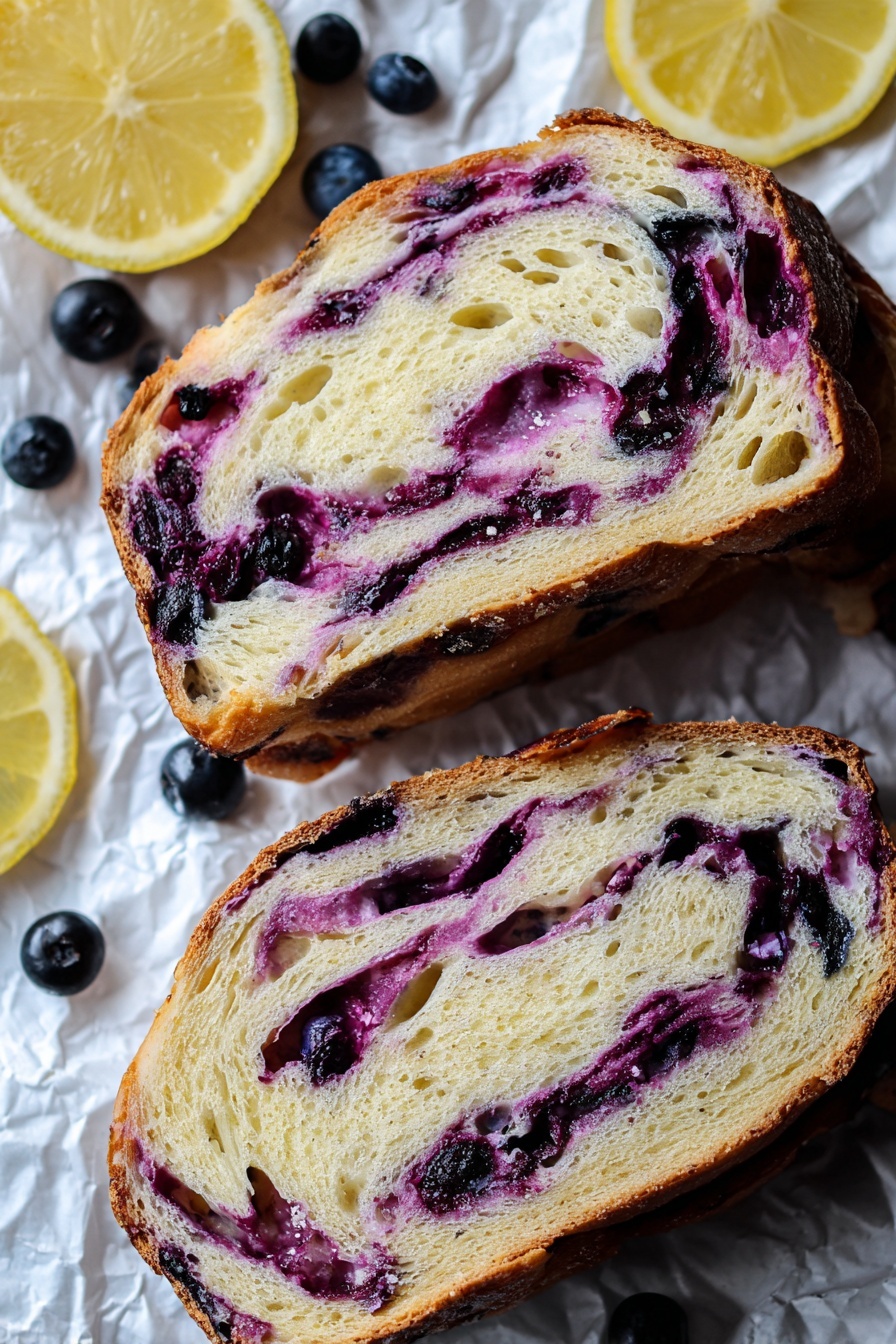
If you adore the tang of sourdough and the vibrant burst of fresh fruit, you’re going to fall head over heels for this Blueberry Lemon Sourdough Bread Recipe. Imagine biting into soft, chewy bread dotted with juicy blueberries and zesty lemon—trust me, it’s a little slice of heaven baked right in your kitchen. I’m excited to walk you through every step so you can enjoy this beautiful, flavorful loaf that my family can’t get enough of!
Why You’ll Love This Recipe
- Bright Flavor Harmony: The lemon zest wakes up the dough while blueberries add natural bursts of juiciness throughout.
- Hands-On Baking Fun: This sourdough bread is perfect for both beginners and seasoned bakers wanting a delicious twist on a classic.
- Flexible Timing: Thanks to the cold proofing step, you can fit the baking into your schedule without stress.
- Irresistible Compliment: Paired with whipped blueberry honey butter, this loaf brings a sense of joy to any breakfast or snack.

Ingredients You’ll Need
Each ingredient in this Blueberry Lemon Sourdough Bread Recipe plays a special role. From the tangy starter that brings the signature sourdough flavor to fresh blueberries bursting with sweetness, these ingredients not only work well together—they shine when combined just right.
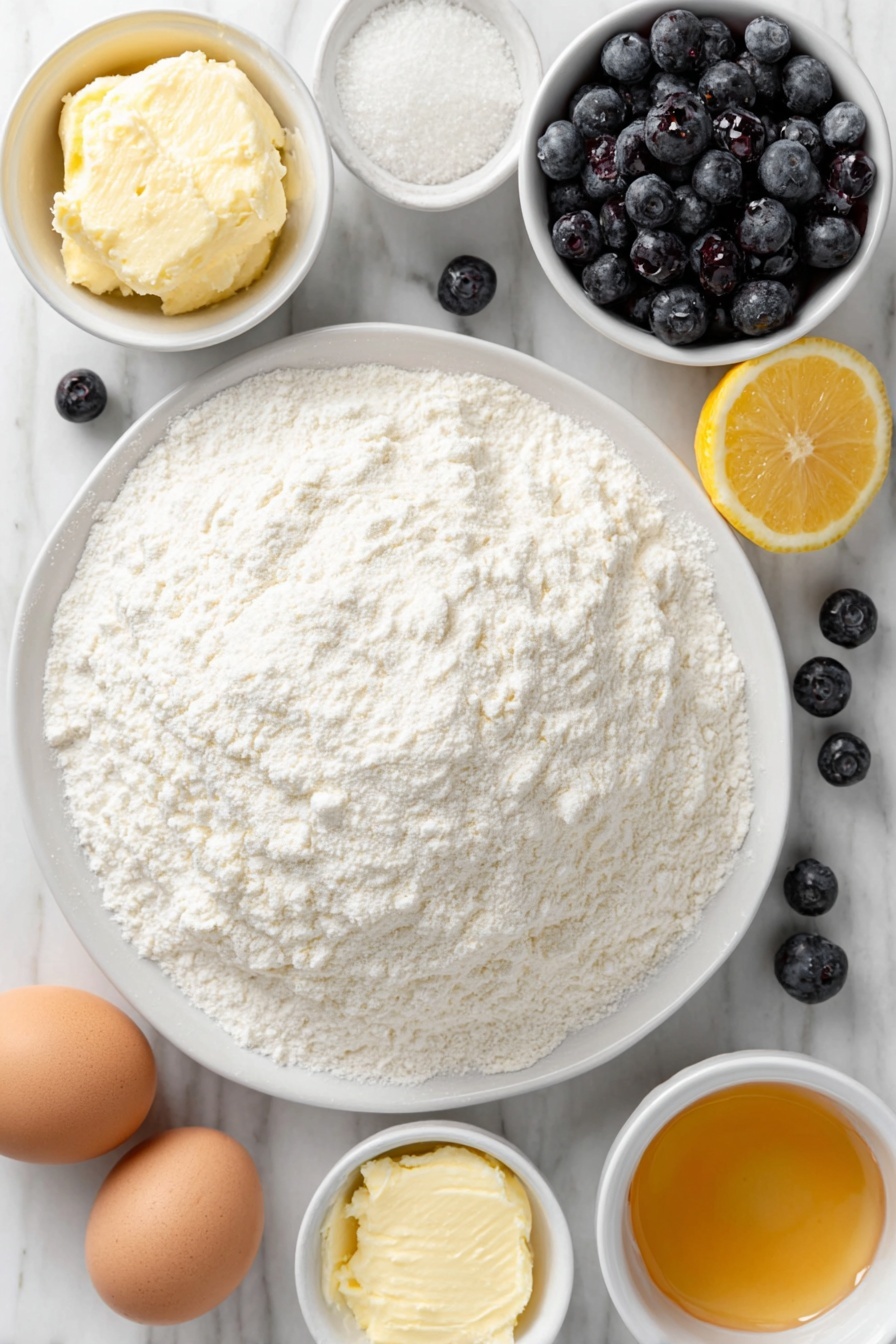
- Active sourdough starter: Make sure it’s bubbly and active for a great rise and that lovely sour flavor.
- Filtered water: Chlorine-free water helps your starter thrive and keeps the dough happy.
- Bread flour: High protein content builds the chewy, elastic texture you want in sourdough.
- Salt: Enhances flavor and controls fermentation for a balanced loaf.
- Fresh blueberries: Use ripe but firm berries to prevent the dough from turning too wet.
- Lemon zest: Adds a bright, citrusy aroma that lifts the bread’s flavor beautifully.
- Butter (for whipped blueberry honey butter): Room temperature for easy whipping.
- Honey: Balances the tang of sourdough and provides natural sweetness.
- A pinch of salt (for butter): Just enough to enhance the flavors in the whipped butter.
Variations
I love how adaptable this Blueberry Lemon Sourdough Bread Recipe is. Whether you’re looking to swap ingredients for dietary preferences or just want to try something a bit different, there’s room to personalize your loaf without losing that wonderful balance of flavors.
- Use frozen blueberries: I sometimes use frozen berries—just be sure to thaw and drain them well to avoid sogginess.
- Substitute honey: Maple syrup works great if you’re avoiding honey, keeping that sweet kick in the butter.
- Gluten-free option: While this recipe is designed for bread flour, experimenting with gluten-free sourdough starters and blends is possible with patience.
- Add spices: A pinch of cinnamon or nutmeg can add a cozy element, perfect for colder months.
How to Make Blueberry Lemon Sourdough Bread Recipe
Step 1: Feed Your Sourdough Starter & Mix the Dough
Start with a bubbly, active sourdough starter. If yours takes 4 to 12 hours to peak, adjust overnight or morning feedings to fit your schedule—that flexible timing really saved me when life got busy. Add 50g starter to 350g filtered water in a large bowl and whisk it until it’s like a milky mix. Then add 500g of bread flour and 11g salt. Mix well with your hands or a Danish dough whisk until no dry flour remains—that shaggy dough is just what you want. Let it rest for 30 minutes to hydrate.
Step 2: Stretch and Fold to Build Strength
With damp hands, stretch a section of dough up and fold it over the rest; do this all around the bowl by turning it a quarter each time. This process tames the dough and creates that beautiful structure. I find that doing four rounds of stretch and folds, each 30-60 minutes apart, helps develop great gluten without needing kneading—it’s like magic! After each round, let the dough rest, and you’ll notice it becoming smoother and more resilient.
Step 3: Bulk Fermentation – Watch Your Dough Rise
This part is where you really learn to read your dough instead of relying solely on time. Ideally, your dough will bulk ferment for 6-9 hours at around 68-70°F, but check for these signs to know it’s ready: dough has grown at least 50%, looks airy with bubbles, jiggles gently when you shake the bowl, and passes the windowpane test without tearing. Slower fermentations in cooler homes are totally okay—patience here pays off literally in flavor and texture.
Step 4: Pre-shape & Rest
Carefully release the dough onto your counter using slightly wet fingers to avoid popping too many bubbles. Let gravity guide the dough off the bowl, then perform another single round of stretch and folds around the dough’s perimeter. Flip it seam side down, cover with a bowl, and give it a 30-minute rest. Meanwhile, prepare your proofing basket—a well-floured banneton or a bowl lined with a tea towel works perfectly here.
Step 5: Final Shape with Blueberries and Lemon Zest
Flip the dough seam side up and gently stretch into a large rectangle—this is called lamination. Be gentle so you don’t tear the dough or burst those lovely blueberries. Spread half the blueberries and half the lemon zest evenly on it. Fold the left side towards the middle, sprinkle more blueberries and zest, then fold the right side over, like folding a letter. Roll the dough tightly toward you. Now, cup your hands and gently tighten the dough ball by quarter turns, stopping before it tears. Some blueberry juice may peek through, which only adds charm. Place this smooth-side-down in your floured proofing basket and cover it ready for its final rest.
Step 6: Cold Proof in the Fridge
Pop your basket into the fridge anywhere from 8 to 72 hours! This slow chill deepens the sourdough’s flavor and gives you freedom in your schedule, which—I’m telling you—is a game changer. Just don’t leave it too long or the dough might over-ferment and lose its rise.
Step 7: Score & Bake for That Perfect Crust
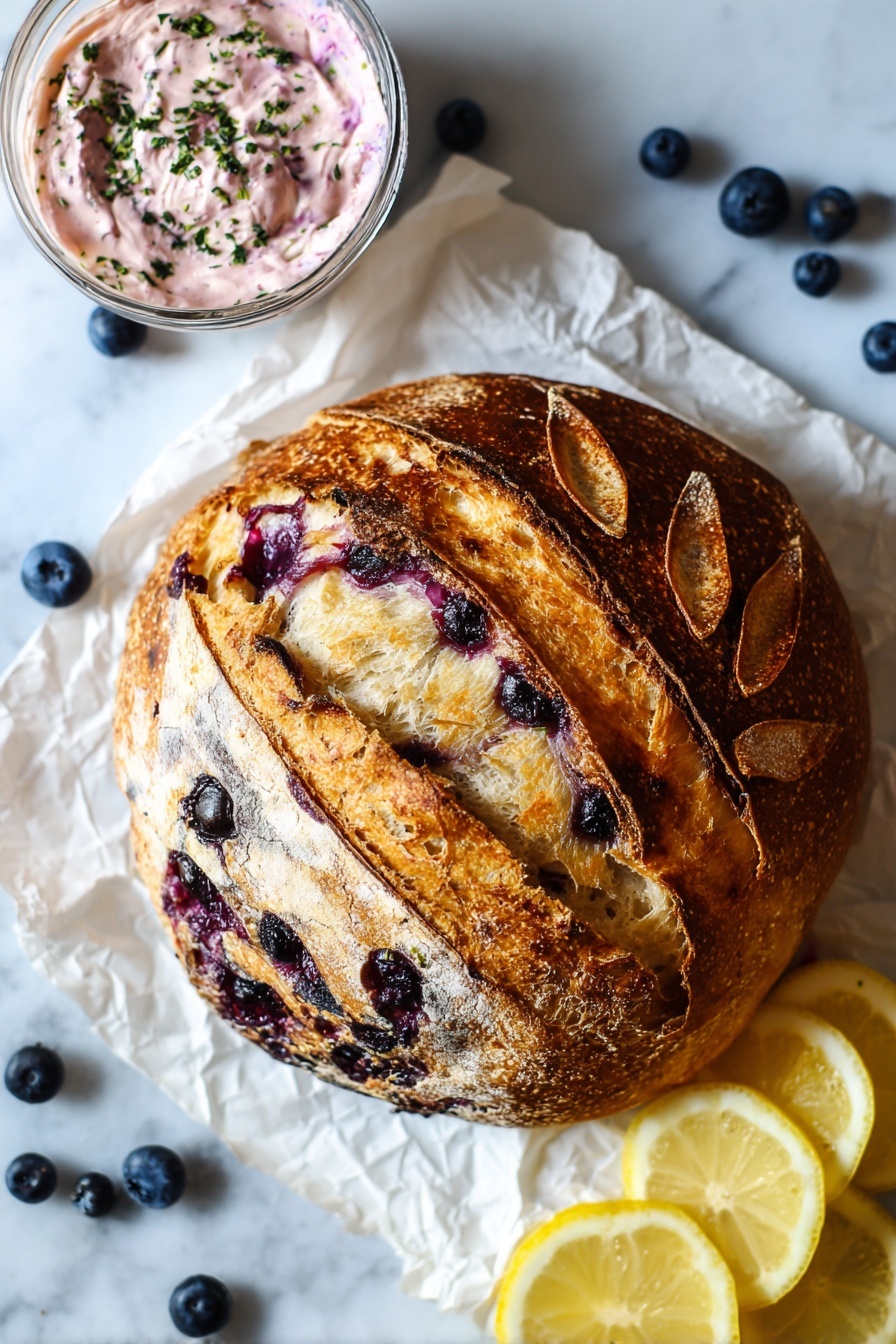
Thirty minutes before baking, place the cold dough in the freezer to help with scoring—a little trick I learned that makes designs pop. Preheat your Dutch oven to 450°F for at least half an hour. On a piece of parchment, gently invert your dough with floured side up. Using a sharp blade or lame, score a crescent moon or your favorite pattern to help the bread expand while baking. Use the parchment paper’s corners to lift the dough into the Dutch oven; bake covered for 27 minutes, then lid off for 10-15 more to get that golden-brown crust. The smell as it bakes? Absolutely irresistible.
Step 8: Cool and Whip Your Blueberry Honey Butter
Once out of the oven, carefully remove your loaf with the parchment and cool it on a wire rack for at least one hour. I know the wait is tough! Cutting too soon makes the crumb gummy, so trust me—it’s worth it to hear your bread “sing” as it cools.
While the bread cools, whip 8 tablespoons of room temperature butter, ½ cup mashed fresh blueberries, 2 tablespoons honey, and a pinch of salt in a mixer until fluffy and spreadable. This butter is like crowning glory for the loaf—sweet, creamy, and fruit-forward.
Pro Tips for Making Blueberry Lemon Sourdough Bread Recipe
- Keep Starter Active: I’ve found feeding my starter consistently every 12 hours keeps it lively and ready for baking.
- Watch Dough, Not Clock: Learning to spot bubbles and jiggle helped me better judge fermentation times than relying on timers.
- Handle Berries with Care: Gently folding blueberries in during shaping prevents them from bursting and turning the dough wet.
- Don’t Skip Resting: Those rest periods after shaping gave me better dough elasticity and a more open crumb.
How to Serve Blueberry Lemon Sourdough Bread Recipe
Garnishes
I love sprinkling a little extra lemon zest or even a light dusting of powdered sugar on top of thick slices of this bread, especially when serving at brunch. It adds a pretty touch and a burst of aroma. For a savory option, a light smear of cream cheese with fresh herbs complements the fruity tang brilliantly.
Side Dishes
This bread pairs wonderfully with a simple side salad for lunch or alongside your favorite cheese board. When my family enjoys it for breakfast, I often serve it with scrambled eggs and fresh fruit—it’s the perfect balance of nutrient-packed and indulgent.
Creative Ways to Present
I once arranged slices on a wooden board with little bowls of whipped blueberry honey butter, honey drizzle, and soft goat cheese for a brunch gathering. It made the loaf feel extra special and gave everyone options to customize each bite—big hit!
Make Ahead and Storage
Storing Leftovers
After cooling completely, I wrap the loaf tightly in a clean kitchen towel, then place it in a bread box or paper bag. This keeps the crust crisp yet the crumb soft for a couple of days. Avoid plastic wrap right away, as it can soften the crust too much.
Freezing
I slice leftover bread and freeze it in an airtight freezer bag. Toasting slices straight from the freezer maintains that fresh-baked flavor and texture. It’s such a convenient way to enjoy homemade bread anytime without the pressure of finishing it quickly.
Reheating
To revive a slice, I pop it in a toaster or under a broiler for a minute or two. If you want to refresh a whole loaf, cover it loosely with foil and heat it in a 350°F oven for 10-15 minutes. It brings back a hint of that crispy crust and soft interior I love.
FAQs
-
Can I use frozen blueberries in this Blueberry Lemon Sourdough Bread Recipe?
Yes, you can! Just make sure to thaw and drain the frozen blueberries well to prevent extra moisture from making the dough soggy. Pat them dry with paper towels before incorporating.
-
How do I know when my sourdough starter is active enough?
An active starter should double in size 4-12 hours after feeding, look bubbly on the surface, and pass the “float test” where a small spoonful floats in water—this means it’s full of gas and ready to leaven your dough.
-
Why is cold proofing important in this recipe?
Cold proofing slows fermentation, allowing flavors to develop more deeply and giving you flexibility on when to bake. It helps create a more complex, tangy profile typical of great sourdough loaves.
-
How should I score the bread before baking?
Use a razor blade or sharp knife to create a design that allows the bread to expand. I find a crescent moon shape easy and effective, but you can get creative—just don’t skip scoring, or your loaf might crack unpredictably during baking.
Final Thoughts
This Blueberry Lemon Sourdough Bread Recipe holds a special place in my kitchen because it blends my love for traditional sourdough with fresh, seasonal flavors that brighten every bite. It’s perfect when you want to impress yourself or your loved ones with something a bit different yet so satisfying. Give it a try; I promise you’ll enjoy the process as much as the delicious results!
Print
Blueberry Lemon Sourdough Bread Recipe
- Prep Time: 30 minutes
- Cook Time: 45 minutes
- Total Time: 13 hours 15 minutes
- Yield: 1 loaf
- Category: Bread
- Method: Baking
- Cuisine: American
- Diet: Vegetarian
Description
This Lemon Blueberry Sourdough Bread recipe combines the tangy, complex flavors of naturally fermented sourdough with fresh blueberries and bright lemon zest, creating a moist and fragrant loaf. Paired with a luscious whipped blueberry honey butter, this artisan bread is perfect for breakfast, brunch, or as a unique snack. The recipe guides you through the detailed process of making sourdough bread from feeding the starter to shaping, proofing, scoring, and baking in a Dutch oven to achieve a beautiful crust and tender crumb.
Ingredients
Lemon Blueberry Sourdough Bread
- 50g active sourdough starter
- 350g water (filtered)
- 500g bread flour
- 11g salt
- 150g fresh blueberries
- Zest of 1 lemon
Whipped Blueberry Butter
- 8 tablespoons (113g) butter, room temperature
- 1/2 cup (75g) fresh blueberries, mashed
- 2 tablespoons (45g) honey
- A pinch of salt
Instructions
- Feed Your Sourdough Starter: Begin by ensuring your sourdough starter is active and bubbly. This can take between 4 to 12 hours depending on ambient temperature. Adjust timing accordingly to have a fully active starter before beginning the dough.
- Make the Dough: In a large mixing bowl, combine 50g active sourdough starter with 350g filtered water and mix until milky. Add 500g bread flour and 11g salt, mixing until incorporated. The dough will look shaggy. Let rest for 30 minutes.
- Stretch and Folds: Using a bowl scraper, lift the dough and with wet hands, stretch and fold it over itself, rotating the bowl a quarter turn between folds. Complete a full circle. Rest for 30 minutes and repeat this stretch and fold process three more times with 30-minute rests in between each.
- Bulk Fermentation: Allow the dough to ferment at around 68-70°F for 6-9 hours until it has increased in size by at least 50%, looks light, jiggles when shaken, has visible bubbles, pulls easily from the bowl, and passes the windowpane test without tearing.
- Pre-Shape: Wet your fingers and gently remove the dough from the bowl without deflating the bubbles. Let gravity help release it onto a clean counter. Do another full circle of stretch and folds, then turn the dough seam side down, cover with the bowl, and rest for 30 minutes.
- Prepare Proofing Basket: Dust a banneton or bowl lined with a tea towel with flour to prevent sticking. This helps the dough keep its round shape during proofing.
- Collect Blueberries and Lemon Zest: Set aside 150g fresh blueberries and the zest of one lemon for layering in the dough.
- Final Shape: Flip the rested dough seam side up. Gently stretch it into a large rectangle using lamination technique, careful not to tear. Spread half the blueberries and lemon zest over the dough.
- Fold Dough: Fold the left side toward the middle and spread half of the remaining blueberries and zest over it. Then fold the right side toward the middle like a tri-fold, spreading the remaining blueberries and zest on top. Roll the dough starting from the edge nearest you.
- Form Dough Ball: Shape the rolled dough into a tight round by cupping your hands and turning it clockwise, gently pulling it toward you. Stop if tearing occurs; some blueberries may break through, which is fine.
- Proof Dough: Place the dough seam side down into the prepared proofing basket. Cover with plastic or a shower cap and refrigerate for cold proofing for 8 to 72 hours to deepen flavor and improve flexibility on baking time.
- Prepare for Baking: Thirty minutes before baking, move the dough to the freezer to help scoring. Preheat your oven to 450°F with a Dutch oven inside for at least 30 minutes.
- Score the Dough: Gently invert the proofed dough onto parchment paper. Using a lame or sharp knife, score a crescent moon or any preferred design to allow for oven spring.
- Bake the Bread: Carefully place the dough with parchment paper into the preheated Dutch oven. Cover and bake for 27 minutes. Then remove the lid and bake uncovered for an additional 10-15 minutes until golden brown.
- Cool the Bread: Remove the bread from the Dutch oven using parchment paper and transfer to a wire rack. Allow the bread to cool completely, at least 1 hour, before slicing to avoid a gummy texture.
- Make Whipped Blueberry Honey Butter: Using a stand mixer fitted with a whisk attachment, beat 113g room temperature butter, 75g mashed fresh blueberries, 45g honey, and a pinch of salt on high speed for 2-3 minutes until light and fluffy.
- Serve: Slice the cooled sourdough bread and spread with the whipped blueberry honey butter. Enjoy your artisanal lemon blueberry sourdough!
Notes
- Adjust sourdough starter feeding schedule to match your ambient temperature to ensure peak activity.
- The stretch and fold technique is flexible; spacing between folds can be 30-60 minutes.
- Bulk fermentation times vary with temperature—observe dough rather than relying on the clock.
- Use regular all-purpose flour dusting for proofing basket if rice flour is unavailable.
- Cold proofing between 8 to 72 hours deepens flavor but avoid over-proofing to prevent collapse.
- Freezing dough before scoring helps achieve cleaner cuts and better oven spring.
- Allow bread to cool fully to develop optimal crumb texture before slicing.
- Some blueberries may burst during shaping; this enhances the flavor inside the bread.
- Use a Dutch oven with a heavy lid for best crust development during baking.
Nutrition
- Serving Size: 1 slice (approximately 80g)
- Calories: 180
- Sugar: 4g
- Sodium: 280mg
- Fat: 2.5g
- Saturated Fat: 1.5g
- Unsaturated Fat: 1g
- Trans Fat: 0g
- Carbohydrates: 36g
- Fiber: 2.5g
- Protein: 6g
- Cholesterol: 5mg


