
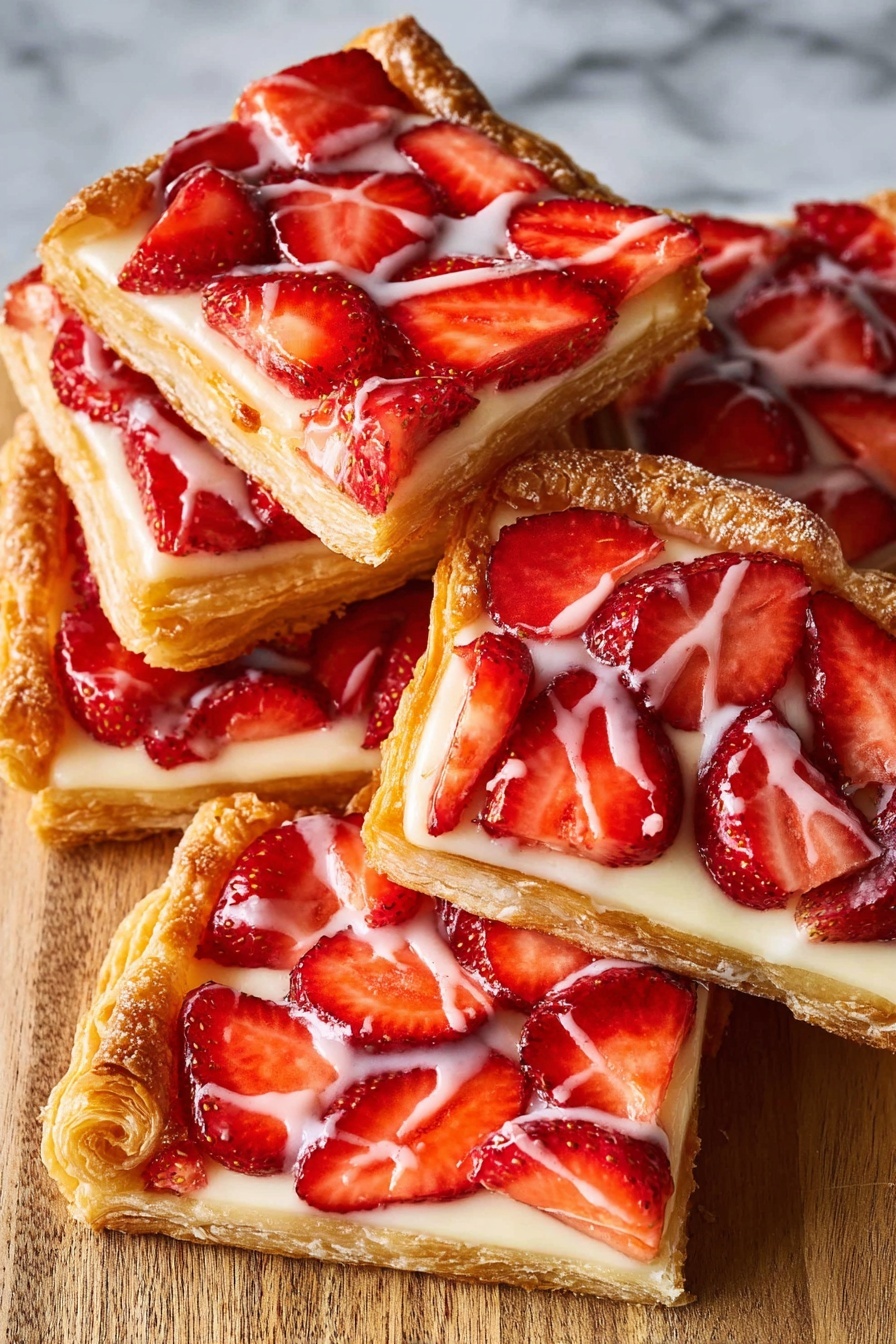
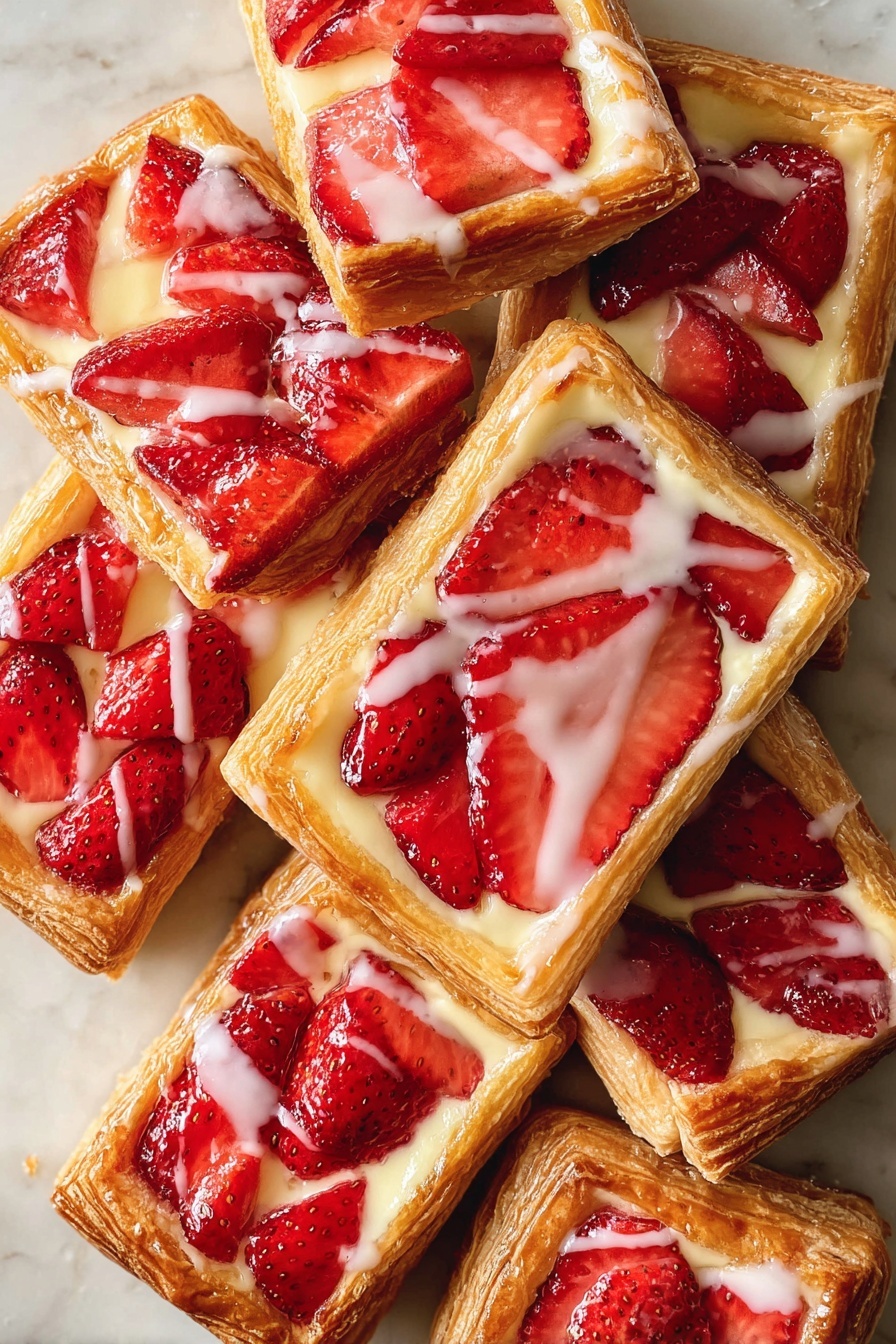
If you’re on the hunt for the Best Strawberry Danish Pastry Recipe, you’re in the right spot. This recipe hits all the right notes—flaky puff pastry, sweet and tangy strawberries, and a creamy filling that will have you coming back for seconds. I absolutely love how this turns out every time I bake it, and I can’t wait to share all the tips I’ve picked up along the way so you can nail it on your very first try too.
Why You’ll Love This Recipe
- Flaky, golden puff pastry: The dough puffs up beautifully for that perfect flaky texture you want in a danish.
- Fresh strawberry burst: The mix of fresh strawberries with just a touch of cornstarch gives a juicy, jammy filling that’s not too watery.
- Cream cheese richness: That smooth cream cheese filling balances the fruit’s sweetness and adds a velvety touch.
- Simple yet impressive: It looks fancy but is surprisingly easy, perfect for your brunch table or a sweet treat anytime.

Ingredients You’ll Need
The magic of this strawberry danish comes down to fresh, quality ingredients that blend perfectly to give you the ideal balance of sweet, creamy, and flaky. I find it’s best to work with fresh strawberries (not frozen) so you get that fresh fruit flavor without excess moisture.
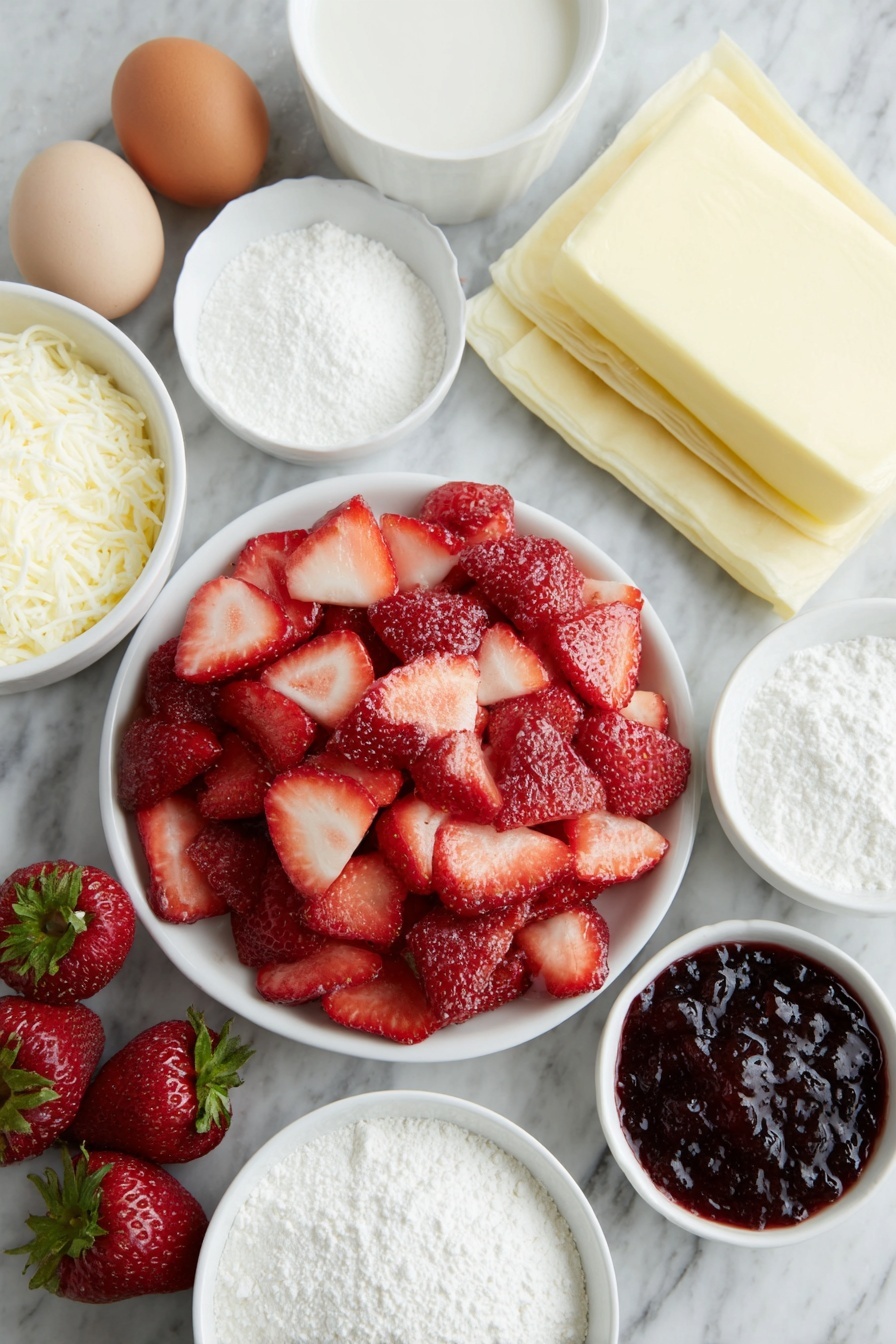
- Strawberries: Fresh and ripe give the best flavor and color; slice them evenly for consistent cooking.
- Cornstarch: Helps thicken the strawberry juices to keep the pastry from getting soggy.
- Sugar: Balances the tartness of the berries and adds a light caramelized touch on the crust.
- Cream Cheese: Softened at room temperature so it mixes smoothly without lumps.
- Powdered Sugar: For smoothing into the cream cheese and optional glaze.
- Vanilla Extract: Enhances flavor in both the cream cheese and glaze for a subtle sweet aroma.
- Puff Pastry Sheets: The base for your danish, thawed at room temperature for easy handling.
- Egg (for egg wash): Gives a beautiful glossy, golden finish and helps toppings stick.
- Strawberry Jam (optional): Warmed and brushed on top for an extra shine and fruity punch.
- Milk: Used in the vanilla glaze for just the perfect drizzle consistency.
Variations
While I adore this classic strawberry and cream cheese combo, sometimes I like to switch it up to keep things fresh and suit whoever I’m serving. Feel free to make this your own—there’s plenty of room for creativity here!
- Use different berries: Blueberries, raspberries, or even mixed berries make lovely alternatives if strawberries aren’t in season.
- Dairy-free version: Swap the cream cheese for a vegan cream cheese or coconut yogurt for a dairy-free twist.
- Braided danish: Instead of cutting into rectangles, try braiding the puff pastry around the filling for a stunning presentation.
- Almond topping: Sprinkle sliced almonds on top before baking for added crunch and flavor.
How to Make Best Strawberry Danish Pastry Recipe
Step 1: Prep Your Pastry and Oven
First things first, let your puff pastry thaw on the counter for 30-45 minutes until it’s pliable but still cool—this makes cutting and folding way easier and helps the layers puff up better while baking. Meanwhile, preheat your oven to 400°F (204°C) and line two large baking sheets with parchment paper. This prep sets you up for success and saves frustration later on.
Step 2: Macerate the Strawberries
In a bowl, toss your sliced strawberries with sugar and cornstarch until they’re evenly coated. Letting them sit for about 15 minutes at room temperature helps the berries release some juices that mix with the cornstarch to get that perfect jammy consistency inside the pastry—not too runny, but nicely thickened.
Step 3: Whip Up That Creamy Filling
Using a mixer or a sturdy whisk, blend the room temperature cream cheese with powdered sugar and vanilla until smooth and silky. Give it a taste to make sure it’s got just the right sweetness—sometimes I add a pinch more powdered sugar depending on how tangy my cream cheese is.
Step 4: Shape and Fill the Danish
Unfold one puff pastry sheet and cut along the fold lines to get six smaller rectangles. Use a paring knife to gently score a ¼ inch border around each rectangle—don’t cut all the way through! This bordered edge puffs up around the filling for that classic danish look.
Spoon about a tablespoon of the cream cheese mixture into the center of each rectangle, carefully staying inside the scored edges. Then, layer your macerated strawberries on top in a decorative pattern. Brush the pastry edges with the beaten egg wash, and if you like a sugary sparkle, sprinkle a little sugar on top before baking.
Step 5: Chill Before Baking
If your puff pastry feels a bit warm or sticky, pop your baking sheets with the assembled danishes into the fridge for 15-20 minutes. This chill step really makes a difference—it helps the pastry puff up beautifully in the oven, giving those flaky layers everyone loves.
Step 6: Bake to Perfection
Bake the danishes at 400°F for 20-25 minutes until they turn a gorgeous light golden brown. You want them crispy and flaky but not burnt, so keep an eye toward the end. Let them cool on the baking sheets for about 5 minutes before transferring to a cooling rack to come to room temperature.
Step 7: Glaze and Enjoy
The finishing touch is totally up to you! Brush warm strawberry jam on top for a shiny, fruity finish, or whisk together a simple vanilla glaze with powdered sugar, milk, and vanilla extract to drizzle over your cooled danishes. Either way, it adds that perfect sweet note that makes this strawberry danish truly irresistible.
Pro Tips for Making Best Strawberry Danish Pastry Recipe
- Keep your puff pastry cold: Warm pastry can get sticky and won’t puff up properly, so work quickly and chill if needed.
- Score the edges gently: Only a shallow cut helps the border puff up while preventing the filling from leaking out.
- Macerate strawberries ahead: This step thickens their juices and prevents soggy bottoms — a game changer I learned the hard way.
- Use room temp cream cheese: It blends smoothly with powdered sugar for a lump-free creamy center, trust me on this one.
How to Serve Best Strawberry Danish Pastry Recipe
Garnishes
I like to keep it simple with a dusting of powdered sugar or a drizzle of vanilla glaze for that little wow factor. Sometimes I add a few tiny mint leaves or a fresh strawberry slice on top just before serving—it adds freshness and looks beautiful on the plate.
Side Dishes
These danishes pair wonderfully with a cup of freshly brewed coffee or a light sparkling wine if you want to brunch in style. For a heartier option, serve alongside scrambled eggs or a simple green salad to balance sweetness with savory.
Creative Ways to Present
For special occasions, I like to arrange the danishes on a tiered cake stand or a rustic wooden board with fresh berry clusters and edible flowers. You can also pipe the cream cheese filling in decorative swirls before adding strawberries for a fanciful touch.
Make Ahead and Storage
Storing Leftovers
Leftover danishes keep beautifully in an airtight container in the fridge for 2 to 3 days. I usually let them come to room temperature before eating, as that brings back some of their flakiness and flavor.
Freezing
If you want to freeze these danishes, assemble them but don’t bake. Freeze them flat on a tray, then transfer to a freezer bag. When ready to eat, bake straight from frozen, adding a few extra minutes to the baking time. This way, you get fresh-baked goodness anytime.
Reheating
Reheat leftovers in a toaster oven or regular oven at 325°F for about 5-7 minutes to refresh that flaky crust and warm the filling. Avoid using the microwave—it tends to make the puff pastry soggy.
FAQs
-
Can I use frozen strawberries for this recipe?
While fresh strawberries are best for maintaining the perfect consistency and flavor, you can use frozen strawberries if you thaw them completely and drain excess liquid well. Keep in mind frozen berries may release more juice, so you might need to increase the cornstarch slightly to avoid sogginess.
-
Do I have to make the cream cheese filling myself?
The cream cheese filling is super simple to whip up and really elevates this strawberry danish, but if you’re short on time, you could substitute with store-bought sweetened cream cheese spread. Just be mindful it might not spread as smoothly or sweetly as the homemade version.
-
Can I prepare these danishes ahead of time?
Absolutely! Assemble the danishes, keep them chilled in the fridge for up to a day, then bake fresh before serving. This gives you the freshest puff pastry puff and best texture on the day of your gathering.
-
What if my puff pastry doesn’t puff up?
Make sure your puff pastry is cold when you place it in the oven and avoid cutting all the way through the border lines. Also, chilling the assembled danishes before baking really helps create that satisfying puff.
Final Thoughts
This Best Strawberry Danish Pastry Recipe is one of my all-time favorite sweets to bake for family and friends because it strikes the perfect balance between impressive and easy. Whether you’re aiming to wow guests or just treat yourself on a weekend morning, these danishes bring that bakery-level taste right to your kitchen. Give it a try—you’ll love pulling these golden beauties fresh from the oven as much as I do!
Print
Best Strawberry Danish Pastry Recipe
- Prep Time: 15 minutes
- Cook Time: 20 minutes
- Total Time: 40 minutes
- Yield: 12 danishes
- Category: Breakfast
- Method: Baking
- Cuisine: American
- Diet: Vegetarian
Description
This delicious Strawberry Danish recipe features flaky puff pastry filled with creamy vanilla-flavored cream cheese and topped with fresh strawberries. Enhanced by a sweet glaze or strawberry jam, these golden-baked pastries make a perfect breakfast treat or dessert that’s visually stunning and irresistibly tasty.
Ingredients
Strawberries
- 4 cups sliced strawberries
- 1 tablespoon cornstarch
- 1 tablespoon sugar
Cream Cheese Filling
- 8 oz. (226 g) cream cheese, room temperature
- ½ cup (60 g) powdered sugar
- 1 teaspoon vanilla extract
Danish Pastry
- 2 puff pastry sheets, thawed
- 1 large egg, lightly beaten with 1 teaspoon water
- 2 – 3 tablespoons sugar for topping (optional)
Toppings
- ¼ cup (60 ml) strawberry jam (optional for topping)
- 1 cup (120 g) powdered sugar
- ½ teaspoon vanilla extract
- 2 – 3 tablespoons (30 – 45 ml) milk
Instructions
- Thaw Puff Pastry: Remove puff pastry sheets from the freezer and allow them to thaw at room temperature for about 30 to 45 minutes until pliable but still cold.
- Preheat Oven & Prepare Baking Sheets: Preheat your oven to 400°F (204°C). Line two large baking sheets with parchment paper to prevent sticking and facilitate even baking.
- Prepare Strawberry Mixture: In a mixing bowl, combine the sliced strawberries, sugar, and cornstarch. Stir gently to coat the berries evenly. Let the mixture sit at room temperature for 15 minutes to macerate, which enhances their flavor and texture.
- Make Cream Cheese Filling: In a separate bowl, beat the room temperature cream cheese until smooth. Add powdered sugar and vanilla extract, mixing thoroughly until creamy and well combined. Adjust sweetness to taste.
- Cut Puff Pastry: Unfold one sheet of puff pastry into a square. Using the pre-scored fold lines, cut it into smaller rectangles. Then cut the long rectangles in half to yield six smaller rectangles total per sheet.
- Score Puff Pastry Borders: Using a small paring knife, gently score a ¼-inch border along the edges of each puff pastry rectangle without cutting all the way through. This helps create a raised crust during baking.
- Fill Puff Pastry: Spoon approximately 1 tablespoon of the cream cheese filling into the center of each rectangle, staying within the scored border to avoid leakage.
- Add Strawberries: Artistically arrange the macerated fresh strawberries on top of the cream cheese layer for a bright, fresh topping.
- Brush Edges & Sugar Topping: Lightly brush the edges of the puff pastry with the egg wash (egg beaten with water) to help them develop a golden finish. Optionally, sprinkle 2-3 tablespoons of sugar over the pastry for added crunch and sweetness.
- Chill Before Baking: If the puff pastry becomes too warm or sticky, refrigerate the prepared Danish on the baking sheet for 15 to 20 minutes. Chilling ensures the dough puffs beautifully during baking.
- Bake: Place the baking sheets in the preheated oven and bake the Danish for 20-25 minutes until the pastry is puffed and a light golden brown color.
- Cool: Allow the Danish to cool on the baking sheet for 5 minutes before transferring them to a wire rack to cool completely to room temperature.
- Prepare Glaze and Finish: For a vanilla glaze, whisk together 1 cup powdered sugar, ½ teaspoon vanilla extract, and 2-3 tablespoons milk until smooth. Drizzle over cooled Danish. Alternatively, warm strawberry jam and brush on top for a glossy finish with extra flavor.
- Serve: Enjoy your strawberry Danish fresh at room temperature or lightly warmed for the best flavor experience.
Notes
- Store leftover Danish in an airtight container in the refrigerator for up to 2-3 days.
- Reheat gently in a toaster oven or conventional oven for best texture and flavor before serving.
- For variations, explore making strawberry Danish without cream cheese or try braiding the puff pastry for a decorative twist.
Nutrition
- Serving Size: 1 Danish (approximate)
- Calories: 280
- Sugar: 18g
- Sodium: 150mg
- Fat: 18g
- Saturated Fat: 8g
- Unsaturated Fat: 8g
- Trans Fat: 0g
- Carbohydrates: 26g
- Fiber: 1.5g
- Protein: 4g
- Cholesterol: 45mg


