
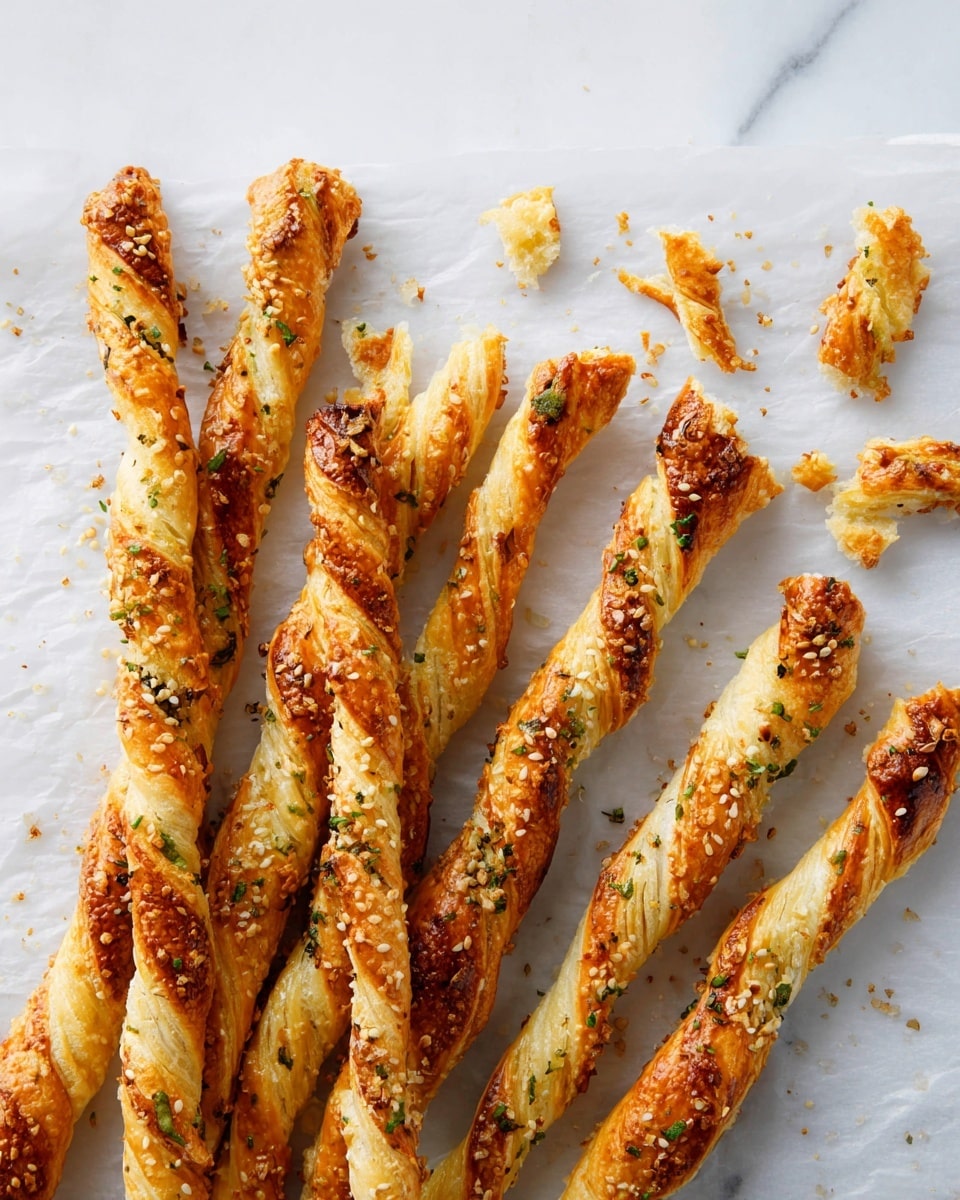
I absolutely love this Best-Ever Cheese Straws Recipe because it’s the perfect balance of crispy, flaky puff pastry layered with sharp cheddar and a hint of green onion. When I first tried this, I was amazed at how simple ingredients could come together to create such an addictive snack. Whether you’re serving these at a party, as a quick appetizer, or just craving a savory treat, they deliver every single time.
You’ll find that the sesame seeds add a subtle nuttiness, and chilling the dough before baking is a game-changer for achieving that perfect puff and crisp texture. Plus, making these cheese straws feels fancy but doesn’t take much effort—perfect when you want to impress without stress.
Why You’ll Love This Recipe
- Quick and Easy: Uses store-bought puff pastry so you can skip the hard work but get amazing homemade flavor.
- Perfect Party Snack: Everyone loves the cheesy crispness—great for gatherings or spontaneous nibbling sessions.
- Customizable Flavors: The green onions and sesame seeds add a fresh twist, but you can swap or add spices to suit your taste.
- Great Make-Ahead: Chilling the dough and prepping ahead makes baking day a breeze.

Ingredients You’ll Need
This Best-Ever Cheese Straws Recipe calls for simple ingredients that pack a punch when combined. Each element complements the flaky puff pastry and melty cheese perfectly, so it’s worth sourcing quality cheddar and fresh green onions.
- Sharp cheddar cheese: Choose a sharp, finely grated variety—the flavor really shines through.
- All-purpose flour: Helps bind the cheese mixture and gives structure to the straws.
- Green onions: Finely chopped, they add a subtle fresh bite without overpowering.
- Sesame seeds: Toasty and nutty, they bring texture and depth to each bite.
- Puff pastry dough: Store-bought is easiest; look for a quality sheet that will puff nicely.
- Large egg: Whisked until frothy, used to brush the dough and seal in the toppings.
Variations
I love that you can easily tweak this Best-Ever Cheese Straws Recipe to match what you have on hand or what flavors you’re craving. Don’t hesitate to experiment—you might find a new favorite!
- Add a kick: I sometimes sprinkle in a pinch of smoked paprika or cayenne pepper for a smoky or spicy twist that gets my family reaching for more.
- Herb twist: Mixing in some finely chopped fresh rosemary or thyme with the green onions adds a lovely earthiness without stealing the show.
- Cheese swap: Try Parmesan or a blend of cheddar and Gruyère for a nuttier, more complex flavor profile that also bakes beautifully.
- Gluten-Free-ish: Although puff pastry is typically made with wheat, I’ve tested gluten-free puff alternatives—just be sure to handle them gently as they can be more delicate.
How to Make Best-Ever Cheese Straws Recipe
Step 1: Mix the Flavorful Cheese Blend
Start by preheating your oven to 425°F (220°C). In a small bowl, combine the finely grated sharp cheddar, all-purpose flour, chopped green onions, and sesame seeds. I like to mix these ingredients thoroughly so that every bite has an even burst of flavor. This step is easy but crucial—it’s the taste foundation for your cheese straws.
Step 2: Roll and Layer the Puff Pastry
Take one sheet of puff pastry dough and roll it out gently on a piece of parchment paper to about 1/8″-thick and 10″ wide. Make sure not to roll too thin, or the straws won’t puff properly. Brush the surface with the whisked egg to help the cheese mixture stick, then sprinkle the cheese blend evenly over the pastry. Trust me, don’t skimp here—this layering is where the magic begins.
Step 3: Cut, Chill, and Twist Your Straws
Using a sharp knife or pizza cutter, slice the puff pastry widthwise into about 3/4″ thick strips. Carefully slide the parchment paper holding the strips onto a baking sheet and pop it into the fridge for at least 20 minutes. Chilling firms up the dough, which helps the straws hold their shape when twisted and baked.
Then, line another sheet tray with parchment, transfer half the strips, and gently twist each one into spirals. Repeat with the rest, and refrigerate both trays for another 30 minutes. This waiting time might feel long, but it’s what guarantees that satisfying puff and crunch.
Step 4: Bake to Golden Perfection
Bake your cheese straws in the preheated oven until they’re golden brown and beautifully puffed—this usually takes 10 to 12 minutes. Midway through baking, rotate your trays to ensure even cooking and a uniformly crispy result. Keep a close eye on them because ovens vary, and you want that perfect golden color without burning. When they come out, they’ll smell irresistible!
Pro Tips for Making Best-Ever Cheese Straws Recipe
- Chill Twice: Refrigerate the dough strips both before and after twisting; it prevents shrinking and ensures even puffing.
- Use Cold Pastry: Work with chilled puff pastry straight from the fridge—it helps maintain structure and prevents sticking.
- Even Thickness: Roll the puff pastry as evenly as possible so the straws bake uniformly and don’t burn on thin spots.
- Watch Oven Timing: Ovens can be tricky, so start checking your straws a minute or two early to avoid over-browning.
How to Serve Best-Ever Cheese Straws Recipe
Garnishes
I usually keep garnishes simple—sprinkling a little flaky sea salt or an extra pinch of sesame seeds right after baking adds a nice touch of texture. Sometimes, I serve these with a fresh herb dip (think chive or dill sour cream) to balance out the richness. It really elevates the experience!
Side Dishes
These cheese straws pair wonderfully with tomato soup or a crisp green salad for a light lunch or snack. At parties, I love arranging them alongside a charcuterie board with olives, cured meats, and pickles—that salty and cheesy combo never fails to impress guests.
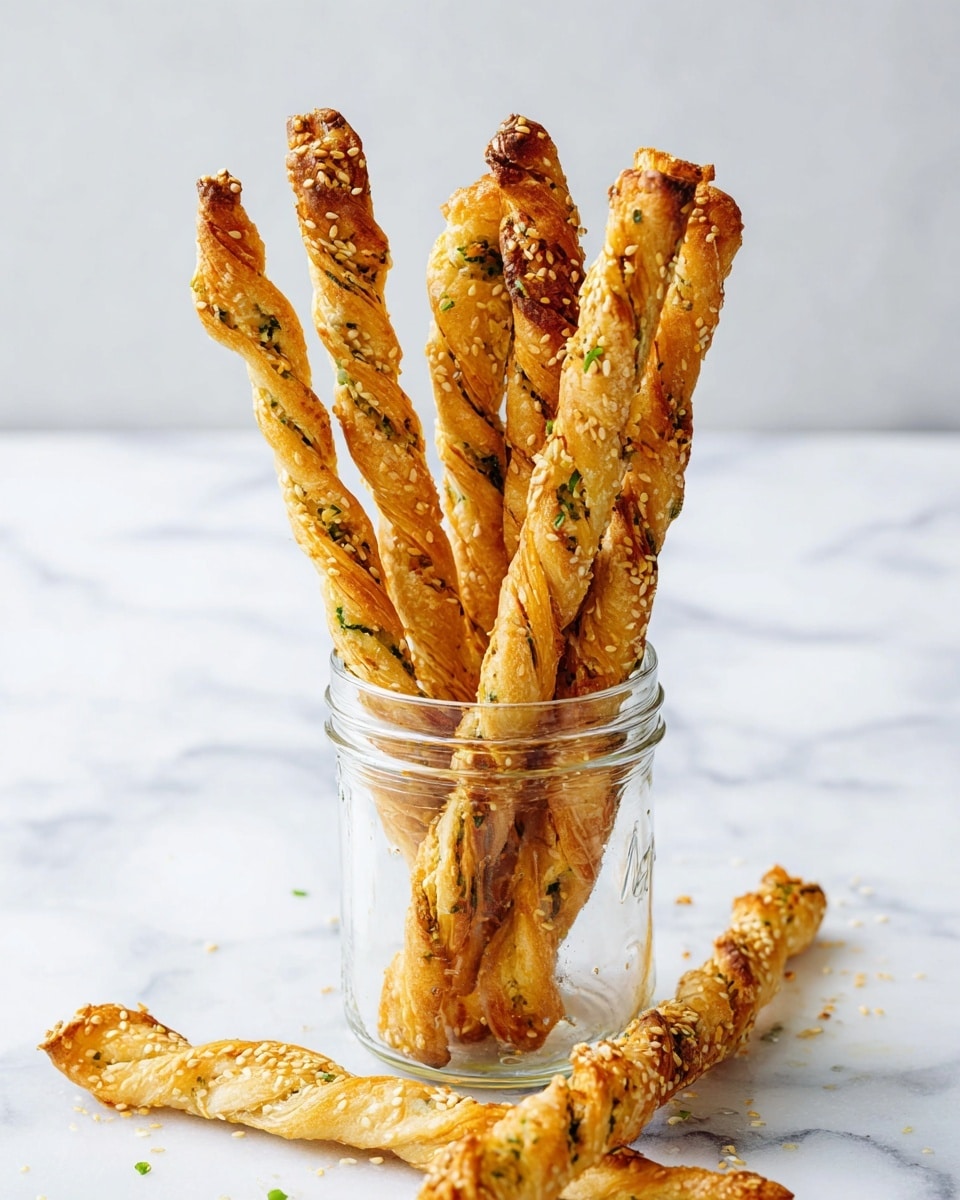
Creative Ways to Present
For special occasions, I like to stand the cheese straws upright in a mason jar or a rustic tin, tied with twine for a charming visual. It’s an easy yet elegant way to showcase these crunchy delights and invites guests to grab and snack.
Make Ahead and Storage
Storing Leftovers
Once cooled completely, I store leftover cheese straws in an airtight container at room temperature. They generally stay crisp for up to three days, though you’ll want to enjoy them sooner for the best crunch. If they soften a bit, a quick zap in the oven revives them beautifully.
Freezing
I’ve frozen the twisted, unbaked strips on parchment-lined trays before baking—just freeze flat, then transfer to a freezer-safe bag. When you’re ready, bake them straight from frozen, adding a couple extra minutes to the baking time. It’s a lifesaver for busy days or unexpected guests!
Reheating
To reheat and restore crispness, pop the cheese straws in a preheated 350°F oven for 3-5 minutes. Avoid microwaves if you can, as they tend to make pastries soggy. A quick rewarm in the oven keeps that delightful crunch alive.
FAQs
-
Can I use other types of cheese in the cheese straws?
Absolutely! While sharp cheddar is classic, cheeses like Parmesan, Gruyère, or even a spicy pepper jack work well. Just be sure to grate the cheese finely so it melts evenly and bakes nicely.
-
Can I make the puff pastry from scratch?
You can, but homemade puff pastry is time-consuming and tricky. This recipe is designed for convenience with store-bought puff pastry, which delivers excellent results quickly. If you’re up for a challenge, homemade pastry will taste fantastic but expect a longer prep time.
-
How long do cheese straws keep their crispness?
Stored properly in an airtight container at room temperature, cheese straws stay crisp for about 2-3 days. If they soften, reheating in the oven will help bring back that delightful crunch.
-
Can I prepare the cheese straws ahead of time?
Definitely! You can slice, twist, and chill the unbaked cheese straws a day ahead, then bake fresh when guests arrive. This makes entertaining so much easier and stress-free.
Final Thoughts
This Best-Ever Cheese Straws Recipe has become one of my go-to treats because it balances simplicity with irresistible flavor and texture. I love sharing these with friends because they’re a real crowd-pleaser, easy to make, and just plain fun to eat. If you haven’t tried making cheese straws at home yet, this recipe is a fantastic place to start—you’ll want to keep it in your snack rotation for good!
Print
Best-Ever Cheese Straws Recipe
- Prep Time: 10 mins
- Cook Time: 12 mins
- Total Time: 1 hr 40 mins
- Yield: 28 cheese straws
- Category: Appetizer
- Method: Baking
- Cuisine: American
Description
These Best-Ever Cheese Straws are crispy, cheesy, and packed with flavor. Made from flaky puff pastry twisted with a sharp cheddar, green onion, and sesame seed mixture, they’re perfect as an appetizer or snack for any occasion. Easy to prepare and baked to golden perfection, these cheese straws offer a delightful blend of savory and crunchy textures.
Ingredients
Cheese Mixture
- 2 oz. finely grated sharp cheddar
- 1 tsp. all-purpose flour
- 2 Tbsp. finely chopped green onions
- 2 Tbsp. sesame seeds
Pastry
- 1 (17.3-oz.) package puff pastry dough, divided into 2 sheets
- 1 large egg, whisked until frothy
Instructions
- Preheat and Prepare Cheese Mixture: Preheat your oven to 425°F. In a small bowl, combine the finely grated sharp cheddar, all-purpose flour, finely chopped green onions, and sesame seeds. This mixture will add flavor and texture to the puff pastry.
- Roll Puff Pastry and Add Toppings: Roll out one sheet of puff pastry to a thickness of 1/8 inch on parchment paper, ensuring it is about 10 inches wide. Brush the surface evenly with the whisked egg, then sprinkle the cheese mixture evenly over the surface.
- Slice Pastry into Strips: Using a sharp knife or pizza cutter, slice the puff pastry widthwise into 3/4-inch thick strips. Slide the parchment paper with the strips onto a baking sheet and refrigerate for at least 20 minutes to firm up the dough.
- Twist Strips into Spirals and Chill: Line another baking sheet with parchment paper. Transfer half of the chilled pastry strips and twist each strip gently into spiral shapes. Repeat with the remaining strips on the second sheet. Place both trays back into the refrigerator for another 30 minutes to ensure the twists hold their shape during baking.
- Bake Cheese Straws to Golden Perfection: Bake the cheese straws in the preheated oven until deeply golden and puffed, about 10 to 12 minutes. Rotate and switch baking sheets halfway through baking for even browning. Remove from oven and let cool slightly before serving.
Notes
- Make sure the puff pastry is well chilled before rolling and slicing to prevent sticking and tearing.
- Feel free to substitute sharp cheddar with other firm cheeses like Gruyère or Parmesan for a different flavor profile.
- For a spicier version, sprinkle some cayenne pepper or smoked paprika into the cheese mixture.
- Serve these cheese straws warm for the best texture and flavor.
- Store leftovers in an airtight container at room temperature for up to 2 days; reheat briefly in the oven to restore crispiness.
Nutrition
- Serving Size: 1 cheese straw
- Calories: 70
- Sugar: 0.2 g
- Sodium: 100 mg
- Fat: 5 g
- Saturated Fat: 2.5 g
- Unsaturated Fat: 2 g
- Trans Fat: 0 g
- Carbohydrates: 5 g
- Fiber: 0.3 g
- Protein: 2 g
- Cholesterol: 20 mg
