
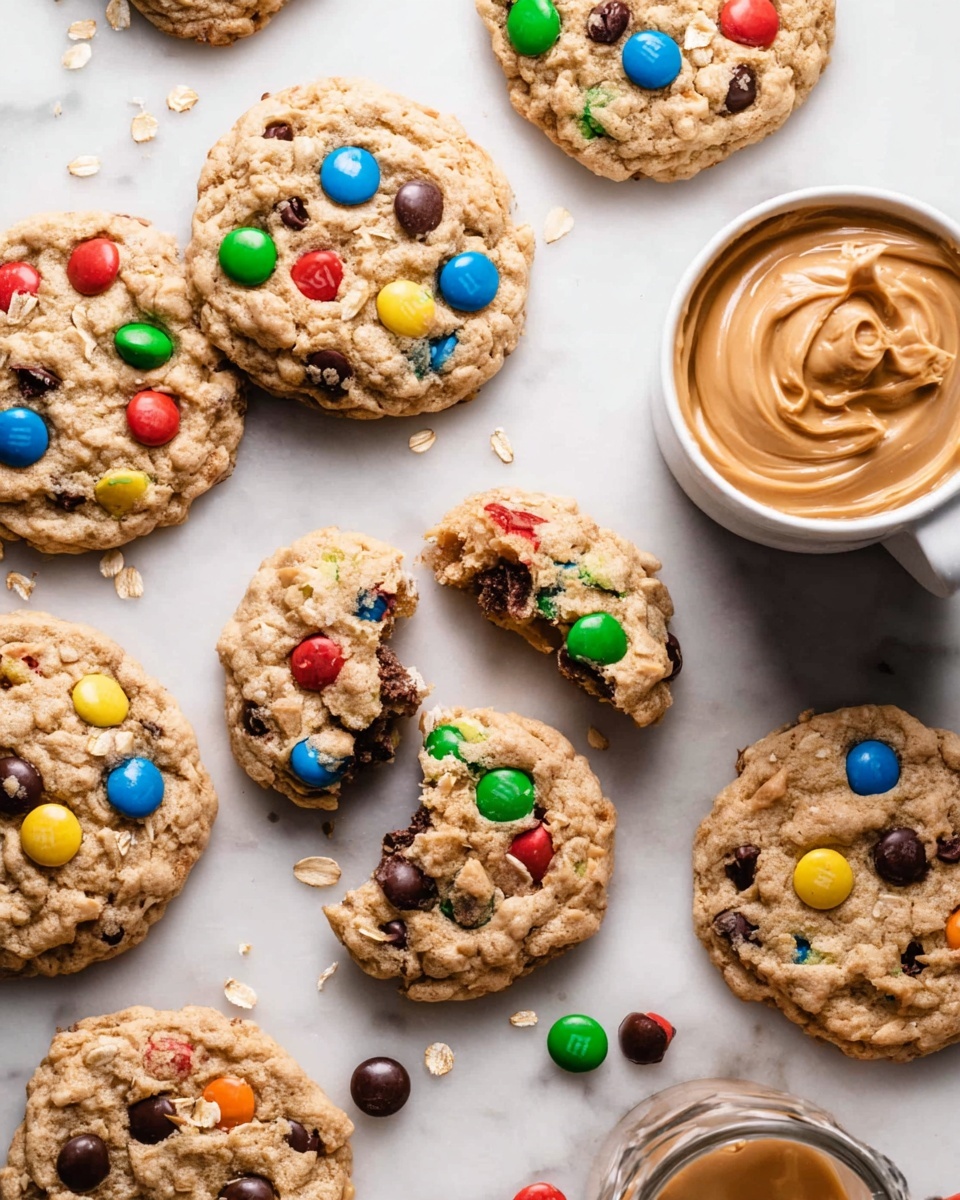
If you’re craving a cookie that feels like it just walked off the shelves of your favorite bakery, you’re going to love this Bakery-Style Monster Cookies Recipe. I absolutely adore how these cookies come out big, chewy, and packed with all the good stuff—peanut butter, oats, m&ms, and chocolate chips. There’s something genuinely satisfying about a cookie that’s both chunky and soft, and this recipe nails it every single time.
Whether you’re baking for a crowd or just want a batch to enjoy with your afternoon coffee, this Bakery-Style Monster Cookies Recipe is your new go-to. I’ve found these cookies work perfectly for everything from lunchbox treats to an after-dinner indulgence. Plus, they’re surprisingly easy to pull together, even if you’re new to baking cookies!
Why You’ll Love This Recipe
- Perfect Texture: Soft and chewy with crisp edges—the ideal cookie experience.
- Loaded with Goodies: Oats, peanut butter, chocolate chips, and m&ms give every bite a delightful burst of flavor.
- Easy to Customize: This Bakery-Style Monster Cookies Recipe is flexible, so you can swap mix-ins without losing that bakery vibe.
- No Chilling Required: Get these cookies from dough to oven without waiting around—perfect for last-minute cravings.

Ingredients You’ll Need
Each ingredient in this Bakery-Style Monster Cookies Recipe plays a vital role, blending classic cookie staples with hearty oats and vibrant m&ms for that bakery touch. I always recommend using fresh, room-temperature butter to make sure everything creams smoothly and gets that perfect dough texture.
- Salted butter: Softened at room temperature to cream nicely with the peanut butter and sugars.
- Creamy peanut butter: Adds rich flavor and chewiness, but feel free to use crunchy if you want some nutty texture.
- Granulated sugar: Balances sweetness and helps the cookies spread just right.
- Light brown sugar: Brings moisture and a subtle caramel undertone for depth of flavor.
- Large eggs: Bind everything together while keeping the cookies tender.
- Vanilla extract: Enhances all the flavors with a warm, aromatic note.
- All-purpose flour: The base for structure—make sure to spoon and level or weigh it for accuracy.
- Baking soda: Helps the cookies rise slightly and get that perfect texture.
- Salt: A pinch to balance sweetness and enhance all the flavors.
- Old fashioned rolled oats: Adds wholesome chew and a rustic feel you’ll love.
- M&Ms: For color, crunch, and that nostalgic candy pop in every bite.
- Semi-sweet chocolate chips: Melts down into pockets of gooey deliciousness; mixing in some milk chocolate chips can add a creamier touch.
Variations
I love that this Bakery-Style Monster Cookies Recipe is so approachable when it comes to swapping ingredients—making it truly your own is half the fun. Over time, I’ve played around with a few tweaks that made my family’s favorites even more exciting, and I encourage you to do the same.
- Nut-Free Version: Swap peanut butter for sunflower seed butter if you’re baking for friends with allergies—still deliciously rich and chewy!
- Seasonal Spices: Adding a pinch of cinnamon and nutmeg gives a cozy, fall-inspired twist that always disappears fast at my house.
- Double Chocolate: Use cocoa powder in the dough and swap m&ms for mini chocolate chunks for an extra chocolate fix.
- Healthier Swap: Replace half the flour with whole wheat flour for a nuttier flavor and a little extra fiber.
How to Make Bakery-Style Monster Cookies Recipe
Step 1: Cream the Butter and Sugars
This is where the magic starts. Use a very large mixing bowl and an electric mixer on high speed to cream the softened butter until it’s light and fluffy. Then, add the creamy peanut butter and mix until it’s completely combined with the butter. Next, add both the granulated and brown sugars, blending them in on high for at least a minute until the mixture looks shiny and smooth. This creaming process traps air and ensures your cookies rise delightfully well.
Step 2: Add Eggs and Vanilla
Crack in the eggs one at a time and mix on medium speed until just combined, then pour in the vanilla extract. Mixing too long here can make your dough tough, so stop as soon as everything looks uniform. I often remind myself that gentle mixing keeps the texture tender.
Step 3: Incorporate Dry Ingredients
In a separate bowl, whisk together the all-purpose flour, baking soda, and salt. Gradually add this dry mix to your wet ingredients and mix on low speed, just until the flour disappears into the dough. Be sure to scrape down the sides of your bowl to incorporate every bit of flour — it makes a big difference!
Step 4: Fold in Oats, M&Ms, and Chocolate Chips
Now the fun part: mix in the oats, colorful m&ms, and chocolate chips on low speed to evenly distribute them without overworking the dough. This step gives the cookies their signature “monster” appearance and those delicious bursts of texture in every bite.
Step 5: Scoop and Bake
Use a large cookie scoop (about 4 tablespoons or 115 grams of dough) to portion your cookies onto parchment-lined baking sheets. Leave plenty of room between each because even though these cookies don’t spread a ton, they still need space. Bake at 350°F (175°C) for 10-13 minutes. The edges will look set, but the centers might seem a little underdone—that’s exactly how you want them! After taking them out of the oven, I like to press the cookies gently with the back of a measuring cup to flatten them a bit and make those classic bakery-style rounds.
Pro Tips for Making Bakery-Style Monster Cookies Recipe
- Use Room Temperature Butter: It creams better with peanut butter and sugars, leading to a fluffier dough that bakes evenly.
- Don’t Overmix After Adding Flour: Mixing just until combined keeps your cookies tender, not tough.
- Flatten Cookies Right from the Oven: Pressing them gently while warm gives that signature bakery look and perfect thickness.
- Trust Your Intuition: The cookies might look gooey when done, but they’ll firm up as they cool—resisting the urge to bake longer ensures chewier results.
How to Serve Bakery-Style Monster Cookies Recipe

Garnishes
I usually skip extra garnishes because this cookie really shines on its own, but if you want to get creative, a light sprinkle of flaky sea salt on top right after baking enhances the sweetness and adds a subtle crunch I love.
Side Dishes
Pair these monster cookies with a cold glass of milk, a scoop of vanilla ice cream, or even a rich hot chocolate for a decadent treat. I’ve done all three, depending on the season, and each combination is heavenly in its own way!
Creative Ways to Present
For parties, I love arranging these cookies on a tiered dessert stand with colorful napkins to match the m&ms. Wrapping a few in clear cellophane with a cute ribbon makes for adorable gifts or lunchbox surprises that always get compliments.
Make Ahead and Storage
Storing Leftovers
I keep leftover monster cookies in an airtight container at room temperature, where they stay soft and fresh for up to 5 days—perfect for sneaking one whenever the cookie craving hits!
Freezing
If I want to save some dough for later, I scoop the cookie dough balls onto a baking tray, freeze them individually, and then transfer them to a freezer-safe container. You can bake them straight from frozen without thawing, which means you can have fresh cookies any time you want without starting from scratch.
Reheating
To warm up leftover cookies, I pop them in the microwave for about 10-15 seconds or heat them briefly in a 300°F oven for 5 minutes. This revives that fresh-baked feeling with melty chocolate and soft centers every time.
FAQs
-
Can I make these monster cookies without peanut butter?
Absolutely! You can substitute the peanut butter with an equal amount of additional butter or try sunflower seed butter for a different twist. Keep in mind, peanut butter adds moisture and richness, so your cookies might have a slightly different texture without it.
-
Why do these cookies look underbaked when I take them out of the oven?
This is totally normal for this Bakery-Style Monster Cookies Recipe. The cookies are meant to be soft and gooey when hot and will firm up as they cool. Baking a test cookie and letting it rest can help you get a feel for the perfect baking time to suit your preference.
-
Can I substitute quick oats for old fashioned oats?
While you can, old fashioned rolled oats give a better texture and chewiness. Quick oats tend to baking down more, resulting in a softer cookie that might lose some of that hearty bite.
-
Do I need to chill the dough before baking?
Nope! These cookies don’t require chilling, which makes them great when you want to bake quickly. However, if you want the dough to be easier to handle or to develop deeper flavors, chilling the dough or dough balls for up to 48 hours is a nice option.
Final Thoughts
Making this Bakery-Style Monster Cookies Recipe has become one of my favorite baking rituals because it always yields cookies that feel like a warm hug. I love sharing them with family and friends because they embody that perfect mix of nostalgia and homemade goodness. Give this recipe a try—you’ll discover a bakery-quality cookie you can make right in your own kitchen, any time you want. Trust me, once you bake this, it’s going to be a staple in your recipe collection!
Print
Bakery-Style Monster Cookies Recipe
- Prep Time: 30 minutes
- Cook Time: 10 minutes
- Total Time: 40 minutes
- Yield: 16 cookies
- Category: Dessert
- Method: Baking
- Cuisine: American
Description
These Bakery-Style Monster Cookies combine the perfect blend of creamy peanut butter, rolled oats, and colorful M&Ms with semi-sweet chocolate chips for an indulgently chewy texture. Soft and gooey when fresh from the oven, these cookies offer a nostalgic treat that sets to the perfect consistency once cooled. Ideal for any occasion, these monster cookies are easy to prepare without any chilling time, or can be chilled for deeper flavor and controlled spread.
Ingredients
Butter and Sugars
- 1 cup salted butter, softened at room temp (2 sticks, 16 tbsp, or 226 grams)
- 1/2 cup creamy peanut butter
- 3/4 cup granulated sugar (158 grams)
- 3/4 cup light brown sugar, packed (165 grams)
Wet Ingredients
- 2 large eggs
- 1 tsp vanilla extract
Dry Ingredients
- 2 and 3/4 cups all-purpose flour, spooned & leveled or weighed out (358 grams)
- 1 tsp baking soda
- 1/4 tsp salt
Add-ins
- 1 cup old fashioned whole rolled oats (104 grams)
- 1 and 1/4 cup M&Ms
- 1 cup semi-sweet chocolate chips or a mix of milk and semi-sweet (177 grams)
Instructions
- Prep the Oven and Cookie Sheets: Preheat your oven to 350°F (177°C). Line cookie sheets with parchment paper or silicone baking mats to ensure easy removal and even baking. No chilling of dough is required, but you may chill dough up to 48 hours if preferred for flavor development and less spreading.
- Make the Cookie Dough – Cream Butter and Sugars: In a very large mixing bowl, use an electric mixer on high speed to cream the softened butter until smooth. Add the peanut butter and mix until completely combined with the butter. Next, add both granulated sugar and light brown sugar. Continue mixing on high speed for at least one minute until the mixture is light and fluffy, indicating proper creaming.
- Add Eggs and Vanilla: Incorporate the eggs one at a time into the creamed butter mixture and add the vanilla extract. Mix just until combined to avoid overworking the dough.
- Add Dry Ingredients: In a separate bowl, whisk together the all-purpose flour, baking soda, and salt. Gradually add these dry ingredients to the wet mixture, mixing just until all the flour disappears and the dough is uniformly combined. Scrape down the bowl sides to ensure even mixing but avoid overmixing to keep cookies tender.
- Fold in Oats, M&Ms, and Chocolate Chips: Lower the mixer speed and gently add the rolled oats, M&Ms, and chocolate chips. Mix on low speed or fold by hand to evenly distribute the add-ins throughout the dough without breaking the mix-ins or toughening the dough.
- Scoop the Dough into Balls: Using a large cookie scoop that holds about 4 tablespoons (approximately 4 ounces or 115 grams) per scoop, portion the dough into cookie balls. This ensures consistent cookie size and even baking. If spreading is an issue, you can chill the dough balls in the freezer for 20-30 minutes before baking.
- Bake the Cookies: Place the cookie dough balls spaced 2 inches apart on the prepared cookie sheets. Bake in the preheated oven for 10-13 minutes. The cookies will appear underbaked or gooey at the center when removed; this is normal. After baking, press down gently on the cookies with the back of a measuring cup to slightly flatten and shape them.
- Cool and Serve: Let the cookies cool on a wire rack completely before storing. They will set to a perfect soft, chewy texture as they cool. These cookies are delicious warm from the oven or at room temperature.
- Storage and Make-Ahead Tips: Store cooled cookies in an airtight container at room temperature for 3-5 days. Cookie dough balls may be refrigerated for 1-3 days or frozen up to 2 months. Bake from frozen without thawing by following the same bake time. Chilled dough tends to spread less, so pressing down the cookies after baking is recommended.
Notes
- You can halve the recipe if you prefer fewer cookies.
- Cookies appear underbaked coming out of the oven but will firm up as they cool.
- Chilling dough can be done up to 48 hours or freezing for up to 2 months for convenience and controlled spread.
- Use a cookie scoop or scale for consistent cookie sizes.
- If cookies spread excessively, quick chill dough balls before baking or gently press cookies after baking to maintain shape.
Nutrition
- Serving Size: 1 cookie
- Calories: 310
- Sugar: 20g
- Sodium: 170mg
- Fat: 16g
- Saturated Fat: 7g
- Unsaturated Fat: 7g
- Trans Fat: 0g
- Carbohydrates: 38g
- Fiber: 2g
- Protein: 5g
- Cholesterol: 40mg


