
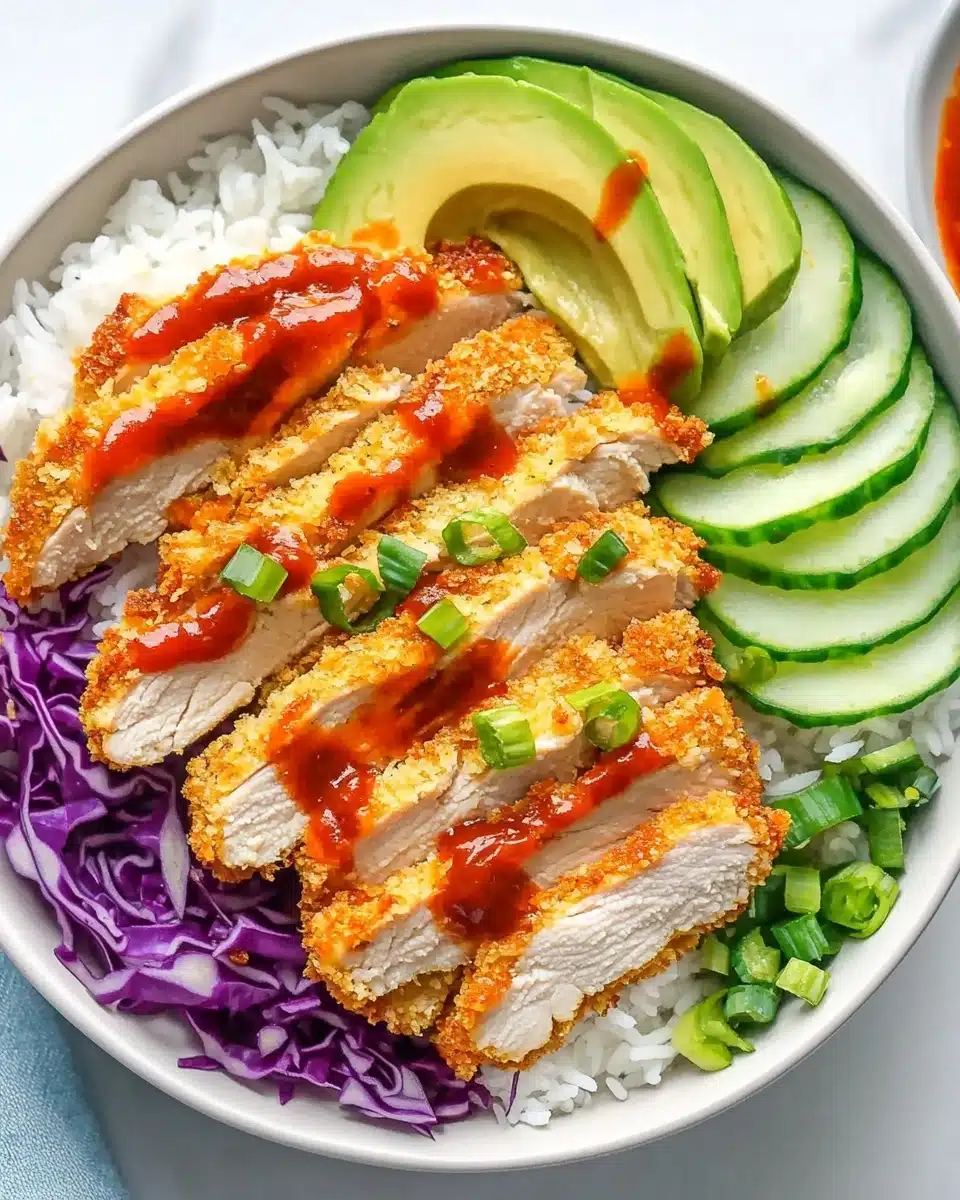
Chicken Katsu Bowls combine Japanese comfort food with a healthy, modern twist—crispy, golden chicken cutlets nestled over fluffy rice, crunchy veggies, and vibrant, savory sauces. This dish is pure weeknight magic and an absolute favorite of mine when I’m craving something soul-soothing and full of satisfying textures!
Why You’ll Love This Recipe
- Crispy, Golden Perfection: The air-fried chicken katsu is shatteringly crisp on the outside and juicy inside, without needing deep frying (or the mess!).
- Sauce Magic: Homemade tonkatsu and curry sauces dial up the flavor and are seriously easy to whisk together with pantry staples.
- Customizable Bowls: Layer in your favorite veggies or swap the rice for something whole grain—this bowl is as versatile as your cravings.
- Meal Prep Friendly: Chicken Katsu Bowls keep so well and can be enjoyed warm or cold, making lunch the next day even more exciting.

Ingredients You’ll Need
You’ll be amazed by how just a handful of smartly chosen ingredients come together to create the magic of Chicken Katsu Bowls. Each one brings a signature flavor or crunch, with plenty of chances to make the bowls your own!
- Chicken breasts: Go for boneless, skinless chicken and pound thin—they’ll cook quickly and stay wonderfully tender.
- Kosher salt & coarse black pepper: The classic seasonings that let the chicken’s flavor shine in every bite.
- Panko breadcrumbs: Japanese-style panko is the secret to that ultra-crispy, light-as-air coating.
- Large eggs: Whisked eggs help the panko stick and create a golden, cohesive crust.
- Cooking spray: A light spray ensures even browning in the air fryer, keeping your katsu crisp but never greasy.
- Ketchup, Worcestershire sauce, soy sauce, Mirin, Dijon mustard: Whisked together, these make a tangy-sweet tonkatsu sauce that’s zippy and bold.
- Mayonnaise, full-fat yogurt, curry powder, garlic, lemon juice: This creamy curry sauce adds a gentle heat and lush, saucy finish that’s irresistible.
- White rice: Choose your favorite; the fluffy base soaks up every bit of sauce and chicken juices.
- Persian cucumbers, red cabbage, mixed greens, scallions: Bring fresh crunch, color, and a lovely balance to the warm chicken and rice.
Variations
Once you’ve mastered the foundation of Chicken Katsu Bowls, it’s a breeze to customize based on what you have on hand, dietary needs, or tonight’s cravings. Think of this recipe as your springboard to endless bowl creativity!
- Try It with Pork or Tofu: Swap chicken for pork tenderloin cutlets or extra-firm tofu for a fun, equally crispy twist.
- Go Grain-Free: Switch the white rice for cauliflower rice, quinoa, or brown rice for more nutrition or lower carbs.
- Spice It Up: Add a dash of Sriracha or a sprinkle of chili flakes to the curry sauce for a bold kick.
- Make It Gluten-Free: Use gluten-free panko and tamari in the sauces—so simple, and no one will taste the difference!
How to Make Chicken Katsu Bowls
Step 1: Prep and Pound the Chicken
Start by slicing your chicken breasts in half horizontally, then give them a gentle but firm pounding with a meat mallet until they’re about ½-inch thick. This helps each piece cook evenly—and quickly!—so you get juicy chicken with a snappy coating every time. Season both sides with salt and pepper and set aside.
Step 2: Set Up Your Breading Station
Blitz your panko in a food processor for even finer crumbs, or simply use a zip-top bag and a rolling pin if that’s easier. Pour the panko into a shallow bowl. Whisk the eggs separately to create your dredging station—having everything ready means less mess and stress once you start coating!
Step 3: Bread the Chicken Cutlets
Dip each chicken cutlet into the eggs, letting any excess drip away, then nestle them into the panko, pressing gently so the crumbs adhere all over. Lay the coated pieces on a wire rack and repeat with the rest. Letting them rest for 5–10 minutes helps the coating stick beautifully when cooked.
Step 4: Air Fry the Katsu
Preheat your air fryer to 350℉, give the basket a quick spray of oil, and lay the cutlets in a single layer (don’t crowd—it’s worth cooking in batches!). Spritz the tops, air fry for 10 minutes, then flip, spray again, and cook another 3–5 minutes until the cutlets are deeply golden and cooked through. Juices should run clear, and a thermometer in the thickest part should read 165°F.
Step 5: Whisk Up the Sauces
While the chicken cools slightly, it’s sauce o’clock! For the tonkatsu sauce, whisk ketchup, Worcestershire, soy sauce, mirin, and Dijon until smooth. For the curry sauce, stir mayonnaise, yogurt, ketchup, garlic, curry powder, and lemon juice together until creamy and luscious.
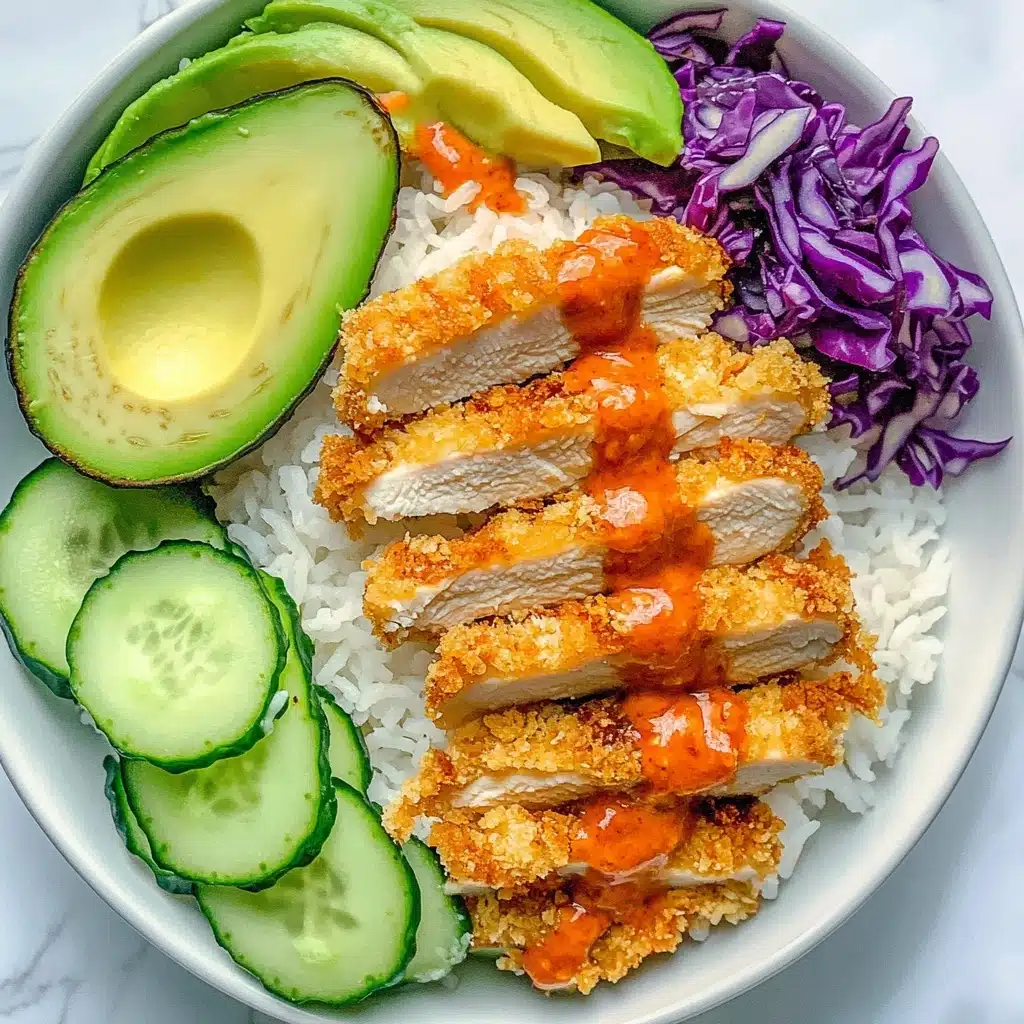
Step 6: Assemble the Bowls
Slice the katsu into strips using a gentle rocking motion—keeping that crisp breading intact feels so satisfying. Build each bowl with warm rice, crunchy cabbage, cucumbers, greens, and scallions. Nestle the chicken katsu on top, then drizzle with your favorite sauce (or both!). Get ready for all the colors, crunch, and flavor you could wish for in a single bite.
Pro Tips for Making Chicken Katsu Bowls
- Crispy Success: Always rest your breaded chicken cutlets before air frying—this helps the coating set and results in a crunchier crust once cooked.
- Even Browning, No Sogginess: Use a light spray of oil on both sides and never crowd the air fryer basket for impeccable crispiness every time.
- Thermometer Best Friend: To avoid dry chicken or undercooked centers, use an instant-read thermometer and aim for that magic 165°F mark.
- Slice Smart: Use a gentle, sawing motion to cut the finished katsu—this keeps the crispy coating locked to the chicken rather than your cutting board.
How to Serve Chicken Katsu Bowls
Garnishes
A sprinkle of fresh scallions, toasted sesame seeds, or even a handful of microgreens takes your Chicken Katsu Bowls to the next level—think of garnishes as the finishing touch that makes every bowl feel restaurant-worthy and Instagram-ready.
Side Dishes
Pair your bowls with classic edamame, miso soup, or a tangy Asian slaw for a balanced meal. Even a simple bowl of fruit or pickled radish on the side adds a refreshing contrast to the rich, crispy chicken.
Creative Ways to Present
Serve Chicken Katsu Bowls family-style with all the toppings and sauces on the table, or pack them up in bento boxes for lunch on the go. For a party twist, slice the chicken smaller for mini bowls or katsu “tacos” using lettuce cups!
Make Ahead and Storage
Storing Leftovers
Leftover katsu and rice keep beautifully in an airtight container in the fridge for up to 3 days. Store veggies and sauces separately to keep the textures just right when assembling leftover bowls.
Freezing
You can freeze cooked chicken katsu on a sheet pan until solid, then transfer to a freezer bag for up to 2 months. When ready to use, simply reheat from frozen for a speedy, crispy meal anytime.
Reheating
Reheat chicken katsu in the air fryer or oven at 350°F until hot and crisped up—about 8–10 minutes from the fridge or a bit longer from frozen. Avoid the microwave, which can make the breading soggy.
FAQs
-
Can I make Chicken Katsu Bowls ahead of time?
Yes! Prepare the chicken, sauces, and toppings in advance. Store everything separately in the refrigerator, then reheat the chicken right before assembling for best texture and flavor.
-
How do I keep the chicken katsu crispy?
Rest the breaded cutlets before cooking, give them plenty of space in the air fryer, and use a wire rack for cooling. Avoid sealing hot katsu in containers, as trapped steam can soften the crust.
-
Can I pan-fry instead of air fry?
Absolutely! Heat a thin layer of oil in a skillet over medium-high, then cook the breaded cutlets until golden on both sides and cooked through—about 3–4 minutes per side.
-
What other vegetables can I use in Chicken Katsu Bowls?
Feel free to get creative—shredded carrots, radishes, avocado slices, or steamed edamame all add great flavor, color, and crunch to your bowl!
Final Thoughts
I hope you give these Chicken Katsu Bowls a spot in your weekly rotation—they’re endlessly customizable, a breeze to make, and always a crowd-pleaser. There’s nothing better than tucking into a big, colorful bowl full of crispy, saucy goodness. Let me know how you make it your own!
Print
Chicken Katsu Bowls Recipe
- Prep Time: 20 minutes
- Cook Time: 15 minutes
- Total Time: 35 minutes
- Yield: 6 Servings
- Category: Air Frying
- Method: Air Frying
- Cuisine: American, Japanese
Description
Delicious Chicken Katsu Bowls featuring crispy air-fried chicken cutlets served over a bed of rice and topped with a flavorful tonkatsu sauce and creamy curry sauce. A satisfying and flavorful meal!
Ingredients
For the Chicken Katsu:
- 3 (6-ounce) chicken breasts, trimmed, halved, and pounded 1/2-inch cutlets
- 1 teaspoon kosher salt
- 1 teaspoon coarse black pepper
- 2 cups Panko breadcrumbs
- 2 large eggs
- cooking spray, as needed
For the Tonkatsu Sauce:
- 1/2 cup ketchup
- 2 tablespoons Worcestershire sauce
- 2 teaspoons soy sauce
- 1/2 teaspoon Mirin
- 1 teaspoon Dijon mustard
For the Curry Sauce:
- 1/3 cup mayonnaise
- 1/3 cup full-fat yogurt
- 1 tablespoon ketchup
- 1 garlic clove, minced
- 2 teaspoons yellow curry powder
- 1 teaspoon lemon juice
For the Bowls:
- 2 cups white rice, cooked according to the package
- 2 Persian cucumbers, thinly sliced
- 1/4 head red cabbage, shredded
- 2 cups mixed greens
- 3 scallions, finely chopped
Instructions
- Prepare the Katsu Chicken: Slice the chicken breasts in half horizontally, then gently pound them into ½-inch-thick cutlets using a meat tenderizer. Season with salt and pepper. Process Panko breadcrumbs and set up dredging station. Coat chicken in egg and Panko, then air fry until crispy.
- Make the Sauces: Whisk ingredients for tonkatsu and curry sauce in separate bowls.
- Assemble the Bowls: Slice cooked chicken, then layer rice, cabbage, greens, cucumbers, and scallions in bowls. Top with chicken strips and sauces.
Notes
- Use thin chicken cutlets for even cooking.
- Pound chicken to ½ inch thickness for uniform cooking.
- Coat chicken well in breadcrumbs for a crispy crust.
- Air fry in batches for best results.
- Preheat air fryer for optimal cooking.
- Use a food thermometer to ensure chicken is cooked through.
Nutrition
- Serving Size: 1 Bowl
- Calories: 480
- Sugar: 8g
- Sodium: 780mg
- Fat: 15g
- Saturated Fat: 3g
- Unsaturated Fat: 10g
- Trans Fat: 0g
- Carbohydrates: 50g
- Fiber: 3g
- Protein: 30g
- Cholesterol: 120mg
