

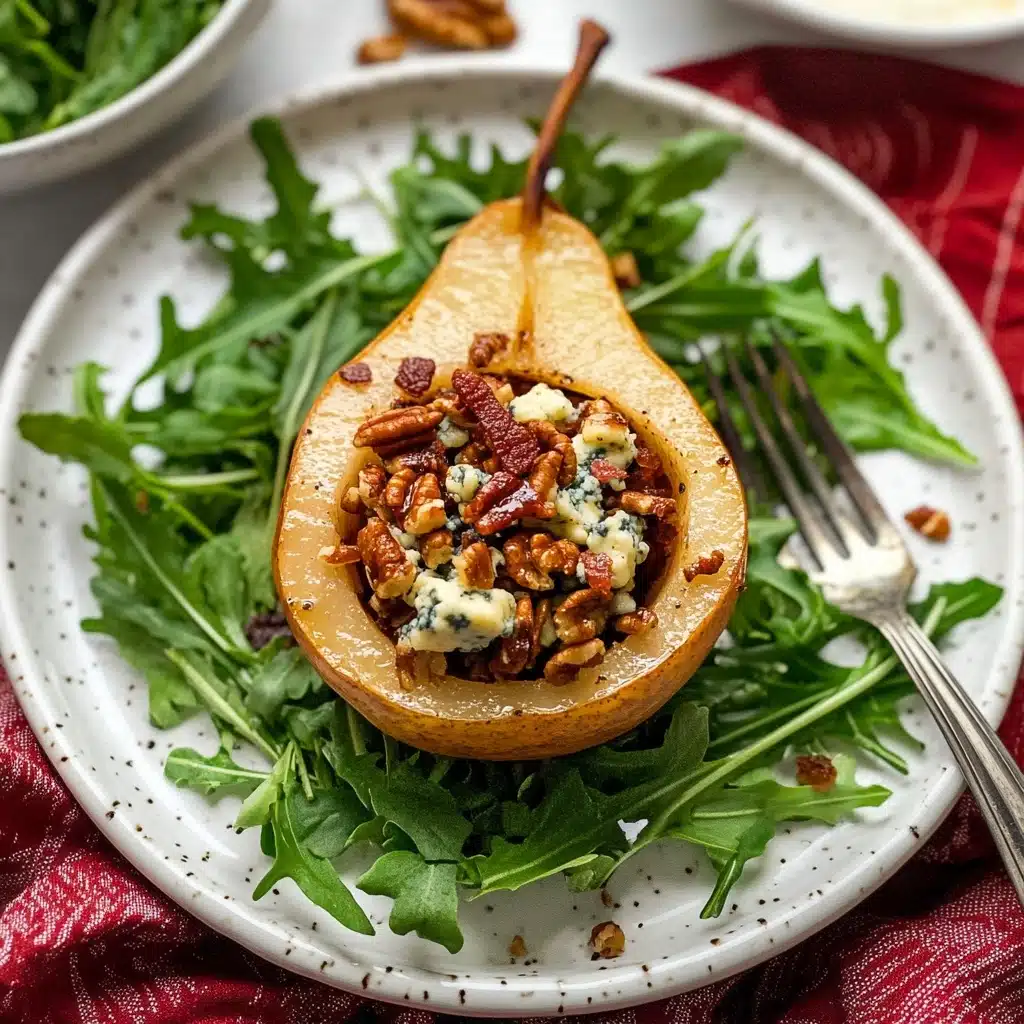
If you’re looking for a dish that’s effortlessly impressive yet soul-soothing, Roasted Pears with Blue Cheese & Walnuts is exactly what you need! Imagine pears roasted until luxuriously soft, stuffed with a heavenly mix of blue cheese, bacon, and walnuts, and finished with golden honey and tangy balsamic glaze. It’s sweet, savory, and a total show-stopper for dinner parties or cozy evenings at home.
Why You’ll Love This Recipe
- Elegant Flavor Fusion: Sweet roasted pears paired with tangy blue cheese and crunchy walnuts create a uniquely sophisticated balance.
- Deceptively Simple: Despite its wow-factor, Roasted Pears with Blue Cheese & Walnuts comes together with just a handful of easy-to-find ingredients.
- Perfect for Entertaining: This dish shines as both a warm salad or a stunning appetizer—guaranteed to spark conversation at the table.
- Balanced Sweet & Savory: Each bite blends creamy, salty, and sweet elements for a truly memorable treat.

Ingredients You’ll Need
The beauty of Roasted Pears with Blue Cheese & Walnuts is how every ingredient plays a starring role. The sweetness of the pears, the salty-silky cheese, crisp bacon, toasty nuts, and that eye-catching swirl of balsamic—you’ll see how simple ingredients can create a bold, memorable dish!
- Blue Cheese (3 oz., crumbled): Choose a creamy, bold blue cheese—like Gorgonzola or Roquefort—for maximum flavor punch. If you prefer something milder, opt for Danish blue or a milder variety.
- Thick-Cut Bacon (4 slices, cooked crispy & crumbled): Smoky bacon adds irresistible crunch and savory notes—don’t skip it unless you need to!
- Walnuts (1/3 cup, finely chopped): A classic partner for pears and blue cheese, walnuts add nutty warmth and bite.
- Bartlett Pears (3 large): These pears are naturally juicy and hold their shape during roasting, making them ideal for stuffing.
- Honey (3 tablespoons, divided): Drizzled before and after roasting, honey highlights the pears’ sweetness and creates a luscious finish.
- Balsamic Vinegar (1 cup): Reducing balsamic gives a rich, syrupy glaze that ties all the flavors together—don’t rush this step!
- Fresh Arugula (3 cups): Peppery, vibrant arugula works as a bright bed for the warm pears, adding color and freshness.
Variations
What I love most about Roasted Pears with Blue Cheese & Walnuts is how easily you can make it your own. Whether you need to accommodate dietary needs or just want to experiment with flavors, this recipe welcomes twists and tweaks.
- Vegetarian Swap: Skip the bacon or use a smoky vegetarian alternative—your pears will still be loaded with flavor!
- Different Cheese: Try goat cheese or feta for tangy flair if blue cheese isn’t your favorite.
- Nut Options: Pecans or hazelnuts lend a different crunch and can be substituted for walnuts if you like.
- Pear Varieties: Bosc or Anjou pears will work beautifully; just make sure they’re not too ripe so they hold up to the roasting.
- No Honey? Pure maple syrup is a delicious replacement!
How to Make Roasted Pears with Blue Cheese & Walnuts
Step 1: Preheat & Prep Your Ingredients
Start by moving your oven rack to the center and heating your oven to 400°F. While it warms up, lay out all your ingredients and cook the bacon until it’s extra crispy (trust me, it adds the best texture). Crumble the bacon, chop your walnuts, and measure out your cheese—having everything ready makes this recipe feel like a breeze.
Step 2: Hollow Out the Pears
Using a small melon baller or spoon, carefully cut the pears in half lengthwise and scoop out the seeds and a bit of the center flesh to create a nice hollow for stuffing. Don’t toss the pear flesh—chop it up for the filling! To keep the pears stable in the oven, slice a tiny bit off their rounded bottoms so they don’t wobble.
Step 3: Mix the Filling
In a medium bowl, stir together the blue cheese, crumbled bacon, chopped walnuts, and the bits of pear you scooped out earlier. This combination is such a flavor bomb—creamy, smoky, nutty, and a little juicy from the fruit. Set aside and breathe in that fantastic aroma!
Step 4: Assemble and First Roast
Arrange your hollowed pears in a baking dish—cut side up, of course. Drizzle the insides with half of your honey to give them that caramelized, golden sweetness. Pop the dish into the oven and roast for 30 minutes so the pears start to soften.
Step 5: Stuff the Pears and Finish Roasting
Take the partially roasted pears out, then generously fill each cavity with your blue cheese-walnut mixture. Drizzle the remaining honey over the tops and slide them back in the oven. Give them another 15 minutes, letting the cheese melt and the pears become super tender and fragrant.
Step 6: Make the Balsamic Glaze
While the pears finish roasting, simmer your balsamic vinegar in a small skillet over medium heat. Stir often and watch as it reduces to a thick, glossy syrup—about a third of its original volume in 10 minutes. This glaze is pure magic drizzled over the finished pears!
Step 7: Serve and Enjoy
Let the finished pears cool for just a couple minutes. Mound some peppery arugula on six plates, crown each salad with a stuffed, glistening pear, and finish with a generous drizzle of your homemade balsamic glaze. Get ready for oohs and aahs—it’s time to enjoy your Roasted Pears with Blue Cheese & Walnuts!
Pro Tips for Making Roasted Pears with Blue Cheese & Walnuts
- Choose Ripe-But-Firm Pears: For this recipe, pears should give ever-so-slightly when pressed but still hold their shape during roasting—overripe pears may collapse in the oven.
- Even Slicing for Stability: Carefully trimming a sliver from the rounded pear bottoms ensures they don’t tip or roll in the baking dish while roasting.
- Syrupy Glaze Magic: Don’t walk away while reducing the balsamic—watch closely as it thickens for that perfect drizzle consistency without burning.
- Crispy Bacon Timing: Fry the bacon until deeply golden and crispy so it retains crunch after being baked inside the pears.
How to Serve Roasted Pears with Blue Cheese & Walnuts
Garnishes
For extra flair, I love adding a sprinkle of fresh thyme, a few extra walnut pieces, or even a little cracked black pepper on top of each pear half. These garnishes heighten the aromas and give your Roasted Pears with Blue Cheese & Walnuts a restaurant-worthy finish.
Side Dishes
This recipe pairs beautifully with a simple baguette, a crisp glass of white wine, or even a vibrant fall soup. Serve alongside roasted chicken or a festive charcuterie board to turn your gathering into something truly special.
Creative Ways to Present
You can serve each pear half on a bed of arugula in individual shallow bowls, or plate them on a rustic wooden board for an eye-catching appetizer platter. For a holiday dinner, nestle the pears among jewel-toned greens and edible flowers for a breathtaking centerpiece that’ll have guests reaching for their phones.
Make Ahead and Storage
Storing Leftovers
Leftover Roasted Pears with Blue Cheese & Walnuts keep well for 1-2 days when stored in an airtight container in the fridge. The flavors mingle beautifully overnight, but the pears will soften further, so keep them separate from the arugula until ready to serve.
Freezing
While technically safe to freeze, I don’t recommend it—the pears will likely lose their lovely texture and the cheese can become grainy. These are best enjoyed fresh from the oven or within a day or so, when the contrast of flavors and textures truly shines.
Reheating
To gently reheat stuffed pears, place them in a covered baking dish at 325°F for about 10–15 minutes, just until warm and the cheese is melty again. Drizzle with fresh balsamic glaze right before serving for the best taste and presentation.
FAQs
-
Can I prepare Roasted Pears with Blue Cheese & Walnuts ahead of time?
Absolutely! You can stuff the pears up to a day in advance and refrigerate them. When you’re ready to serve, simply bake as directed, making it extra convenient for entertaining.
-
What if I don’t have blue cheese?
No problem—substitute with goat cheese, feta, or even a sharp white cheddar for a different flavor profile. The creamy texture is what matters most here!
-
Can I make Roasted Pears with Blue Cheese & Walnuts vegetarian or nut-free?
Absolutely—you can leave out the bacon for a vegetarian version, or use a bacon alternative. For nut allergies, simply omit the walnuts or use toasted seeds like pumpkin or sunflower for crunch.
-
Do I need to peel the pears before roasting?
There’s no need to peel—keeping the skin on helps the pears hold their shape during roasting and adds a lovely color and subtle flavor to the finished dish.
Final Thoughts
If you’re craving something special, Roasted Pears with Blue Cheese & Walnuts truly delivers every time. It’s the kind of dish that warms your kitchen and wows your taste buds, whether you’re serving it up for friends or indulging in a quiet night in. I hope you give this recipe a try—your table (and your heart) will thank you!
Print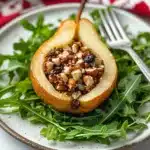
Roasted Pears with Blue Cheese & Walnuts Recipe
- Prep Time: 15 minutes
- Cook Time: 45 minutes
- Total Time: 1 hour
- Yield: 6 servings
- Category: Baking
- Method: Oven
Description
Roasted Pears with Blue Cheese & Walnuts is a delightful combination of sweet, savory, and nutty flavors that make for a perfect appetizer or light meal. The warm balsamic glaze adds a tangy finish to this elegant dish.
Ingredients
Blue Cheese Mixture:
- 3 oz. blue cheese, crumbled
- 4 slices thick-cut bacon, cooked crispy and crumbled
- 1/3 c. walnuts, finely chopped
Roasted Pears:
- 3 large Bartlett pears
- 3 T. honey, divided
- 1 c. balsamic vinegar
- 3 c. fresh arugula
Instructions
- Prepare Blue Cheese Mixture: Combine blue cheese, crispy bacon, and chopped walnuts in a medium bowl. Set aside.
- Prepare Pears: Cut pears in half, remove seeds and flesh, and create a small section to sit flat. Place in a baking dish.
- Stuff Pears: Mix removed pear flesh with blue cheese mixture. Fill pear halves and drizzle with honey. Roast in oven.
- Make Balsamic Glaze: Heat vinegar until reduced. Set aside.
- Assemble: Place arugula on plates, top with stuffed pear, drizzle with balsamic glaze, and serve.
Nutrition
- Serving Size: 1 stuffed pear with arugula
- Calories: 310
- Sugar: 19g
- Sodium: 460mg
- Fat: 18g
- Saturated Fat: 7g
- Unsaturated Fat: 9g
- Trans Fat: 0g
- Carbohydrates: 30g
- Fiber: 4g
- Protein: 9g
- Cholesterol: 30mg


