
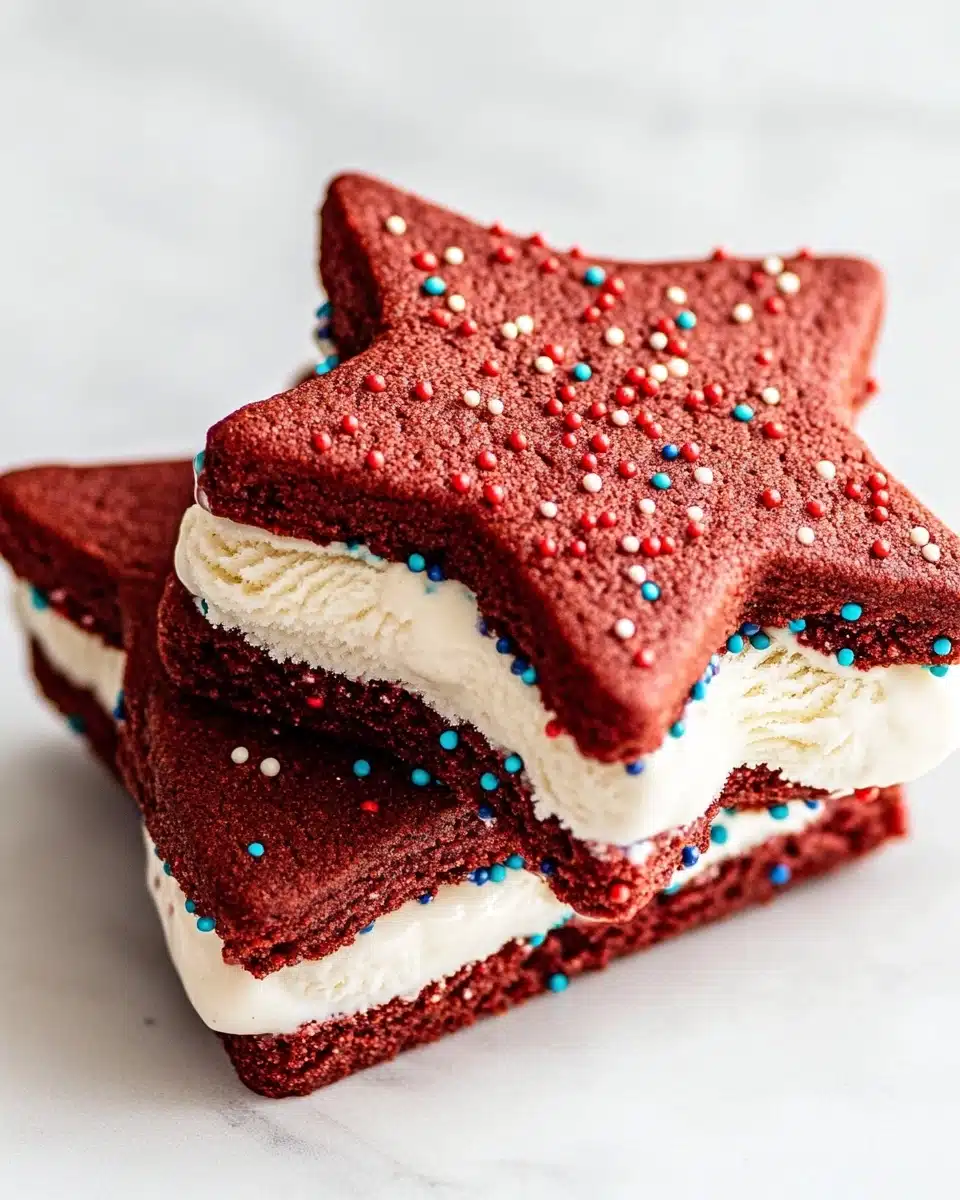
Red Velvet Ice Cream Sandwiches are the ultimate nostalgic-meets-modern summer treat: soft, star-shaped red velvet cookies wrapped around rich, creamy ice cream, all finished with a playful dusting of colorful sprinkles. Every bite is a celebration, combining the tangy, cocoa-kissed flavor of classic red velvet with cool, dreamy ice cream—absolutely irresistible for kids and grown-ups alike!
Why You’ll Love This Recipe
- Show-stopping Presentation: The star-shaped cookies and vivid red color make these a festive centerpiece for any summer gathering or holiday spread.
- Flexibly Fun: You can switch up the ice cream flavors, roll them in sprinkles, or play with shapes to suit any occasion or craving.
- Easy, Make-Ahead Treat: Prep everything in advance and keep your Red Velvet Ice Cream Sandwiches stashed in the freezer, ready for spontaneous dessert emergencies—or celebrations.
- Crowd-Pleasing Flavor: The best of both worlds: that classic chocolatey-red velvet comfort meets cool, creamy vanilla (or cheesecake!) ice cream.

Ingredients You’ll Need
We’re keeping things simple, but each ingredient in these Red Velvet Ice Cream Sandwiches packs a punch in terms of flavor, texture, or pure visual delight. The cookies deliver rich chocolate and color, the ice cream brings luscious creaminess, and the sprinkles add that perfect festive crunch!
- 24 red velvet cookies, shaped into stars: Soft, chewy and bright—these are the heart of the sandwich, holding everything together and providing that signature red velvet flavor and eye-popping hue.
- 2 pints vanilla or cheesecake flavored ice cream: The dreamy filling! Let it soften a bit first for easy spreading and perfectly clean sandwich shapes.
- Sprinkles (optional): Not just for looks—these add extra fun and offer a sweet little crunch with every bite.
Variations
The best part about these Red Velvet Ice Cream Sandwiches? They’re endlessly customizable! Tweak them for dietary needs, personal favorites, or whatever you have on hand—it’s all about making them your own, no matter the season or celebration.
- Try different ice creams: Swap in chocolate, caramel, or even cookies & cream ice cream for a twist on the classic vanilla or cheesecake filling.
- Go dairy-free: Use your favorite non-dairy ice cream (like oat milk or coconut-based) for a vegan-friendly treat that’s just as creamy and dreamy.
- Change the shape: Use heart, circle, or square cookie cutters—these sandwiches are just as delightful any way you slice them.
- Add flavor mix-ins: Stir in crushed cookies, freeze-dried raspberries, or even a swirl of chocolate fudge into your ice cream layer for a surprise in every bite.
How to Make Red Velvet Ice Cream Sandwiches
Step 1: Prepare the Ice Cream Layer
Start by letting your ice cream sit on the counter until it’s soft enough to spread without resistance. Line a large rimmed baking sheet with parchment or plastic wrap, then carefully spread the softened ice cream in an even layer—aim for about 1 to 1.5 inches thick for the ultimate sandwich experience. Press a fresh sheet of plastic right on top to avoid freezer burn, and freeze until the ice cream is totally firm (at least 2 hours, or up to 3 days if you want to prep ahead!).
Step 2: Cut Out the Ice Cream Shapes
When you’re ready to put everything together, peel off the top sheet of plastic and use the same star cookie cutter you used for your red velvet cookies to stamp out perfect ice cream stars. Work quickly—the ice cream softens fast!—and pop the shapes back in the freezer as you go so they stay firm and easy to handle.
Step 3: Assemble the Sandwiches
Take two cookies and sandwich an ice cream star between them, gently pressing together so the filling reaches the edges. If you’re feeling festive, roll the exposed ice cream edges in a bowl of sprinkles. Place your finished sandwiches on a tray and return to the freezer as you assemble the rest—it helps them stay picture-perfect!
Step 4: Freeze Before Serving
To lock in that perfectly chewy-cookie-to-creamy-ice-cream ratio, let the sandwiches freeze for at least 1 hour before serving. This final chill ensures they’ll hold their shape beautifully—every single bite is chilly, creamy, and simply sublime!
Pro Tips for Making Red Velvet Ice Cream Sandwiches
- Ice Cream Spreads Best When Softer: Let your ice cream sit out until just soft enough to spoon and spread, but not melting; this makes it easy to achieve a beautiful, even layer without air pockets.
- Star Cutters, Big Impact: Using the exact same cookie cutter for both the cookies and ice cream ensures those crisp, impressive sandwich edges everyone loves.
- Work in Batches to Prevent Melting: Keep ice cream and assembled sandwiches in the freezer as you work—if things start to soften, pop them back in for a quick chill before continuing.
- Cookie Texture is Key: Bake your cookies so they’re soft and chewy—overbaked cookies get too hard once frozen and aren’t as easy to eat straight from the freezer.
How to Serve Red Velvet Ice Cream Sandwiches

Garnishes
Rolling the edges of your Red Velvet Ice Cream Sandwiches in colorful sprinkles is my go-to finishing flourish—they add festive flair and irresistible crunch. You can also try mini chocolate chips, crushed freeze-dried berries, or even a zigzag of melted white chocolate if you want an extra luxurious touch.
Side Dishes
Since these sandwiches are the star (pun intended!) of the show, keep sides light and refreshing. A small bowl of fresh summer berries or a crisp fruit salad balances the richness, or add chilled lemonade or iced coffee for the ultimate picnic pairing.
Creative Ways to Present
Display Red Velvet Ice Cream Sandwiches stacked on a platter lined with parchment and scatter extra sprinkles for a playful, party-ready look. Or, wrap each sandwich in wax paper and tie it with twine for a retro ice cream parlor touch—perfect for handing out at parties or picnics!
Make Ahead and Storage
Storing Leftovers
When you have extras (lucky you!), individually wrap each Red Velvet Ice Cream Sandwich tightly in plastic wrap or wax paper. Place the wrapped sandwiches in an airtight container or freezer bag, and store them in the freezer to keep them fresh for up to one week.
Freezing
Freezing is a breeze—just make sure the assembled sandwiches are fully firm before wrapping. A little patience goes a long way in preventing ice crystals and keeping both cookie and filling at their best. You can freeze them up to a week in advance, making them perfect for parties!
Reheating
No reheating needed for these sweets! But for the best texture (so the ice cream softens just enough and the cookies aren’t too firm), let the sandwiches rest at room temperature for 5 to 10 minutes before serving. That’s the secret for biting right through with no mess or fuss.
FAQs
-
Can I use store-bought red velvet cookies?
Absolutely! If you’re short on time, grab soft-baked red velvet cookies from your favorite bakery or grocery store. Just make sure they’re slightly chewy—not crunchy—so they don’t become too hard when frozen.
-
What’s the best way to cut the ice cream without it melting?
Work quickly, and if the ice cream softens too much, simply pop the tray back in the freezer for 10–15 minutes. Lightly greasing the cookie cutter can also help the ice cream release easily for clean, crisp shapes.
-
How far in advance can I assemble Red Velvet Ice Cream Sandwiches?
You can assemble them up to a week ahead. Wrapping each one individually in plastic keeps them fresh—and means you’re always ready for surprise guests or a late-night sweet tooth attack!
-
Can I make these gluten-free or dairy-free?
Definitely! Use your favorite gluten-free red velvet cookie recipe or mix, and swap in dairy-free ice cream for a totally allergy-friendly delight that everyone can enjoy.
Final Thoughts
If you’re ready for a dessert that delivers pure joy in every bite, don’t wait—make these Red Velvet Ice Cream Sandwiches part of your next picnic, pool party, or cozy night in. They’re fun to craft, endlessly customizable, and every single one is guaranteed to put a smile on your face. I can’t wait for you to fall in love with these summery sweets!
Print
Red Velvet Ice Cream Sandwiches Recipe
- Prep Time: 20 minutes
- Total Time: 3 hours 20 minutes
- Yield: 12 ice cream sandwiches
- Category: Dessert
- Method: Freezing
- Diet: Vegetarian
Description
Red Velvet Ice Cream Sandwiches are a delightful treat that combines the rich flavors of red velvet cookies with creamy vanilla or cheesecake ice cream. These festive sandwiches are perfect for any occasion and are sure to impress your guests.
Ingredients
Red Velvet Cookies:
- 24 red velvet cookies, shaped into stars
Ice Cream Filling:
- 2 pints vanilla or cheesecake flavored ice cream
Garnish:
- Sprinkles, if desired
Instructions
- Soften Ice Cream: Allow the ice cream to sit at room temperature until softened.
- Prepare Ice Cream Sheet: Line a large rimmed baking pan with parchment paper or plastic wrap. Spread softened ice cream evenly over lined baking sheet. Press additional plastic wrap against the surface of the ice cream. Freeze until totally firm, at least 2 hours or up to 3 days.
- Shape Ice Cream and Assemble Sandwiches: Remove ice cream sheet from freezer. Using a cookie cutter, cut out shapes of ice cream and sandwich each between two cookies. Place on a tray and freeze as you assemble all the sandwiches.
- Final Freeze: Freeze sandwiches until firm, at least 1 hour, before serving. Individually wrap in plastic and store in the freezer for up to 1 week. Let sit at room temperature for 5 to 10 minutes before serving.


