
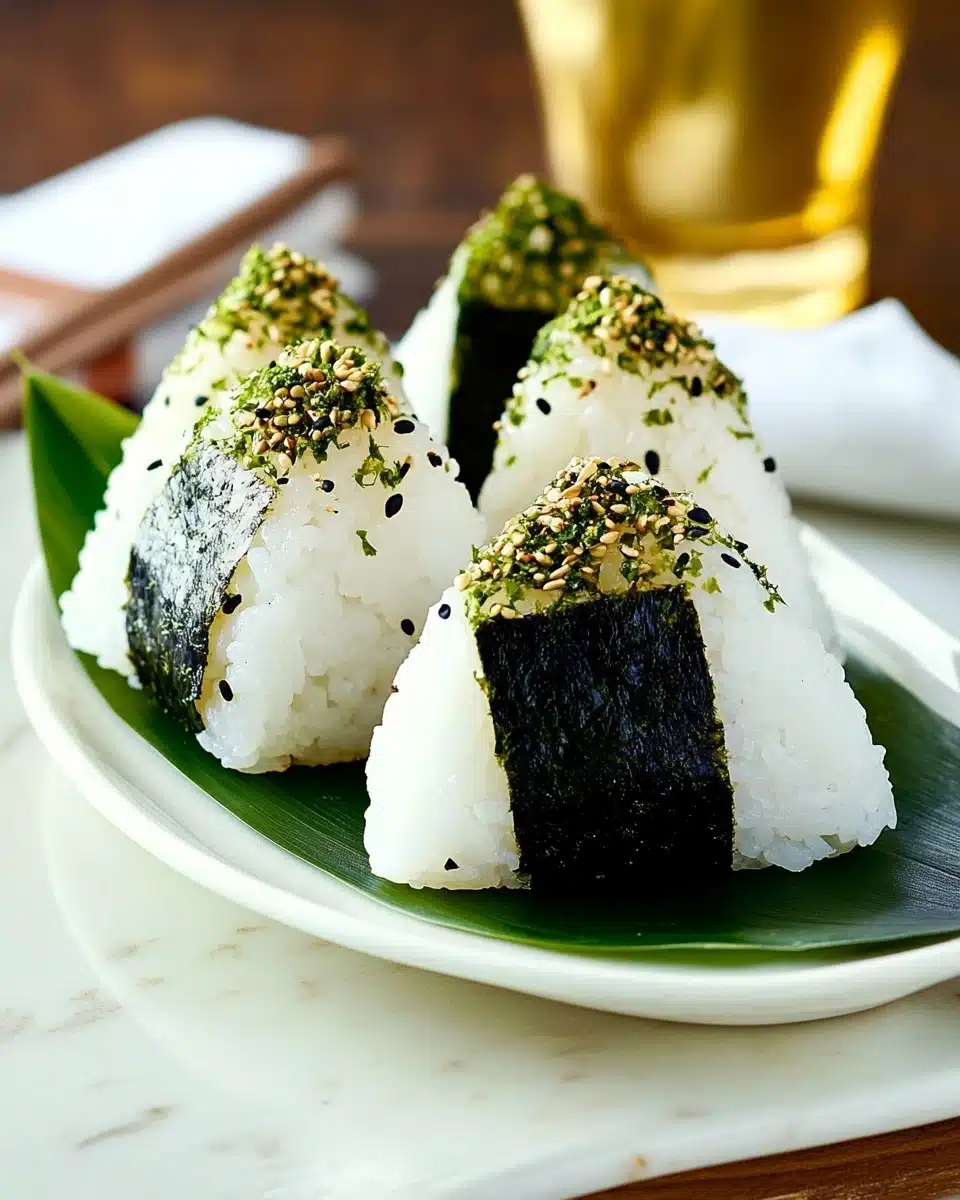
Onigiri (Japanese Rice Balls) are the ultimate symbol of handheld Japanese comfort food—soft balls of fluffy rice hugged by a crisp sheet of nori, often hiding a delicious surprise inside. These rice balls are endlessly customizable and perfect for snacking, picnics, or packing into lunch boxes. If you’ve ever wanted a taste of Japanese nostalgia at home, you’ll absolutely fall in love with making your own Onigiri!
Why You’ll Love This Recipe
- Customizable Fillings: Whether you’re craving something savory, tangy, or a bit spicy, Onigiri (Japanese Rice Balls) can be filled to match your mood and taste.
- Satisfyingly Simple: With just a few wholesome ingredients, you’ll create bites that are comforting, fun to shape, and totally delicious.
- Perfect for Meal Prep: Pack them for picnics, school lunches, hikes, or a quick snack—these rice balls are always ready to go!
- A Taste of Japan at Home: Experience an iconic Japanese food tradition, right in your kitchen, with authentic texture and flavor.

Ingredients You’ll Need
One of the things that makes Onigiri (Japanese Rice Balls) shine is their short ingredient list. Each element brings something special, whether it’s the gentle stickiness of Japanese rice, the savory pop from a quick-cured salmon, or the umami hug of nori.
- Japanese short-grain white rice: The heart of onigiri—the plump, shiny grains stick together beautifully for molding.
- Water: Essential for making perfectly steamed, fluffy rice with just the right bite.
- Diamond Crystal kosher salt: Used to season both the rice and your hands for shaping, adding mild flavor and keeping the rice fresh.
- Nori (dried laver seaweed) sheets: Adds crunch and a subtle ocean richness; also keeps your fingers clean when eating!
- Salmon fillets/Kosher salt: For a quick and satisfying salted salmon filling that’s impossibly flaky and delicious.
- Katsuobushi (dried bonito flakes): Paired with soy sauce for the classic okaka filling, bringing deep umami.
- Soy sauce: Adds savory seasoning to fillings such as okaka or tuna mayo.
- Albacore tuna (canned in olive oil): A staple for Western-friendly “tuna mayo” onigiri that’s creamy and rich.
- Kewpie mayonnaise: Japanese mayo is tangy and silky—the secret to the most craveable tuna filling.
- Umeboshi (pickled plum): Delivers tart, salty bursts that wake up every bite.
- Spicy salted pollock or cod roe (karashi mentaiko): If you want a spicy, briny filling with depth.
- Shio kombu: Tender, umami-packed seasoned seaweed for a simple, plant-based option.
- Furikake (rice seasoning): For rolling your finished onigiri in colorful, mouthwatering flavor.
Variations
Don’t be afraid to get creative! Onigiri (Japanese Rice Balls) are endlessly adaptable, so you can switch up the fillings, rice seasoning, or even the shape depending on your cravings and what’s lurking in your pantry.
- Vegetarian Onigiri: Fill with seasoned shio kombu, pickled vegetables, or umeboshi for big flavor and no meat.
- Spicy Kick: Mix in karashi mentaiko or top with a dab of wasabi for a burst of heat in every bite.
- Furikake-Crusted: Roll your rice balls in furikake or toasted sesame seeds to add color, crunch, and extra excitement.
- Yaki Onigiri: Try grilling the finished Onigiri and brushing them with a bit of soy sauce for savory, crispy edges.
- Brown Rice or Multigrain: Swap in brown rice or a blend for a nuttier, heartier version.
How to Make Onigiri (Japanese Rice Balls)
Step 1: Cook and Prepare Japanese Rice
Start by rinsing Japanese short-grain rice until the water runs mostly clear—this removes excess starch and ensures every grain is plump and distinct. Soak the drained rice for 20–30 minutes, then cook it in your rice cooker or on the stove using the right water-to-rice ratio. Once it’s cooked, let it rest and cool slightly—the rice should still be warm, but not scalding, for easy shaping.
Step 2: Prepare Your Fillings
While the rice cooks, whip up your favorite fillings! Broil or bake salted salmon until dry and flake it up, toss katsuobushi with soy sauce for okaka, blend drained tuna with Kewpie mayo and soy for a creamy filling, or simply pit and mash umeboshi. Have spicy roe, shio kombu, or furikake on standby for other flavor options.
Step 3: Shape the Onigiri
Get a bowl of water for your hands and some kosher salt—this stops the rice from sticking and keeps things deliciously seasoned. There are three classic shaping methods: use a moistened onigiri mold, shape with your hands (using light, sure pressure to make a triangle), or try plastic wrap if you want super-neat balls for bento. Place a scoop of rice in your palm or mold, tuck in a small spoonful of filling, cover with more rice, and gently shape into a compact triangle or ball.
Step 4: Wrap and Garnish
Wrap each Onigiri (Japanese Rice Balls) with a strip or sheet of nori—this crisps up the texture and gives you that iconic Japanese flavor and look. If you want an extra treat, coat the outside with furikake, press in a few sesame seeds, or top each Onigiri with a little of its filling for instant identification.
Step 5: Serve or Pack for Later
Enjoy your freshly made Onigiri right away while the rice is tender and the nori crisp, or wrap tightly for a delicious snack or lunch on the go. If packing for later, keep the nori and rice balls separate to preserve that perfect crunch, and assemble right before eating.
Pro Tips for Making Onigiri (Japanese Rice Balls)
- Rice Texture is Everything: Use short-grain Japanese rice—if it’s too dry, onigiri will crumble; too wet, and they’ll be sticky and mushy.
- Shaping with Love, Not Muscle: Press rice gently just until it holds—squeezing too tightly makes dense onigiri. A light touch keeps them airy and tender.
- Keep Hands Damp and Salted: Dip your fingers in water often and use a little kosher salt for easy shaping and subtle seasoning in every bite.
- Crisp Nori Secret: Only add nori right before eating for the ultimate crisp bite—store separately if packing ahead!
How to Serve Onigiri (Japanese Rice Balls)

Garnishes
The classic garnish for Onigiri is a band or full wrap of nori, but you can get creative with toppings: a sprinkling of sesame seeds, a pinch of furikake, or a little dollop of extra filling on top makes each rice ball as pretty as it is tasty. For a pop of color, try adding tiny bits of pickled ginger or shiso leaf.
Side Dishes
Onigiri (Japanese Rice Balls) are perfectly satisfying on their own, but they also shine beside miso soup, tamagoyaki (Japanese omelet), a quick salad of cucumber and wakame, or thinly sliced pickled vegetables. For a full bento box, nestle them in with steamed greens and a few sweet orange slices.
Creative Ways to Present
Get playful with how you serve Onigiri! Arrange several shapes (triangles, rounds, or even cute animals with nori “faces”) for a party platter, or thread mini Onigiri onto skewers for fun, portable snacks. Wrap each in a different type of nori or place colorful furikake-crusted onigiri on a bamboo leaf for a striking, authentic display.
Make Ahead and Storage
Storing Leftovers
If you need to store leftover Onigiri (Japanese Rice Balls), wrap each one tightly in plastic wrap or wax paper, then tuck them into an airtight container. Skip the nori wrap until just before eating, and consume within 6–8 hours for best texture.
Freezing
You can freeze Onigiri—just wrap unwrapped rice balls individually and freeze them plain. Let them thaw in the fridge or at room temperature, then add fresh nori before eating; fillings like cooked salmon freeze better than mayonnaise-based ones.
Reheating
To warm up chilled or thawed Onigiri, remove any nori, cover with a damp paper towel, and microwave just until the rice is soft and warm. Add nori after reheating to restore its crispness, or grill the Onigiri lightly with a touch of soy sauce for yaki onigiri, enjoying irresistible crispy edges.
FAQs
-
Can I use any kind of rice for Onigiri (Japanese Rice Balls)?
For authentic, stick-together texture, Japanese short-grain white rice is a must. Long-grain or medium-grain rice won’t hold shape and will fall apart—if needed, try sushi rice as a substitute, but avoid jasmine or basmati.
-
What are the best fillings for Onigiri?
Some crowd-pleasers include salted salmon, tuna mayo, umeboshi, okaka, spicy mentaiko, and shio kombu, but feel free to get creative with leftovers like cooked chicken, pickled veggies, or even cheese for a fusion twist.
-
How do I prevent the rice from sticking to my hands?
Keep a small bowl of water nearby and dip your hands frequently while shaping the onigiri. A light sprinkle of kosher salt on your palms also helps with flavor and keeps stickiness in check.
-
How far ahead can I make Onigiri (Japanese Rice Balls)?
For the very best texture, enjoy them on the day you make them. However, they’ll keep for up to a full day at cool room temperature, and you can extend their life by freezing (just add nori later).
Final Thoughts
I hope you’re as excited as I am to roll up your sleeves and try making Onigiri (Japanese Rice Balls) at home! There’s really nothing like those warm, tender bites of rice paired with your favorite fillings—you might just find your new comfort food obsession. Happy shaping and snacking, friends!
Print
Onigiri (Japanese Rice Balls) Recipe
- Prep Time: 30 minutes
- Cook Time: 30 minutes
- Total Time: 1 hour
- Yield: 9 onigiri (13 with a mold)
- Category: Side Dish
- Method: Rice Cooker, Oven
- Cuisine: Japanese
- Diet: Vegetarian
Description
Learn how to make delicious Japanese onigiri, or rice balls, with various traditional fillings like salted salmon, okaka, tuna mayo, and more. These versatile snacks are perfect for bento boxes or as a quick, tasty treat.
Ingredients
For the Steamed Rice
- 2 1/4 cups uncooked Japanese short-grain white rice (3 rice cooker cups; 540 ml)
- 2 1/2 cups water (600 ml)
For the Onigiri
- Diamond Crystal kosher salt
- 3 sheets nori (dried laver seaweed)
For the Japanese Salted Salmon Filling (quick version)
- 1-2 fillet salmon
- Diamond Crystal kosher salt
For the Okaka Filling
- 1 packet katsuobushi (dried bonito flakes) (one packet is typically 3 g or 5 g)
- 1 Tbsp soy sauce
For the Tuna Mayo Filling
- 1 (5-ounce) can albacore tuna (preferably packed in olive oil)
- 2 Tbsp Japanese Kewpie mayonnaise
- 1/2 Tbsp soy sauce
For the Other Fillings
- 2 umeboshi (Japanese pickled plum)
- 2 sacs spicy salted pollock roe or cod roe (karashi mentaiko)
- shio kombu (prepared)
- furikake (rice seasoning)
Instructions
- To Prepare the Steamed Rice
Step by step instructions for preparing the steamed rice.
- To Prepare the Onigiri Fillings
Detailed steps for preparing the various onigiri fillings.
- To Shape the Onigiri
Instructions on shaping the onigiri using different methods.
- To Coat with the Furikake
Coating the onigiri with furikake for added flavor.
- To Wrap with the Nori and Serve
Final steps for wrapping the onigiri with nori and serving.
- To Store
Tips on storing the onigiri for later consumption.
Notes
- Onigiri can be customized with any preferred fillings.
- Freshly cooked rice works best for shaping onigiri.
- Enjoy onigiri warm or at room temperature.
Nutrition
- Serving Size: 1 onigiri
- Calories: Approximately 200 calories
- Sugar: Varies based on fillings
- Sodium: Varies based on fillings
- Fat: Varies based on fillings
- Saturated Fat: Varies based on fillings
- Unsaturated Fat: Varies based on fillings
- Trans Fat: Varies based on fillings
- Carbohydrates: Varies based on fillings
- Fiber: Varies based on fillings
- Protein: Varies based on fillings
- Cholesterol: Varies based on fillings


