

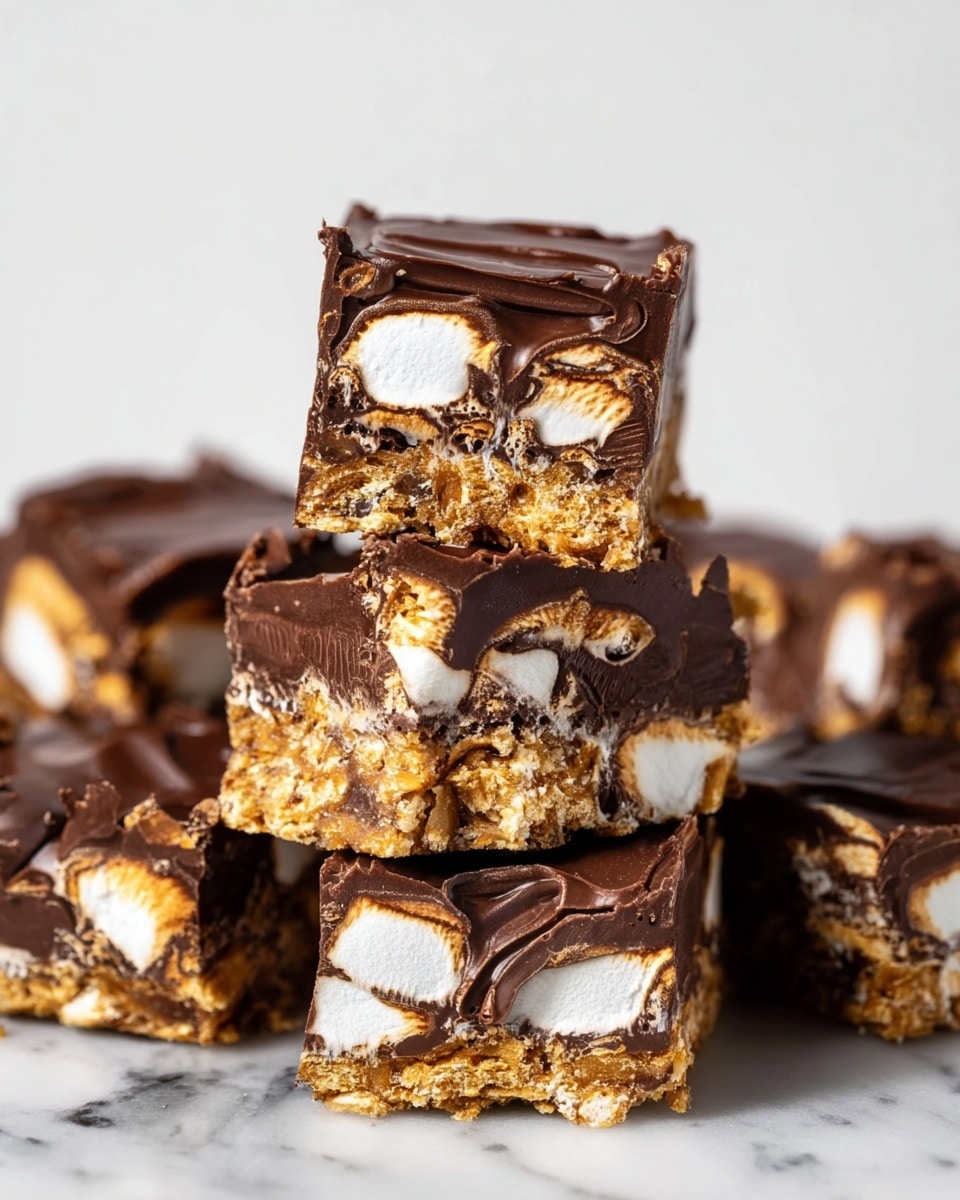
If you’re craving that classic campfire treat without ever lighting a match, this No Bake S’mores Bars Recipe is your new best friend. Seriously, I absolutely love how this recipe captures all the gooey, chocolatey goodness of s’mores in a super easy bar you can whip up in minutes. Whether you’re in a rush or just want a mess-free dessert, you’re going to be so glad you tried this.
Why You’ll Love This Recipe
- No Oven Required: Perfect for hot days or when you just want to keep things simple without heating up the kitchen.
- Quick & Easy: You only need about 15 minutes to prep, then let the fridge do the rest of the work.
- Kid-Friendly Fun: Great project to make with kids, who love stirring and pressing the mixture.
- Classic Campfire Flavor: All the chocolate, marshmallow, and graham cracker goodness in a no-fuss bar.

Ingredients You’ll Need
These ingredients come together to create that nostalgic s’mores flavor, but in an easy bar form you can make anytime. I recommend using good quality chocolate chips, and personally, I like semi-sweet to balance the sweetness of the marshmallows and cereal.
- Chocolate chips: Semi-sweet or milk work well here; the melting chocolate ties all the flavors together.
- Crisco shortening or vegetable oil: This helps the chocolate melt smoothly and keeps the bars from being too thick or hard.
- Mini marshmallows: You want lots of gooeyness, so don’t skimp—they soften beautifully when mixed in.
- Golden Grahams cereal: Their crunch is key, mimicking graham crackers in classic s’mores.
Variations
I love that this No Bake S’mores Bars Recipe is so adaptable. You can tweak it to suit your pantry, dietary needs, or just to have a little fun with flavors.
- Peanut Butter Swirl: Stir in a few spoonfuls of peanut butter to the melted chocolate for a rich, nutty twist—my family goes crazy for this version.
- Gluten-Free: Swap Golden Grahams for your favorite gluten-free graham cereal or crushed gluten-free crackers.
- Dark Chocolate Swap: If you love a deeper chocolate flavor, use dark chocolate chips instead of semi-sweet.
- Extra Crunch: Add chopped nuts like pecans or almonds for a little added texture.
How to Make No Bake S’mores Bars Recipe
Step 1: Prep Your Pan for Easy Removal
Start by lining an 8×8-inch pan with foil and give it a light spray of cooking spray. This step is a lifesaver—I discovered that without foil, the bars stuck like crazy and made cutting a nightmare. With the foil, you just lift them right out when they’re set.
Step 2: Melt the Chocolate Smoothly
Place your chocolate chips and shortening or oil in a microwave-safe bowl. Heat in 30-second intervals, stirring really well after each, until you have a smooth, glossy chocolate mixture. This usually takes about 1 to 2 minutes, but power and microwave strength vary, so don’t rush. Stirring after every interval is key—trust me, you don’t want scorched chocolate.
Step 3: Mix in the Marshmallows and Cereal
Once your chocolate is ready, stir in the Golden Grahams and mini marshmallows. The marshmallows might start softening a bit, which is exactly what you want for that gooey texture. Take your time folding in everything evenly so you get that perfect balance of crunchy and melty in every bite.
Step 4: Press and Chill Until Set
Pour the mixture into the prepared pan and press it down firmly to compact it—brace yourself, this is a little messy, but totally worth it. Pop it in the fridge for at least 2 hours to set. Once chilled, use the foil to lift the entire block out and slice into squares.
Pro Tips for Making No Bake S’mores Bars Recipe
- Use Foil for Easy Removal: Lining the pan with foil makes slicing and cleanup so much easier, a trick I always use now.
- Don’t Skip the Oil or Shortening: It keeps the melted chocolate silky and prevents it from hardening too much.
- Press Firmly, but Gently: Compacting the bars helps them hold together but pressing too hard can crush the cereal and lose that crunch.
- Store Chilled: They melt quickly at room temperature, so keep them refrigerated until you’re ready to enjoy.
How to Serve No Bake S’mores Bars Recipe
Garnishes
I like to sprinkle a few extra mini marshmallows or some crushed graham cracker crumbs on top just before serving—it adds a cute touch and a little extra texture. Sometimes, a drizzle of melted chocolate over the bars amps up the chocolatey feel, especially if you’re serving these for a crowd.
Side Dishes
Serve these bars alongside a cup of hot chocolate or a cold glass of milk for an ultimate cozy combo. I’ve also paired them with fresh berries to cut through the sweetness and add a refreshing surprise.
Creative Ways to Present
For special occasions, I love arranging these bars on a platter with colorful napkins and adding little wooden skewers for people to grab. They’re also a huge hit in lunchboxes or picnic baskets because they’re perfectly portable and don’t crumble easily.
Make Ahead and Storage
Storing Leftovers
They keep beautifully in an airtight container in the fridge for about a week. I try to keep them tightly covered to avoid the marshmallows getting too firm or drying out—that way they stay nice and soft.
Freezing
If you want to stash some for later, just freeze the bars in a sealed container or freezer bag. I usually slice them first, wrap each bar individually in parchment paper, then freeze. They thaw quickly on the counter or in the fridge.
Reheating
Since these bars are best enjoyed slightly melty, I like to let them sit at room temperature for about 10 minutes before eating straight from the fridge. If you prefer them warmer, a quick 10-second zap in the microwave does the trick—just don’t overdo it or the marshmallows might melt too much.
FAQs
-
Can I use different cereal instead of Golden Grahams?
Absolutely! While Golden Grahams are classic because of their graham cracker flavor and crunch, you can substitute with other crunchy cereals like honey grahams, crispy rice, or even crushed gluten-free crackers if needed. Just keep in mind the texture and flavor will vary slightly.
-
How long do No Bake S’mores Bars last?
Stored in an airtight container in the refrigerator, these bars will stay fresh for up to one week. They tend to soften and taste best after a few minutes at room temperature before serving.
-
Can I make these bars vegan?
Yes! Use dairy-free chocolate chips and vegan marshmallows, and double-check the cereal ingredients to make sure everything fits your dietary needs. The result is just as tasty and satisfying.
-
Do I have to refrigerate the bars?
It’s best to refrigerate the bars to help them set and maintain their shape, as the chocolate and marshmallow can get quite soft at room temperature. Just take them out a few minutes before serving to let them soften slightly.
Final Thoughts
When I first tried this No Bake S’mores Bars Recipe, I was amazed at how the flavors instantly transported me back to summer nights around the campfire—minus the smoke and mess! It’s such a simple, quick treat that delivers that classic s’mores experience any time of year. I’m confident you’ll find it becomes a go-to favorite, whether you want a last-minute dessert or an easy snack that feels like a little celebration. Go ahead, give it a try—I promise your sweet tooth will thank you!
Print
No Bake S’mores Bars Recipe
- Prep Time: 15 minutes
- Cook Time: 0 minutes
- Total Time: 2 hours 15 minutes
- Yield: 25 squares
- Category: Dessert
- Method: No-Cook
- Cuisine: American
Description
These No Bake S’mores Bars are a quick and delicious treat combining melted chocolate, gooey marshmallows, and crunchy Golden Grahams cereal. Perfect for an easy dessert or snack, they require no oven and come together in just minutes before chilling to set into chewy, sweet bars that taste like classic s’mores.
Ingredients
Chocolate Mixture
- 1 12 ounce bag chocolate chips, semi-sweet or milk
- 1 tablespoon Crisco shortening or vegetable oil
Mix-ins
- 2 cups mini marshmallows
- 2 cups Golden Grahams cereal
Instructions
- Prepare the Pan: Line an 8×8 inch pan with foil and spray it with cooking spray to ensure easy removal of the bars once set.
- Melt Chocolate: Place the chocolate chips and shortening or oil in a large microwave-safe bowl. Heat in 30-second increments, stirring well after each, until the chocolate is fully melted and smooth. This usually takes about 1 to 2 minutes in an 1100W microwave.
- Mix Ingredients: Stir in the Golden Grahams cereal and mini marshmallows to the melted chocolate until everything is evenly coated.
- Shape Bars: Pour the mixture into the prepared pan. Press down firmly to compact the mixture, which may get a little messy but helps the bars hold together.
- Chill: Place the pan in the refrigerator for at least 2 hours to let the bars set completely.
- Serve: Once set, slice into squares. These bars melt like candy, so keep them refrigerated if not eating immediately. They taste best after sitting at room temperature for a few minutes. Store leftovers in an airtight container for up to one week.
Notes
- For easier removal, make sure to line the pan with foil and use cooking spray.
- Pressing the bars firmly helps prevent crumbling.
- Keep bars refrigerated to maintain their shape since they melt quickly at room temperature.
- These bars are best eaten within a week for optimal freshness.
Nutrition
- Serving Size: 1 square
- Calories: 150
- Sugar: 14g
- Sodium: 50mg
- Fat: 8g
- Saturated Fat: 5g
- Unsaturated Fat: 2.5g
- Trans Fat: 0g
- Carbohydrates: 20g
- Fiber: 1g
- Protein: 1g
- Cholesterol: 0mg


