

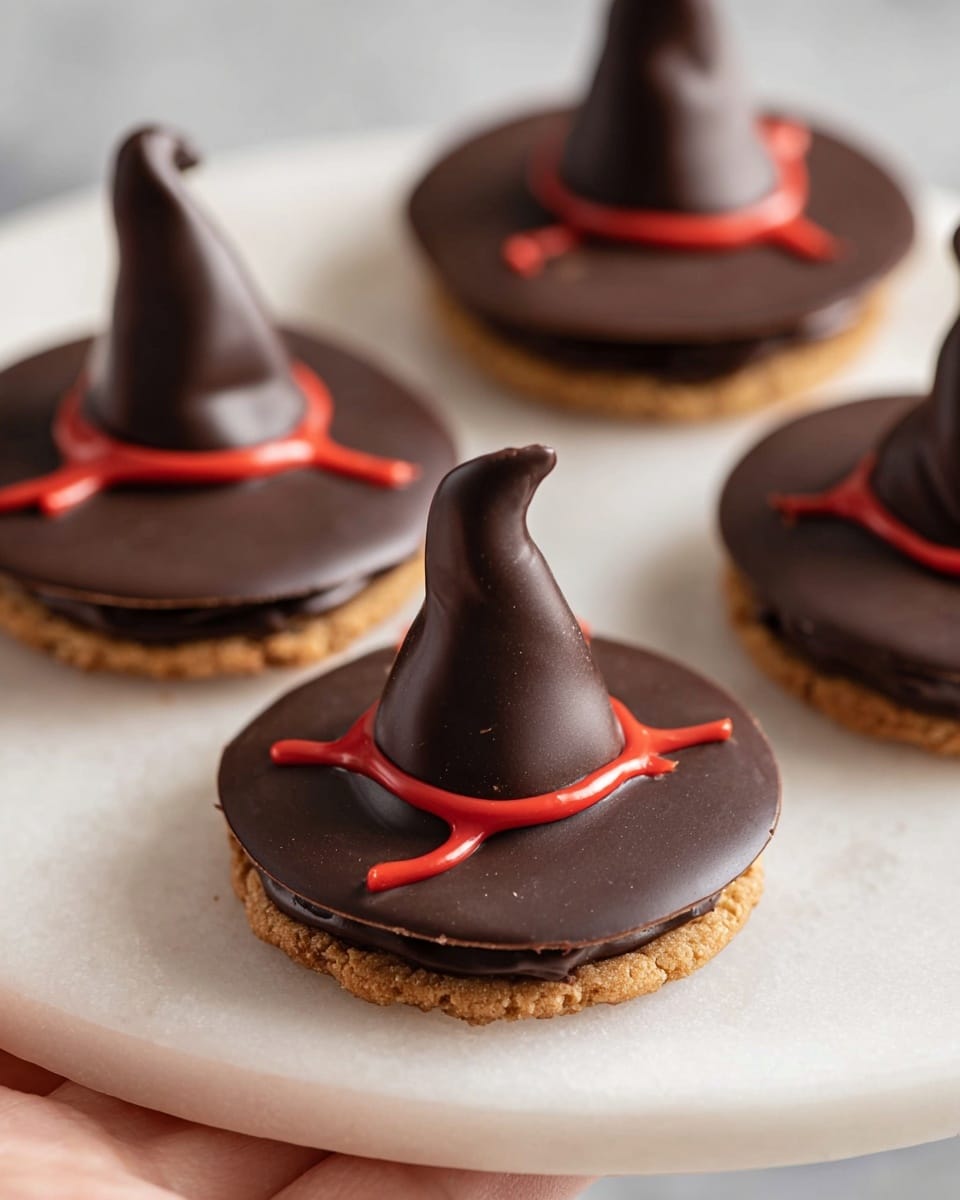
If you’re looking for a Halloween treat that’s as fun to make as it is to eat, you absolutely have to try my Witches’ Hats Cookies Recipe. These adorable little treats combine the crunch of classic striped cookies with the chocolatey punch of Hershey’s Kisses, all tied together with bright, colorful icing. I’ve made these with friends, family, and my kids, and they never fail to bring smiles and impress guests — not to mention they’re super easy, even if baking isn’t your usual thing. Keep reading, and I’ll walk you through exactly how to whip them up so you get perfect witchy hats every time!
Why You’ll Love This Recipe
- Simple to Assemble: No baking required – just a few easy steps to a festive cookie.
- Kid-Friendly Fun: Great for getting little hands involved in Halloween kitchen prep.
- Customizable Colors: Use any icing color to match your party theme or your kid’s favorite shades.
- Crowd-Pleasing Taste: The combination of fudge stripe cookies and chocolate kisses makes these irresistible.

Ingredients You’ll Need
When it comes to the ingredients for this Witches’ Hats Cookies Recipe, simplicity is the best part. Each component brings the perfect texture or flavor that makes these treats stand out—plus, sourcing them is a breeze at any grocery store.
- Fudge Stripe Cookies: I prefer these because their stripes add a cool visual texture, but you can swap in Oreos if needed.
- Hershey’s Kisses: The classic choice for the hat’s peak — chocolatey and perfectly shaped for this purpose.
- Red Icing (or any color): I love using red for a spooky ribbon effect, but feel free to get creative with purple, green, or orange.
Variations
One of the best things about this Witches’ Hats Cookies Recipe is how easy it is to make it your own. Over time, I’ve tried a few variations that keep things fresh and suit different tastes or holidays.
- Mini Witches’ Hats: I once made these using mini fudge stripe cookies and tiny kisses for bite-sized treats — perfect for classroom parties!
- Dairy-Free Option: Swap Hershey’s Kisses for dairy-free chocolate drops and use vegan icing for allergy-friendly magic.
- Spooky Colors: Changing up the icing color can instantly transform the mood — try black or purple for a truly witchy vibe.
- Festive Sprinkles: Adding orange or black sprinkles on the icing ribbon was a hit at my last Halloween gathering.
How to Make Witches’ Hats Cookies Recipe
Step 1: Prep Your Base Cookies
Start by turning your fudge stripe cookies upside down on a cookie sheet or clean surface — this gives you a flat base to stick the kiss on. I learned that flipping them ensures the chocolate “hat tip” stays snug and looks great.
Step 2: Attach the Hershey’s Kisses
Unwrap each Hershey’s Kiss, then pipe a small dab of icing on the bottom of the kiss. Press it firmly onto the center of each cookie base. This little “glue” step is key — when I first tried just placing the kisses without icing, they slid right off, so don’t skip that!
Step 3: Decorate with a Ribbon
Use the icing to pipe a ribbon around the base of the Kiss. Go wild here — I usually add a little swirl or zigzag. Sprinkles are a fun add-on if you want extra flair! My kids love choosing the sprinkle colors.
Step 4: Let Them Chill
Pop your finished witches’ hats into the fridge for at least 10 minutes. This chill time lets the icing firm up and hold everything in place, so you don’t end up with chocolate hats tipping over at the party.
Pro Tips for Making Witches’ Hats Cookies Recipe
- Cookie Base Matters: Choose fudge stripe cookies or Oreos with a flat bottom for the best stability.
- Icing Consistency: Make sure your icing isn’t too runny — it needs to hold the kisses firmly in place without sliding off.
- Use a Piping Bag: I prefer a piping bag with a small round tip to create neat ribbons around the hats; it’s less messy and looks professional.
- Storage Tips: Keep these in an airtight container once chilled to maintain their crunch and prevent the chocolate from melting.
How to Serve Witches’ Hats Cookies Recipe
Garnishes
I love adding a little edible glitter or Halloween-themed sprinkles on top of the icing ribbon for an extra pop of festive flair. Sometimes I tuck these cookies into small paper cupcake liners with fun prints — it makes them look like mini presents on the table.
Side Dishes
These cookies shine as a standalone treat, but pairing them with apple cider or a pumpkin spice latte really rounds out your spooky snack spread. I also like having a bowl of mixed nuts or candy corn nearby for guests who want something savory or extra sweet.
Creative Ways to Present
For Halloween parties, I’ve arranged the Witches’ Hats Cookies on a black platter with artificial cobwebs around the edges, giving it that spooky vibe. Another fun trick is to serve them stacked like a pile of hats using a tiered dessert stand — it gets people talking!
Make Ahead and Storage
Storing Leftovers
I always keep leftover witches’ hats in an airtight container at room temperature if I’m serving them within a couple of days. They stay fresh and crunchy that way. Just be sure to keep them away from heat so the kisses don’t get melty.
Freezing
If you want to prep in advance, you can freeze the assembled cookies in a single layer on a baking sheet, then transfer them to a freezer-safe container. When you’re ready to snack, just thaw at room temperature for about 30 minutes. The texture stays surprisingly good!
Reheating
These don’t really need reheating, but if your kisses get a bit hard from chilling, letting them sit on the counter for a few minutes will soften the chocolate nicely without changing the cookie texture.
FAQs
-
Can I use other types of cookies instead of fudge stripe cookies?
Absolutely! Oreos are a popular alternative since their flat surfaces make for an easy base. Just pick a cookie that’s sturdy enough to hold the chocolate kiss without crumbling.
-
What if I don’t have red icing?
No problem at all! Any colored icing works perfectly and lets you customize the look. You can use store-bought tubes or whip up a quick homemade icing with powdered sugar and food coloring.
-
How long do these Witches’ Hats Cookies last?
Stored in an airtight container at room temperature, they stay fresh for about a week. Just keep them cool to prevent the chocolate from melting or the icing from getting sticky.
-
Can I make these gluten-free?
You can! Grab your favorite gluten-free chocolate sandwich cookies and use gluten-free icing to keep them safe for those with gluten sensitivities. The assembly stays just as simple.
Final Thoughts
This Witches’ Hats Cookies Recipe is one of those festive treats that’s as charming as it is delicious. I love how it brings together simple, store-bought ingredients and turns them into something special and magical with just a little icing and creativity. Whether you’re making them with kids or whipping up a last-minute party snack, these cookies never disappoint. I hope you give it a whirl this Halloween — I guarantee your friends and family will ask you for the recipe!
Print
Witches’ Hats Cookies Recipe
- Prep Time: 20 minutes
- Cook Time: 0 minutes
- Total Time: 20 minutes
- Yield: 32 cookies
- Category: Dessert
- Method: No-Cook
- Cuisine: American
Description
These Witches’ Hats are a festive and fun Halloween treat, combining crispy fudge stripe cookies with luscious Hershey’s Kisses and colorful icing to create adorable edible hats. Perfect for parties or a spooky snack, they are easy to assemble and delightfully delicious.
Ingredients
Cookie Base
- 1 package Fudge Stripe Cookies (or Oreos)
Topping
- 32 Hershey’s Kisses
- Red icing (or any color of your choice)
Instructions
- Arrange the Cookies: Turn the fudge stripe cookies upside down on a cookie sheet to prepare the base for the witches’ hats.
- Prepare the Kisses: Unwrap all 32 Hershey’s Kisses and get ready to attach them to the cookies.
- Attach the Kisses: Pipe a small amount of icing onto the bottom of each Hershey’s Kiss, then press each kiss firmly onto the center of an upside down cookie.
- Add Decoration: Use the icing to pipe a ribbon around the base of each kiss on the cookie. Feel free to add sprinkles or other decorations to enhance the look.
- Chill to Set: Place the assembled witches’ hats in the refrigerator to chill until the frosting sets and the kisses are firmly attached.
Notes
- You can use any color of frosting to customize your witches’ hats.
- Oreos make a great alternative for the cookie base.
- Store the witches’ hats in an airtight container to keep them fresh for up to one week.
Nutrition
- Serving Size: 1 cookie
- Calories: 90
- Sugar: 8g
- Sodium: 65mg
- Fat: 4g
- Saturated Fat: 2.5g
- Unsaturated Fat: 1g
- Trans Fat: 0g
- Carbohydrates: 12g
- Fiber: 0.5g
- Protein: 1g
- Cholesterol: 5mg

