

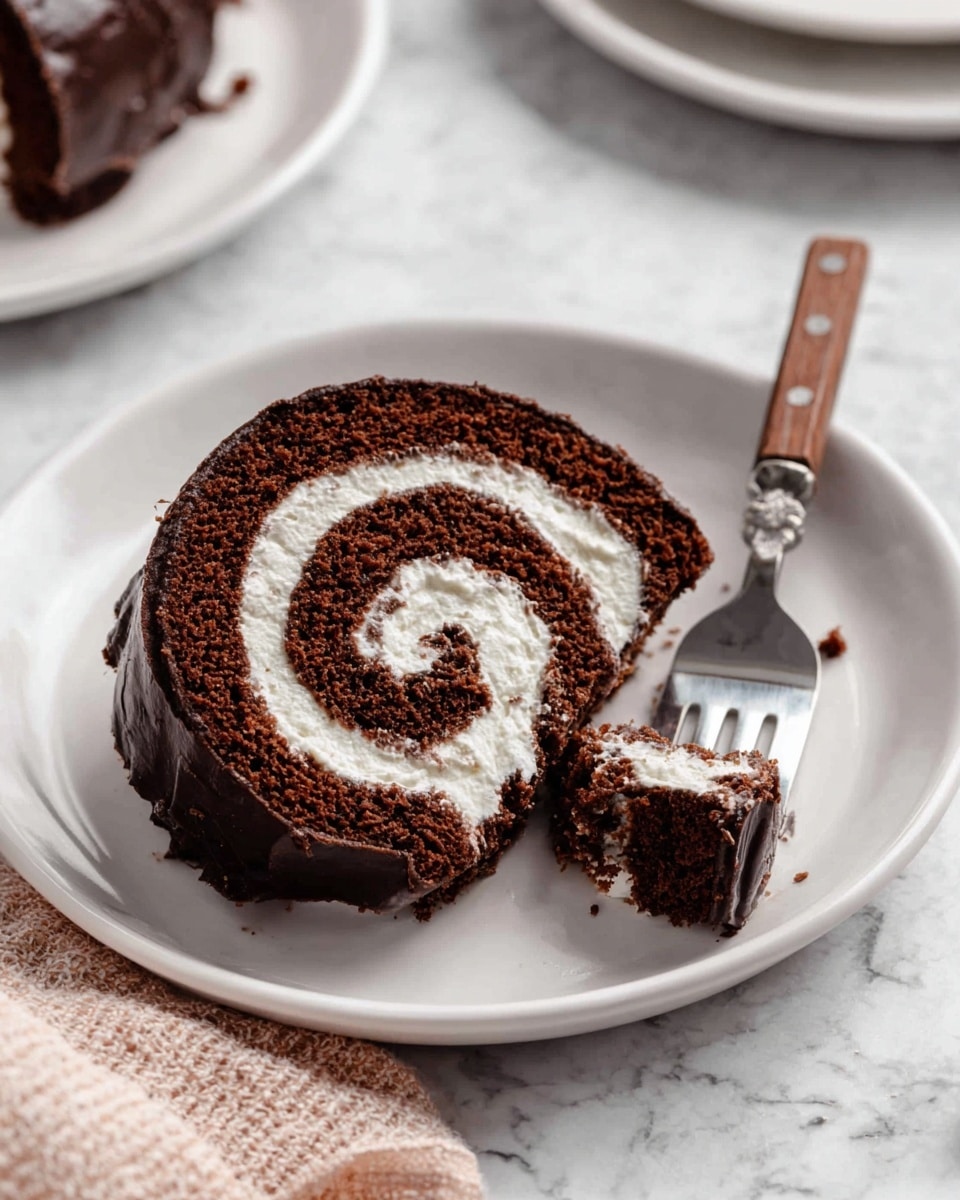
If you’re craving a show-stopping dessert that’s light, chocolatey, and incredibly satisfying, then you’re in for a treat with this Chocolate Swiss Roll Cake Recipe. Trust me, this cake roll has become one of my absolute favorites — it’s soft, fluffy, and the whipped cream filling is just heavenly. Plus, the glossy chocolate ganache on top? Chef’s kiss. Stick around because I’m going to walk you through every detail so your cake turns out perfect every single time.
Why You’ll Love This Recipe
- Light yet Rich Texture: The cake is incredibly fluffy, thanks to separating eggs and folding techniques, yet still deeply chocolatey and moist.
- Perfect for Any Occasion: Whether it’s a birthday, holiday, or just a Friday night treat, this cake impresses without stress.
- Customizable Filling & Toppings: From classic whipped cream to marshmallow creme, and a luscious ganache, you can tailor it to your taste.
- Tested & Easy to Follow: I’ve perfected this recipe through multiple trials to ensure you’ll have success on your first try.

Ingredients You’ll Need
This recipe uses simple pantry staples that blend beautifully—flour and cocoa powder for that rich chocolate flavor, eggs for structure and lightness, and a touch of espresso powder to really deepen that chocolatey goodness. Pro tip: opting for cake flour will make the cake super tender, but all-purpose works just fine if that’s what you have on hand.
- Cake Flour or All-Purpose Flour: Provides the foundation, cake flour lends a softer crumb, but all-purpose is perfectly fine too.
- Cocoa Powder: Unsweetened and either natural or Dutch-process works; it’s the star for that deep chocolate taste.
- Baking Powder: Gives the cake its necessary rise and keep it light.
- Salt: Enhances all the flavors; never skip it!
- Eggs: Make sure they’re at room temperature for best volume when you whip the whites.
- Granulated Sugar: Divided to help stabilize the egg whites and sweeten the batter and whipped cream.
- Vegetable Oil: Keeps the cake moist without weighing it down.
- Buttermilk or Whole Milk: Adds a tender touch and richness.
- Vanilla Extract: Picks up the chocolate with a warm aroma.
- Espresso Powder (Optional): A secret weapon to intensify the chocolate flavor without any coffee taste.
- Heavy Cream: Critical for the whipped cream and ganache topping.
- Marshmallow Creme (“Fluff”) (Optional): Swirling this into the whipped cream adds a subtle marshmallow magic.
- Semi-Sweet Chocolate: For the shiny ganache that finishes the cake beautifully.
- Light Corn Syrup (Optional): Helps achieve that gorgeous glossy ganache finish.
Variations
One of the best things about this Chocolate Swiss Roll Cake Recipe is how easy it is to tweak. I often swap in some flavors or try out mini versions depending on the occasion — and you should too! It’s all about making the recipe work for your taste and schedule.
- Mini Cake Rolls: I chopped the recipe into smaller rolls for parties — easier to serve and everyone loves the single-serving sizes.
- Dairy-Free Version: Use coconut cream for whipping and a dairy-free chocolate for ganache; it’s just as delicious and inclusive.
- Flavor Boosts: Swap vanilla for almond extract in the whipped cream or add orange zest to the batter for a citrus chocolate twist.
- Marshmallow Cream Filling: Mix in marshmallow creme into the whipped cream for a subtle, sweet fluffiness that my family obsessed over.
How to Make Chocolate Swiss Roll Cake Recipe
Step 1: Prep for Perfection
Before anything, preheat your oven to 350°F (177°C). Grease a 12×17-inch baking pan thoroughly and line it with parchment paper — both the pan and the paper get a light spray or butter to guarantee your cake pops out without sticking. This step is crucial and saves you from frustrating tears later.
Step 2: Mix Your Dry Ingredients
Sift together the cake flour, cocoa powder, baking powder, and salt with a fine mesh sieve. Sifting is a small extra effort that pays off big—no clumps and a beautifully smooth batter.
Step 3: Whip Egg Whites to Fluffy Peaks
Using your mixer on high, beat the egg whites with 1/4 cup of the sugar until you get foamy medium peaks—think slightly soft peaks that hold their shape but still have a gentle droop. Beating too far to stiff peaks can dry out your batter, so watch closely here.
Step 4: Whisk Yolks with Sugar & Other Wet Ingredients
Without washing the bowl, add your egg yolks and the remaining sugar, then beat on high for about a minute. Next, stir in the vegetable oil, milk, vanilla, and if you’re using it, espresso powder. The mix will be thin and slightly bubbly at the top — that’s perfect.
Step 5: Fold & Combine Batter Gently
Carefully fold half the whipped egg whites into the yolk mixture on low speed for 10 seconds, then repeat with the rest. Now, sift in your dry ingredients and gently fold them with a silicone spatula until just combined and fluffy—over-mixing will deflate your batter, so resist the urge to stir too vigorously.
Step 6: Bake & Roll While Warm
Spread the batter evenly into your prepared pan; it will be thin, so shimmy the pan to level it out. Bake for 12 to 14 minutes or until the top springs back lightly when touched. As soon as it’s out, loosen the edges with a knife, flip the cake onto a cocoa-dusted parchment paper or towel, peel off the original parchment, and gently roll the cake up while warm. Then let it cool, rolled, at room temperature for about 3 hours—it helps avoid cracking later.
Step 7: Whip Your Cream Filling
Whip the cold heavy cream with sugar and vanilla until medium to stiff peaks form, then fold in marshmallow creme if you want that extra luxury. This filling is light yet velvety, making every bite melt in your mouth.
Step 8: Fill & Reroll
Slowly unroll your cooled cake, spread the whipped cream leaving a half-inch border, then carefully roll it back up—this time without the towel. Place on a wire rack set over a baking sheet to catch any ganache drips.
Step 9: Make & Pour Ganache
Heat your cream until just simmering, pour it over chopped chocolate (with optional corn syrup for shine), and let sit for a couple minutes. Stir gently until smooth and glossy, then pour over your cake roll. Let it chill at least 30 minutes before slicing so it sets beautifully.
Pro Tips for Making Chocolate Swiss Roll Cake Recipe
- Use Room Temperature Eggs: They whip better, giving a lighter cake with more volume.
- Don’t Skip the Parchment Paper Greasing: Even a well-greased pan can stick; greased parchment ensures your roll lifts perfectly without tears.
- Roll While Warm, Cool at Room Temp: Rolling the cake right out of the oven and letting it cool rolled prevents cracks and keeps that sponge springy.
- Avoid Over-baking: The cake should be springy and soft; overbaking dries it out and causes cracking when rolled.
How to Serve Chocolate Swiss Roll Cake Recipe
Garnishes
I love dusting a little extra cocoa powder or powdered sugar right before serving for that elegant touch. If I’m feeling fancy, I sprinkle toasted almonds or chocolate shavings on top of the ganache — it adds texture and that wow factor.
Side Dishes
Pairing this chocolate roll with fresh berries really balances out the richness. A scoop of vanilla ice cream or a dollop of raspberry sauce on the side is also a crowd-pleaser and makes it feel like a restaurant-worthy dessert.
Creative Ways to Present
For holidays, I’ve wrapped the roll in edible gold leaf or piped whipped cream rosettes along the edges. Mini chocolate curls on top or a drizzle of salted caramel sauce also bring a level of artistry that really impresses guests.
Make Ahead and Storage
Storing Leftovers
I always keep leftovers wrapped tightly in plastic wrap and stored in the fridge. It stays fresh and moist for up to 3 days, and honestly, I’ve found it tastes even better after sitting overnight because all the flavors meld beautifully.
Freezing
If I’m prepping this dessert ahead of time, I assemble the cake roll with whipped cream, wrap it tightly, and freeze it before adding the ganache. It freezes really well for up to 2-3 months. When ready, thaw overnight in the fridge, then add the ganache topping fresh before serving.
Reheating
This cake is best enjoyed cold, but if you want it just slightly less chilled, I let it sit at room temp for 15-20 minutes before slicing. The ganache softens nicely, and the filling is just the right temperature for a melt-in-your-mouth experience.
FAQs
-
Can I make the Chocolate Swiss Roll Cake Recipe dairy-free?
Absolutely! Replace the heavy cream with coconut cream for both the whipped filling and ganache, and use a dairy-free chocolate bar for the ganache topping. The texture and flavor might be slightly different but still delicious.
-
What’s the best way to prevent the cake from cracking when rolling?
Rolling the cake while it’s still warm and using a cocoa-dusted kitchen towel or parchment paper helps keep it pliable. Rolling it tightly but gently and letting it cool completely in the rolled shape prevents cracks from forming.
-
Can I use all-purpose flour instead of cake flour?
Yes! This recipe works well with either flour type. Cake flour gives a softer crumb, but all-purpose flour does a great job too. Just be sure to spoon and level your flour for accuracy.
-
Is espresso powder necessary?
It’s optional but highly recommended—it deepens the chocolate flavor without adding a coffee taste. If you don’t have it, you can skip it entirely and still have a fantastic cake.
-
How should I slice the cake roll for best presentation?
Use a sharp serrated knife and wipe it clean between slices. Chilling the cake for at least 30 minutes helps the ganache firm up and makes slicing neater and easier.
Final Thoughts
I absolutely love how this Chocolate Swiss Roll Cake Recipe brings such joy at my table — it feels elegant but is surprisingly manageable even for home bakers like us. When I first made this, I was amazed by how fluffy and rich it was without being heavy. I hope you’ll give it a try, maybe even with your own spin, and discover how satisfying making and sharing this classic cake can be. I’m cheering you on from my kitchen to yours — happy baking!
Print
Chocolate Swiss Roll Cake Recipe
- Prep Time: 1 hour
- Cook Time: 12-14 minutes
- Total Time: 3 hours 40 minutes
- Yield: 10-12 slices
- Category: Dessert
- Method: Baking
- Cuisine: American
- Diet: Vegetarian
Description
This classic Chocolate Swiss Roll Cake features a light and fluffy chocolate sponge rolled with a creamy vanilla whipped filling and topped with a smooth chocolate ganache. Perfectly balanced with rich cocoa and a hint of espresso powder to deepen the flavor, this elegant dessert is ideal for special occasions or indulgent everyday treats.
Ingredients
Cake
- 3/4 cup (95g) cake flour or all purpose flour (spooned & leveled)
- 1/4 cup (21g) unsweetened natural or Dutch-process cocoa powder, plus more for rolling
- 1 teaspoon baking powder
- 1/2 teaspoon salt
- 4 large eggs, at room temperature and separated
- 3/4 cup (150g) granulated sugar, divided
- 1/4 cup (60ml) vegetable oil
- 1/4 cup (60ml) buttermilk or whole milk
- 1 and 1/2 teaspoons pure vanilla extract
- 1 teaspoon espresso powder (optional)
Vanilla Whipped Cream
- 1 cup (240ml) cold heavy cream or heavy whipping cream
- 3 Tablespoons (38g) granulated sugar or confectioners’ sugar
- 1 teaspoon pure vanilla extract
- Optional: 2 Tablespoons marshmallow creme (“Fluff”)
Chocolate Topping (Ganache)
- 1/2 cup (120ml) heavy cream or heavy whipping cream
- One 4 ounce bar (113g) semi-sweet chocolate, finely chopped
- Optional for glossy shine: 1 teaspoon light corn syrup
Instructions
- Preheat and Prepare Pan: Preheat oven to 350°F (177°C). Grease a 12×17-inch baking pan thoroughly with nonstick spray or butter, then line with parchment paper. Spray or grease the parchment for extra nonstick protection to ensure easy release of the cake later.
- Sift Dry Ingredients: Using a fine mesh sieve, sift together the cake flour, cocoa powder, baking powder, and salt. Set aside.
- Whip Egg Whites: Beat the egg whites with 1/4 cup (50g) granulated sugar on high speed using a hand or stand mixer with whisk attachment until medium peaks form, about 4–5 minutes. Transfer to another bowl.
- Mix Egg Yolks and Wet Ingredients: In the same bowl, whisk egg yolks with the remaining sugar on high speed for 1 minute. Add vegetable oil, milk, vanilla extract, and espresso powder if using. Beat on high speed for 2 minutes until thin and slightly bubbly on top.
- Combine Egg Whites and Yolks: Gently fold half the whipped egg whites into the egg yolk mixture on low speed for 10 seconds to lighten it. Repeat with remaining egg whites, folding carefully to retain airiness.
- Fold in Dry Ingredients: Sift the flour mixture over the batter and fold it in gently with a silicone spatula until just combined. The batter should remain light and fluffy; avoid overmixing.
- Bake the Cake: Spread the batter evenly in the prepared pan in a thin layer. Smooth the surface by gently shimmying the pan. Bake for 12–14 minutes or until the cake springs back lightly when touched. Do not overbake.
- Prepare to Roll Cake: While baking, lay a piece of parchment paper or a kitchen/tea towel dusted with 2 tablespoons cocoa powder on the counter. Immediately after removing cake from oven, loosen edges with a knife and invert onto the prepared parchment/towel. Peel off the parchment the cake baked on. Starting from the narrow end, roll the warm cake tightly with the parchment/towel. Let it cool completely rolled up at room temperature for about 3 hours.
- Make Vanilla Whipped Cream: Whip cold heavy cream, sugar, and vanilla extract on medium-high speed until medium to stiff peaks form (2–3 minutes). Optionally beat in marshmallow creme for added flavor.
- Fill and Roll Cake: Carefully unroll the cooled cake and spread whipped cream evenly over the surface, leaving a 1/2-inch border. Gently re-roll the cake without the parchment/towel. Place on a wire rack over a baking sheet to catch drips.
- Prepare Chocolate Ganache: Place chopped chocolate and corn syrup (if using) in a bowl. Heat cream until it just begins to simmer, then pour over chocolate. Let sit for 2–3 minutes, then stir gently until smooth and glossy.
- Finish Cake: Pour the ganache evenly over the rolled cake. Spoon any dripped ganache back over the cake. Refrigerate for 30–60 minutes to set before slicing and serving.
- Storage: Cover leftover cake and store in the refrigerator for up to 3 days for best freshness.
Notes
- Make Ahead & Freezing: You can prepare the cake through the rolling step (step 7) and keep it rolled at room temperature for 1 day before continuing. Filled cake rolls freeze well (without ganache) up to 2–3 months; thaw overnight in the refrigerator before adding ganache.
- Special Equipment: Recommended tools include a 12×17-inch baking sheet, parchment paper, electric mixer, fine mesh sieve, silicone spatula, cooling rack, linen kitchen towel, and espresso powder.
- Mini Rolls: After spreading whipped cream, cut cake into four 6×8.5-inch rectangles. Roll each individually for mini chocolate rolls. Slice as desired.
- Pan Size: A 12×17-inch pan yields a thinner cake layer preferred for rolling. A 10×15-inch pan will produce a thicker cake, requiring a longer bake time of about 17–19 minutes and may be more prone to cracking.
- Flour Choice: Either cake flour or all-purpose flour works equally well. Use 95g strictly measured.
- Espresso Powder: Enhances chocolate flavor without adding coffee taste; optional to omit.
- Sugar in Whipped Cream: Both granulated and confectioners’ sugar work well for sweetening the whipped cream.
- Marshmallow Creme: Adds a soft marshmallow flavor to the whipped cream; completely optional.
- Recipe Updates: This version is updated for improved moisture, flavor, and crack prevention. For the original recipe, replace oil with butter, reduce cocoa and flour amounts, eliminate milk, and bake for 10 minutes.
Nutrition
- Serving Size: 1 slice (approx. 1/12 of cake)
- Calories: 280
- Sugar: 20g
- Sodium: 150mg
- Fat: 18g
- Saturated Fat: 10g
- Unsaturated Fat: 6g
- Trans Fat: 0g
- Carbohydrates: 26g
- Fiber: 2g
- Protein: 4g
- Cholesterol: 110mg


