

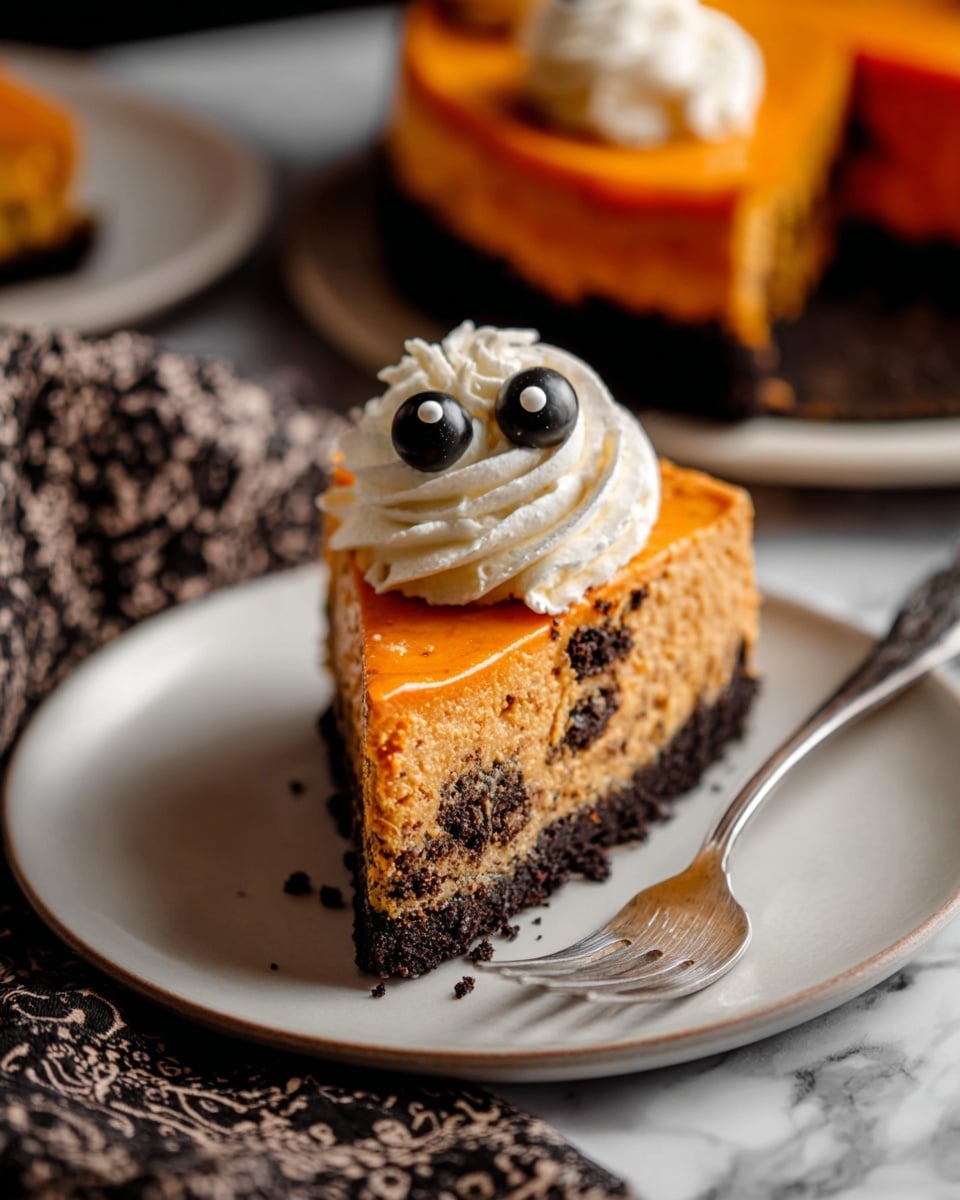
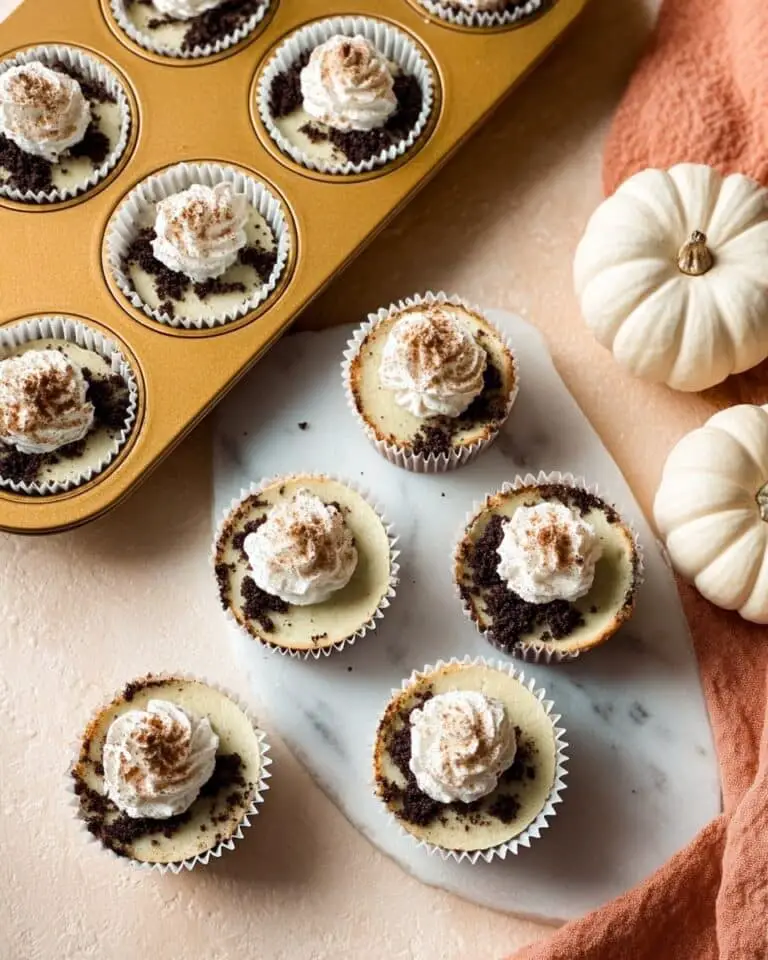
If you’re hunting for a show-stopping dessert that’s perfect for the spooky season, you’ve just hit the jackpot. I’m excited to share my fan-freaking-tastic Halloween Cookies & Cream Cheesecake with Whipped Ghosts Recipe, a creamy, dreamy cheesecake that balances the classic cookie-and-cream flavor with festive Halloween vibes topped off by cute little whipped cream ghosts. This recipe has quickly become a family favorite at my house, and I can’t wait for you to try it—it’s both approachable and seriously delicious.
Why You’ll Love This Recipe
- Rich Creamy Texture: The full-fat cream cheese and Greek yogurt blend gives you a silky smooth cheesecake every time.
- Perfect Oreo Crunch: An Oreo crust that holds its shape well but also melts in your mouth without feeling greasy.
- Festive Whipped Ghosts: The fun whipped cream ghosts with candy eyes add a whimsical Halloween touch that’s sure to wow guests.
- Easy to Make, Hard to Beat: With clear steps and pro tips, even if you’re new to cheesecake, you’ll nail this one!

Ingredients You’ll Need
Every ingredient in this Halloween Cookies & Cream Cheesecake with Whipped Ghosts Recipe was chosen to build the perfect balance of richness, texture, and flavor—and to bring those classic cookie-and-cream vibes to life. Make sure your cream cheese and eggs are at room temperature, which really helps your batter come out smooth and avoids lumps.
- Oreos: I like to use Halloween-themed DoubleStuf Oreos to up the festive factor, but you can use regular Oreos—just remember that removing some of the filling helps avoid a too-greasy crust.
- Unsalted butter: Melted and mixed with your Oreo crumbs, it creates that perfectly set crust without overpowering the flavor.
- Cream cheese: A full fat block is key for creamy, decadent cheesecake—no substitutions here!
- Granulated sugar: Sweetens the batter without masking the crisp cookie flavor.
- Heavy whipping cream: Adds moisture and richness, helping your filling stay silky smooth.
- Greek yogurt or sour cream: Provides a slight tang and creaminess, making the cheesecake feel lighter and more balanced.
- Vanilla extract: Boosts the flavor depth—don’t skip or skimp!
- Orange food coloring: Optional but so much fun to tint the cheesecake with a subtle Halloween tone; gel color works best.
- Large eggs and egg yolks: Room temperature eggs are crucial for mixing smoothly and avoiding cracks during baking.
- More chopped Oreos: Folded gently into the batter to keep chunks of cookie throughout each bite.
- Homemade whipped cream: Light and fluffy for creating the adorable whipped ghosts on top.
- Candy eyes: The finishing touch for ghost faces—choose your favorite brand or make your own!
Variations
I love that this Halloween Cookies & Cream Cheesecake with Whipped Ghosts Recipe is like a blank canvas—you can easily adapt it for your own taste or dietary needs. Over the years, I’ve played with a few tweaks depending on the crowd and occasion, and it always turns out delightful.
- Dairy-Free Version: I swapped cream cheese for a vegan cream cheese and used coconut cream instead of heavy cream—results? Still delicious but with a slightly different texture, perfect for allergen-friendly gatherings.
- Spooky Add-Ins: One year, I stirred in some finely chopped peppermint candies with the Oreos, giving it a fun twist that my family adored.
- Gluten-Free Crust: Crushed gluten-free chocolate sandwich cookies work just as well for the crust if you have gluten sensitivities.
- Extra Orange Tint: If you’re feeling bold, add a bit more orange gel coloring to really make that Halloween pop under those whipped ghosts.
How to Make Halloween Cookies & Cream Cheesecake with Whipped Ghosts Recipe
Step 1: Make the Oreo Crust and Prebake
Start by preheating your oven to 325ºF (162ºC). This will give you enough time to prep the crust and ensure the oven is ready. Crush your Oreos finely in a food processor—this is where I sometimes pause to nibble a bit of Oreo crumbs; can’t resist! Mixing the crumbs with melted butter is key here; the butter acts as a binder and makes sure the crust stays together but still has that perfect crumbly texture. Press this mix firmly along the bottom of a greased 9″ springform pan. I find pressing with a flat-bottomed glass works wonderfully for an even layer. Bake it for about 8-10 minutes until the crust is set. Let it cool while you work on the filling, so it doesn’t get soggy when the filling goes in.
Step 2: Whip Up Your Creamy Cookies & Cream Filling
With your cream cheese softened (this can’t be overstated—room temperature cream cheese makes all the difference!), beat it on medium-high speed until smooth—about 2 minutes. I’ve learned that rushing this part results in lumps, and those lumps are no fun. Add granulated sugar and mix again until combined. Now, reduce your mixer speed to low. Here’s a trick I swear by: keeping the mixer low prevents air bubbles, which can cause cracks. Add the heavy cream, Greek yogurt, vanilla, and a drop or two of orange gel coloring (or skip if you prefer). Mix everything gently until just combined. Then add eggs one at a time, mixing slowly after each addition. Remember, slow and steady wins the race here. Fold in your chopped Oreos carefully—you want chunks, not crumbs, so be gentle!
Step 3: The Water Bath and Baking Magic
Pour the batter over your cooled crust. Now comes the secret to a crack-free, ultra-smooth cheesecake: the water bath. Place your 9″ springform pan inside a slightly larger pan, then put that pan inside an even bigger one—a double or triple pan setup. Fill the outermost pan with hot water halfway up the sides of the middle pan. This steam bath keeps the oven environment moist and helps the cheesecake bake evenly without drying out. Pop it into the oven and bake for about 1 hour 35 minutes to 1 hour 50 minutes. You’ll know it’s done when the center jiggles just a little, about a 2-inch wide spot. If you like, use a digital thermometer to check the internal temp reaches 145ºF (63ºC). Turn off the oven and leave the cheesecake inside with the door slightly cracked (I wedge mine open with a spatula). Let it cool in there for an hour—this gradual cooling helps avoid cracks.
Step 4: Cool Completely and Chill Overnight
After the hour in the oven, remove the cheesecake from the bath pans and set it on a cooling rack for another 2 hours. By this point, your kitchen will smell like heaven—the perfect creamy, Oreo-filled treat waiting to be topped. Once cooled, wrap tightly or cover the cheesecake and refrigerate for at least 6 hours, or better yet, overnight. Trust me, this step really sets the flavors and texture.
Step 5: Create the Whipped Cream Ghosts and Decorate
When you’re ready to serve, gently loosen the crust from the edge and release the springform ring. Now for the fun part: dollop your homemade whipped cream to shape your little ghosts! I like using a piping bag with a star tip but a spoon works just as well. Add candy eyes to each ghost for that adorable spooky vibe. These details always get oohs and aahs in my house. Keep the cheesecake refrigerated until serving to keep the whipped cream ghosts fluffy and fresh.
Pro Tips for Making Halloween Cookies & Cream Cheesecake with Whipped Ghosts Recipe
- Room Temperature Ingredients: Bringing your cream cheese, eggs, and cream to room temp helps the batter blend smoothly and prevents lumps or cracking.
- Low Mixer Speed is Key: I learned the hard way that mixing at too high a speed after adding eggs causes air bubbles, leading to cracks in the finished cheesecake.
- Don’t Skip the Water Bath: It might feel fiddly, but that water bath keeps baking gentle and locks in moisture — it’s my secret weapon for perfect cheesecake every time.
- Slow Cooling Prevents Cracks: Leaving the cheesecake in the oven with the door ajar chills it gradually, avoiding sudden temperature changes that cause cracks.
How to Serve Halloween Cookies & Cream Cheesecake with Whipped Ghosts Recipe
Garnishes
I’m all about keeping the focus on the charming whipped ghosts and those Oreo chunks inside, so I usually skip extra toppings. But if you want, sprinkle a few crushed Oreos around the edges for extra crunch or add some edible glitter for a magical Halloween sparkle. Sometimes I even dust a bit of cocoa powder or powdered sugar with a spooky stencil to up the festive factor—so fun!
Side Dishes
This rich cheesecake pairs beautifully with light, fresh sides. I love serving it with a simple berry compote or fresh sliced strawberries which cut through the richness perfectly. For a Halloween party vibe, some spiced apple cider or pumpkin spice lattes alongside make the entire dessert spread feel extra cozy and seasonal.
Creative Ways to Present
I once served this Halloween Cookies & Cream Cheesecake with Whipped Ghosts Recipe layered in clear mini mason jars topped with miniature ghosts and candy eyes—a total hit at a kids’ Halloween party! You can also pipe the whipped cream ghosts onto individual slices or even use small cookie cutters to create ghost-shaped cheesecake bites for a fancy finger-food style presentation.
Make Ahead and Storage
Storing Leftovers
Once decorated, keep your leftover Halloween Cookies & Cream Cheesecake with Whipped Ghosts tightly covered in the fridge. I use a cake dome or wrap the whole pan in plastic wrap. It stays fresh up to 5 days, which is great if you want to enjoy more than just the party night.
Freezing
If you want to prepare ahead, this cheesecake freezes beautifully without the whipped cream ghosts. I freeze it tightly wrapped in plastic wrap and then foil for up to 3 months. When you’re ready, just thaw overnight in the fridge and freshly pipe your whipped cream ghosts before serving.
Reheating
This cheesecake is best served cold, so I don’t recommend reheating it. If you’re after a little softer texture, you can let slices sit at room temperature for 15-20 minutes before serving—it really brings out the creamy richness without losing structure.
FAQs
-
Can I use regular Oreos instead of Halloween Oreos?
Absolutely! Regular Oreos work perfectly in this Halloween Cookies & Cream Cheesecake with Whipped Ghosts Recipe. If you’re using DoubleStuf Halloween Oreos, removing some filling can prevent the crust from being too greasy, but with regular Oreos, you can keep all the filling.
-
Why do I need to use a water bath?
The water bath creates a moist oven environment which ensures even baking and prevents cracks on the cheesecake surface. It’s a trick I never skip because it makes the cheesecake texture silky and flawless every time.
-
Can I make the whipped cream ghosts in advance?
I recommend piping the whipped cream ghosts just before serving because whipped cream can lose its shape over time. However, you can whip the cream a few hours ahead and keep it chilled until ready to decorate.
-
How do I avoid cracks on the cheesecake?
Use room temperature ingredients, mix on low speed, bake with a water bath, and cool the cheesecake slowly in the oven with the door slightly open. These steps combined prevent cracks and give you a gorgeous smooth cheesecake.
Final Thoughts
This Halloween Cookies & Cream Cheesecake with Whipped Ghosts Recipe has become one of those recipes I always rely on when I want to impress without stress. The balance of creamy filling, Oreo crunch, and those adorable ghostly whipped cream decorations creates a dessert experience everyone raves about. I hope you enjoy making it as much as I do—grab your Oreos, and let’s get baking!
Print
Halloween Cookies & Cream Cheesecake with Whipped Ghosts Recipe
- Prep Time: 25 minutes
- Cook Time: 1 hour 50 minutes
- Total Time: 10 hours 15 minutes
- Yield: 10 slices
- Category: Dessert
- Method: Baking
- Cuisine: American
Description
This Halloween Cheesecake features a rich cookies and cream filling on a crunchy Oreo crust, tinted with orange food coloring for a festive touch. It’s topped with adorable whipped cream ghosts decorated with candy eyes, making it a perfect spooky dessert for fall celebrations and Halloween parties.
Ingredients
OREO CRUST
- 20 Oreos
- ¼ cup (57g) unsalted butter, melted
COOKIES & CREAM CHEESECAKE
- 32 ounces (900g) full fat block cream cheese, completely softened to room temperature
- 1 cup (200g) granulated sugar
- ¼ cup (60mL) heavy whipping cream, at room temperature
- 5 ounces (153g) Greek yogurt or sour cream (about ⅔ cup), at room temperature
- 1 Tablespoon vanilla extract
- Orange food coloring (gel preferred), to tint
- 4 large eggs, at room temperature
- 2 large egg yolks, at room temperature
- 14 Oreos, chopped
WHIPPED CREAM GHOSTS
- 1 cup homemade whipped cream
- Candy eyes
Instructions
- Prepare the Oreo Crust: Preheat the oven to 325ºF (162ºC) and spray a 9″ springform pan with nonstick spray. Crush 20 Oreos in a food processor to fine crumbs, then mix with melted butter. Press the mixture evenly into the bottom of the pan and bake for 8-10 minutes until set. Remove and let cool.
- Make the Cheesecake Batter: Beat the softened cream cheese on medium-high speed until smooth (about 2 minutes). Add granulated sugar and beat another 2 minutes until combined. Lower mixer speed to low and add heavy cream, Greek yogurt or sour cream, vanilla extract, and orange food coloring. Mix until fully combined. Add eggs one at a time on low speed, mixing until just combined after each addition. Gently fold in chopped Oreos without overmixing.
- Set up Water Bath and Bake: Pour batter over cooled crust in the springform pan. Place this pan inside a slightly larger pan, and then place both into an even larger roasting pan. Pour hot water into the outer pan halfway up the sides of the middle pan to create a water bath. Carefully transfer to the oven and bake for 1 hour 35 minutes to 1 hour 50 minutes. The center should jiggle slightly and reach an internal temperature of 145ºF (63ºC).
- Cool the Cheesecake: Turn off the oven and leave the cheesecake inside with the door slightly open for 1 hour to cool gradually. Then remove the springform pan from the water bath and cool on a rack for 2 more hours. After it’s completely cooled, cover tightly and refrigerate for at least 6 hours or overnight.
- Decorate with Whipped Cream Ghosts: Before serving, loosen the crust from the sides of the pan, release the springform ring, and top the cheesecake with homemade whipped cream formed into ghosts. Add candy eyes to finish the spooky look. Store leftovers refrigerated up to 5 days or freeze for up to 3 months. Thaw overnight in the fridge before serving.
Notes
- Oreos: Halloween Double Stuf Oreos were used with half the filling removed to reduce butter needed in the crust. Regular Oreos with full filling can be used as well.
- Orange Food Coloring: Gel coloring is preferred (such as AmeriColor) and can be adjusted to your desired shade. It can also be omitted if preferred.
- Mixer Speed: Keep mixer speed low after adding cream cheese to avoid incorporating too much air, which can cause cracks or bubbles in the cheesecake.
- Water Bath Pans: Using nested pans for the water bath eliminates the need for foil wrapping and ensures even baking.
- Cooling: Propping the oven door open with a wooden spoon or spatula helps the cheesecake cool gradually and prevents cracking.
Nutrition
- Serving Size: 1 slice (1/10th of cheesecake)
- Calories: 560
- Sugar: 35g
- Sodium: 220mg
- Fat: 38g
- Saturated Fat: 22g
- Unsaturated Fat: 14g
- Trans Fat: 0.5g
- Carbohydrates: 44g
- Fiber: 2g
- Protein: 8g
- Cholesterol: 160mg
