

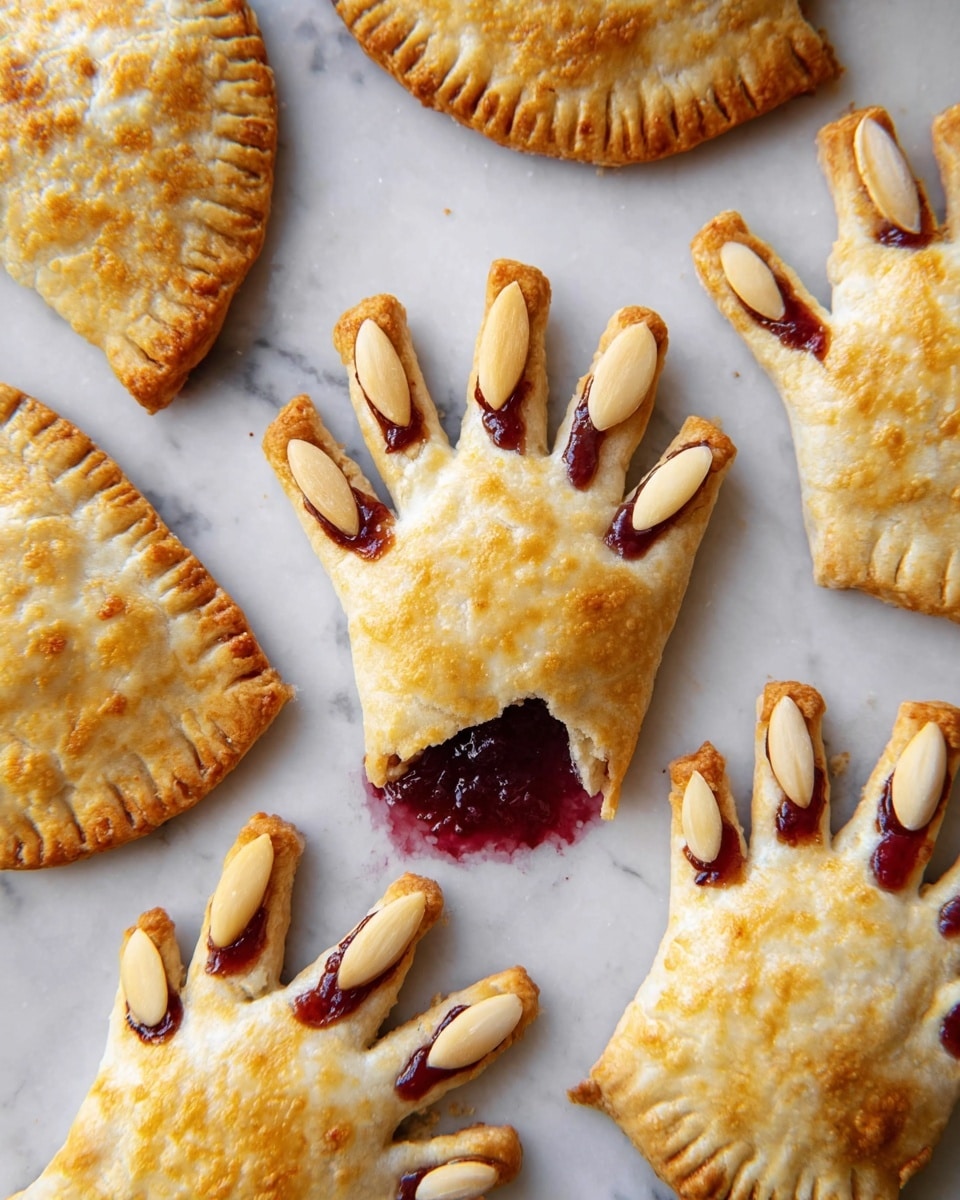
If you’re looking for a charming, festive treat that’s as fun to make as it is to eat, you’re going to adore this Easy Halloween Hand Pies Recipe. I absolutely love how these cute little hand-shaped pies burst with sweet jam and have an irresistibly flaky crust. Whether you’re baking with kids or want a standout dessert for your Halloween party, this recipe has got you covered!
Why You’ll Love This Recipe
- Simplicity: Uses store-bought pie crust to speed up prep time, making it perfect for busy days.
- Festive Fun: Shape and decorate the pies like spooky hands for a playful Halloween twist.
- Versatility: You can swap the jam for your favorite fillings, sweet or savory.
- Crowd Pleaser: My family goes crazy for these — they’re just the right size for sharing and snacking.

Ingredients You’ll Need
These ingredients are straightforward and easy to find, making this sweet treat super accessible. I like using store-bought pie crust because it cuts down the hassle, and the raspberry jam gives just the right fruity punch without being overpowering.
- All-purpose flour: Helps keep the dough from sticking while rolling out those hand shapes.
- Store-bought pie crust: Saves you loads of time but still gives that buttery, flaky texture everyone loves.
- Raspberry or strawberry jam: Choose your fave fruit jam; these flavors offer a great balance of sweetness and tartness.
- Large egg: Whisked with water, it makes the perfect egg wash for that golden, shiny crust.
- Sliced almonds: These act as the spooky “nails” for the hand pies — a fun, crunchy detail!
Variations
I love how easy it is to tweak this Easy Halloween Hand Pies Recipe to fit whatever mood or occasion you’re in. Feel free to get creative with the filling or even the “nail” decorations!
- Swap fillings: I once tried a cinnamon apple filling and it was a big hit; picky eaters loved it as a fall alternative.
- Savory twist: For a dinner party, using cheese and mushrooms makes a surprisingly delicious savory hand pie.
- Allergy-friendly crusts: Gluten-free pie crusts work great too—I tested it out and the texture stayed flaky and tasty.
How to Make Easy Halloween Hand Pies Recipe
Step 1: Prepare Your Workspace and Oven
Preheat your oven to 425°F and line two baking sheets with parchment paper—trust me, this makes cleanup a breeze. When working with the pie crust, lightly flour your surface so it doesn’t stick, which saves you from frustrating tearing. Rolling scraps back together works well here, so don’t stress about the perfect piece every time.
Step 2: Cut Out the Hand Shapes
Use a sharp knife to trace around a hand cut-out on each pie crust. If you have a hand-shaped cookie cutter, even better—it makes this step faster and fun for kids to help out. Arrange half the cut hands on your baking sheets with at least 2 inches between them, because they’ll puff up a bit in the oven. You’ll re-roll and cut more hands from the scraps, so no dough is wasted.
Step 3: Add the Jam and Seal
Spoon a small dollop of jam right into the center of each hand on the pan—be careful not to overfill, or you’ll have messy pies. Place another hand cut-out on top, gently pressing the edges around the palm area to seal. I like to use the tines of a fork to crimp the edges; it creates a cute decorative touch and makes sure nothing oozes out while baking. The fingers don’t get filled, so just press them lightly together.
Step 4: Add Knuckle Slits and Egg Wash
Take a small paring knife and make tiny slits at the knuckles on the fingers for venting steam—this helps the pies bake evenly without bursting. Brush the entire pie generously with your egg wash to get that irresistible golden shine and a hint of gloss.
Step 5: Bake and Decorate
Bake for 10 to 15 minutes until the pies turn golden brown and are cooked through—keep an eye on them so they don’t get overly dark. When they’re out and still warm, add a small spoonful of jam on the tip of each finger and gently press an almond slice on top to create spooky “nails.” It’s such a simple touch that turns these into conversation starters!
Pro Tips for Making Easy Halloween Hand Pies Recipe
- Don’t Overfill: It’s tempting to load the pies with jam, but a little goes a long way—too much can cause leaks.
- Keep Dough Cold: If your kitchen’s warm, pop the rolled-out dough back in the fridge for 10 minutes before cutting for easier handling.
- Use Parchment Paper: It prevents sticking and helps the hand pies bake evenly without burning on the bottom.
- Press Edges Well: Sealing with a fork is key—this keeps the filling sealed inside and your hands mess-free!
How to Serve Easy Halloween Hand Pies Recipe
Garnishes
I usually stick with the almond “nails” and a little jam dollop on the fingers—they make such a fun, spooky effect. Sometimes I’ll dust the pies lightly with powdered sugar for a “haunted” frosty look or add a tiny drizzle of melted dark chocolate for extra flair.
Side Dishes
These hand pies pair really well with a warm cup of spiced cider or hot chocolate. For a party, I like bringing out a small cheese and charcuterie board too—it balances the sweet hand pies nicely.
Creative Ways to Present
For Halloween, I’ve presented these on a platter lined with faux cobwebs and plastic spiders—it’s a simple trick that gets lots of “oohs” and “ahhs.” You can also place them individually in small paper bags with a Halloween sticker as cute party favors.
Make Ahead and Storage
Storing Leftovers
After they cool completely, I store leftover hand pies in an airtight container at room temperature for up to 2 days. They stay surprisingly fresh, but I recommend warming them slightly before serving.
Freezing
I’ve frozen unbaked hand pies by placing them on a baking sheet to freeze solid, then transferring them to a freezer-safe bag. This way, you can bake them fresh anytime you want—just add a few extra minutes to the baking time.
Reheating
For reheating, pop them in a 350°F oven for about 5-7 minutes until warmed through and crisp again. I avoid microwaves because they tend to make the crust soggy, and nobody wants that!
FAQs
-
Can I use homemade pie crust for this recipe?
Absolutely! While store-bought pie crust keeps this recipe quick and easy, homemade crust works perfectly too and adds a personal touch. Just be sure your dough is well-chilled before rolling and cutting for best results.
-
What other fillings work well in this Easy Halloween Hand Pies Recipe?
You can try apple cinnamon, pumpkin puree mixed with spices, or even chocolate hazelnut spread for a decadent twist. For savory options, cheese with mushrooms or cooked sausage are delicious alternatives.
-
How do I keep the hand pies from leaking during baking?
Make sure to press the edges firmly together with a fork and don’t overfill with jam. The small slits on the fingers also help vent steam, preventing leaks and preserving that neat, hand shape.
-
Can I make these ahead of time for a Halloween party?
Yes! Prepare and freeze the unbaked pies up to a month in advance. On party day, bake fresh from frozen and add the almond nails after baking for best taste and presentation.
Final Thoughts
This Easy Halloween Hand Pies Recipe holds a special place in my heart because it turns a simple dessert into something playful and memorable. Baking these always brings smiles and a little magic to our Halloween celebrations. I hope you have just as much fun making and sharing them with your friends and family—trust me, they’re a showstopper!
Print
Easy Halloween Hand Pies Recipe
- Prep Time: 10 minutes
- Cook Time: 15 minutes
- Total Time: 25 minutes
- Yield: 8 (4-inch) hand pies
- Category: Dessert
- Method: Baking
- Cuisine: American
Description
These Easy Halloween Hand Pies are a fun and festive treat perfect for the spooky season. Using store-bought pie crust and a sweet berry jam filling, these hand-shaped pastries are simple to make and bake until golden brown. Decorated with sliced almonds as ‘nails’ and a glaze of jam, they are a delightful dessert for Halloween parties or family gatherings.
Ingredients
Pie Crust
- All-purpose flour, for rolling out dough
- 1 (14.1-oz.) package store-bought pie crust (2 crusts total)
Filling and Topping
- 1/3 cup raspberry or strawberry jam, plus more for decorating
- 1 large egg, whisked with 1 Tablespoon water (egg wash)
- Sliced almonds (for decorating nails)
Instructions
- Preheat Oven and Prepare Baking Sheets: Preheat your oven to 425°F (220°C) and line two baking sheets with parchment paper to prevent sticking.
- Roll Out Dough and Cut Shapes: Lightly flour your work surface and unroll the pie crusts. Using a sharp knife or a hand-shaped cookie cutter, trace and cut out hand shapes. Arrange half of the hand shapes on the prepared baking sheets, spacing at least 2 inches apart. Re-roll scraps to cut out additional hands.
- Add Jam Filling: Spoon a small portion of raspberry or strawberry jam into the center of each hand shape on the baking sheets.
- Seal the Pies: Place another hand shape on top of each filled hand, pressing lightly to seal the edges. Use a fork to crimp the edges around the palm area, ensuring the jam is well sealed. Lightly press the edges of the fingers together without crimping since there is no filling there.
- Make Slits for Venting: With a paring knife, carefully make small slits on each finger near the knuckles to allow steam to escape while baking.
- Apply Egg Wash and Bake: Brush the entire surface of the hand pies with the egg wash. Bake in the preheated oven for 10 to 15 minutes, or until golden brown and cooked through, depending on the size of your pies.
- Decorate: Once baked, remove the pies from the oven. Add a small dollop of jam to the tip of each finger and press sliced almonds into the jam to resemble fingernails.
- Serve or Store: Serve the hand pies immediately while warm, or allow them to cool and store in an airtight container at room temperature for later enjoyment.
Notes
- You can use either raspberry or strawberry jam, or any other berry jam of your choice.
- Ensure the edges of the pies are sealed properly to prevent the jam from leaking during baking.
- If you do not have a hand cookie cutter, you can create a template by tracing your hand on a piece of paper, cutting it out, and using it as a guide.
- The egg wash gives the pies a golden, shiny finish; do not skip this step for best results.
- Sliced almonds add a spooky touch as ‘fingernails’, but you can omit or substitute with other decorations as desired.
- Hand pies are best eaten fresh but can be stored at room temperature for up to 2 days.
Nutrition
- Serving Size: 1 hand pie
- Calories: 210
- Sugar: 12g
- Sodium: 140mg
- Fat: 10g
- Saturated Fat: 3g
- Unsaturated Fat: 5g
- Trans Fat: 0g
- Carbohydrates: 28g
- Fiber: 1g
- Protein: 3g
- Cholesterol: 30mg


