

If you’re looking for a fun, festive treat that’s as easy to make as it is adorable to serve, you’re going to flip for this BOO! Chocolate Peanut Butter Bars Recipe. I absolutely love how these spooky little ghost bars come together with just a few simple ingredients, and you’ll find they’re perfect for Halloween parties, kid-friendly snacks, or anytime you want a no-fuss sweet that packs big flavor and personality. Stick with me, and I’ll walk you through each step so your BOO! Chocolate Peanut Butter Bars come out looking frightfully delightful every time.
Why You’ll Love This Recipe
- No-Bake and Simple: You don’t need to turn on your oven, which means a quick and easy prep that everyone can help with.
- Perfect Balance of Flavors: The combination of chocolate and peanut butter always hits the spot, with a little crunch from the cereals.
- Festive Ghost Shapes: The imperfect ghost decorations add a charming homemade vibe that’s way cuter than store-bought treats.
- Kid-Friendly and Crowd-Pleasing: My family goes crazy for these, and they’re great for kids to help decorate.

Ingredients You’ll Need
These ingredients come together in a snap and create a mix of creamy, crunchy, and sweet flavors that you’ll love. Plus, they’re easy to find at most grocery stores, and a couple of pantry staples will make sure you’re ready to go anytime inspiration strikes.
- Honey: I recommend a mild-flavored honey so it doesn’t overpower the peanut butter and chocolate.
- Maple syrup: Adds a touch of natural sweetness and pairs perfectly with the honey.
- Creamy peanut butter: Smooth peanut butter blends best here to create that signature classic flavor.
- Corn flakes cereal: For crunch and texture, these keep it light and crispy.
- Brown rice krispies: They add a different kind of crunch and help hold the bars together.
- Semi-sweet or dark chocolate: Choose your favorite—semi-sweet is classic, but I like dark for a richer taste.
- White chocolate: For those cute ghost shapes—use good quality melting chocolate for smooth spreading.
- Candy eyes and black sprinkles: These make the ghosts come alive and add a playful finishing touch.
Variations
One of the things I love about the BOO! Chocolate Peanut Butter Bars Recipe is how easy it is to tweak. Depending on your tastes or what you have on hand, you can definitely make these your own.
- Nut-Free Variation: I tried swapping peanut butter for sunflower seed butter for my niece’s school party, and it worked out beautifully with the same creamy texture and flavor balance.
- Chocolate Choices: Feel free to use milk chocolate if you prefer it sweeter or even add a dash of espresso powder to your melted chocolate for a grown-up twist.
- Extra Crunch: Toss in some chopped nuts or add mini pretzels to the cereal mix for a salty-sweet combo that’s addictive.
- Seasonal Touches: Around the holidays, I love adding a sprinkle of pumpkin pie spice to the cereal mix—it adds a warm, cozy vibe that everyone asks for again and again.
How to Make BOO! Chocolate Peanut Butter Bars Recipe
Step 1: Prep Your Pan and Mix the Crunchy Base
Start by lining a 9×13-inch baking dish with parchment paper—this makes it so much easier to lift the bars out when they’re set. In a large bowl, mix together the corn flakes, brown rice krispies, and 1 cup of creamy peanut butter. This combination of cereals gives you sweet crunch with just the right amount of chewiness. If you stir everything gently but thoroughly, you’ll get a great, even base for the bars.
Step 2: Cook the Honey-Maple Syrup Mixture and Combine
Heat honey and maple syrup in a small pot over medium heat until it just boils—this usually takes about 2 minutes. This step helps the syrup thicken slightly so it acts like the perfect sticky glue without being too runny. Pour this hot mix directly into your cereal and peanut butter bowl, then stir well to coat everything evenly. Press this mixture firmly and evenly into the prepared pan—you want it packed tight so the bars hold together beautifully once chilled. Pop it into the fridge for 15 minutes to set.
Step 3: Melt the Chocolate and Spread It Over the Base
While the base chills, melt together your semi-sweet or dark chocolate with ¼ cup peanut butter in the microwave. I usually do this in 30-second bursts, stirring in between so the chocolate melts smoothly without burning. Once melted, spread this glossy chocolate-peanut butter layer gently but evenly over the cereal base. This rich top layer is what makes these bars so deliciously indulgent.
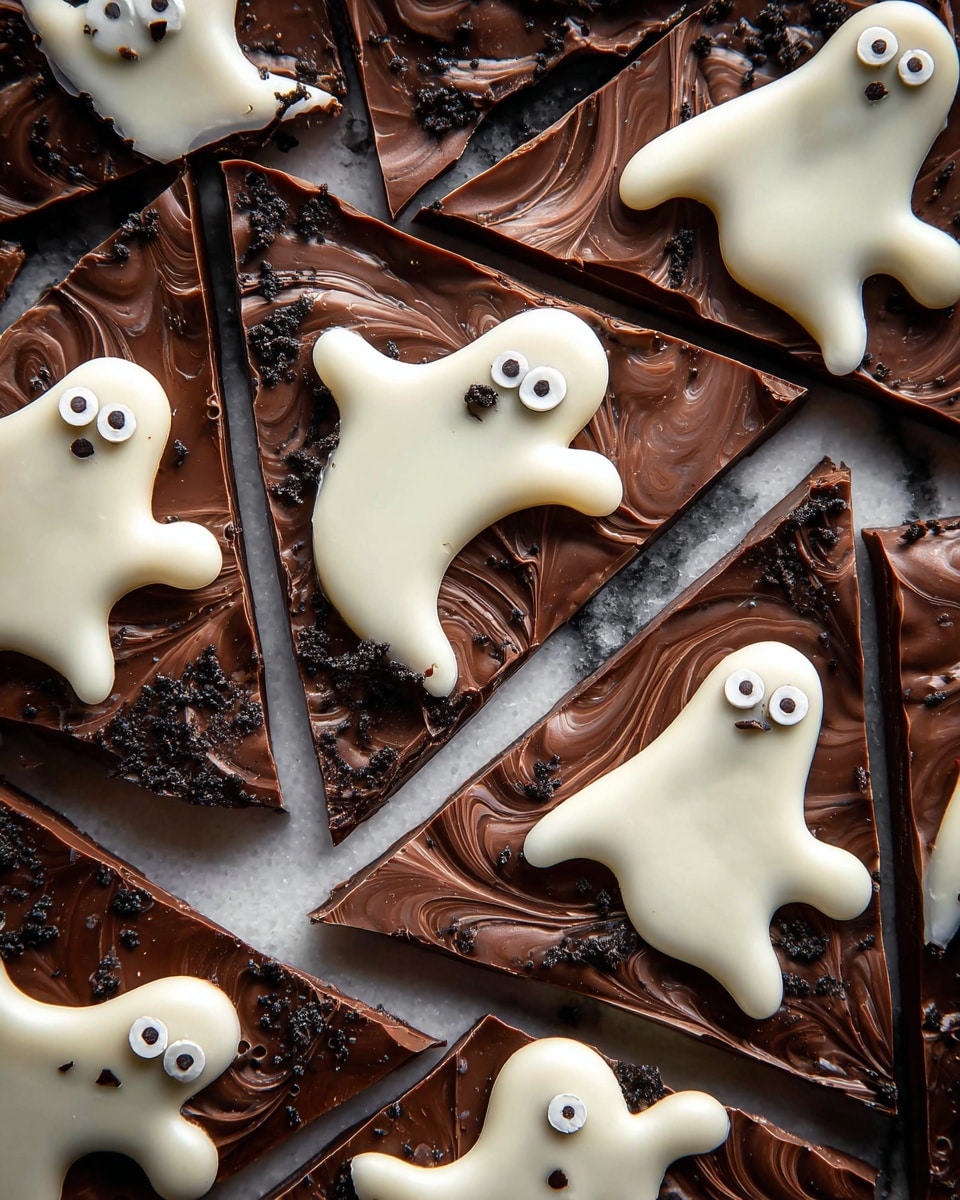
Step 4: Create Those Charming Ghosts with White Chocolate
Now for the fun part! Melt your white chocolate separately until smooth. Then spoon dollops onto the dark chocolate—use about 1 teaspoon for smaller ghosts and 1 tablespoon for larger ones. Make sure you leave about an inch of space between each ghost because you’ll be shaping them next. Grab a wooden skewer or the end of a skinny spoon and gently drag the white chocolate outward to form ghostly shapes. Don’t worry if they look a little wonky—that gives them all the more charm and personality! Stick two mini candy eyes on each ghost before heading back to the fridge for another 15 minutes to set.
Step 5: Cut and Chill Until Ready to Serve
Once set, carefully lift the entire slab out of the pan using the parchment paper. Cut around each ghost shape to create cute, irregularly shaped bars that look like little friendly spooks. Keep these in the fridge until you’re ready to serve them, so they stay firm and fresh. Trust me, these disappear fast at my house!
Pro Tips for Making BOO! Chocolate Peanut Butter Bars Recipe
- Use Parchment Paper: I always line my pan to easily lift the bars out without smashing those cute ghosts.
- Perfect Chocolate Melting: Microwave your chocolate in short bursts and stir often—it’s how I avoid burning it every single time.
- Press Firmly but Gently: The cereal base needs to be tightly packed during chilling to prevent crumbly bars later.
- Don’t Stress Ghost Shapes: Imperfections add character—my kids always say they look “cuter when weird!”
How to Serve BOO! Chocolate Peanut Butter Bars Recipe
Garnishes
I usually keep garnishes simple because the candy eyes and sprinkles do all the heavy lifting. Sometimes, I dust a tiny bit of edible glitter for a shimmering ghost effect when serving at parties—it looks magical and makes kids’ eyes light up every time.
Side Dishes
These bars are sweet treats on their own, but for a fun twist, I sometimes pair them with a glass of cold milk, or a warm cup of chai tea, which balances the sweet richness perfectly. For a Halloween party, they’re great alongside pumpkin spice cupcakes or some baked apple slices with cinnamon.
Creative Ways to Present
For a festive display, I’ve placed these ghosts on a black serving tray sprinkled with edible “spooky dust” (which is really just powdered sugar mixed with a hint of cocoa). You can also arrange them on individual mini plates with candy corn scattered around to amp up the Halloween vibe.
Make Ahead and Storage
Storing Leftovers
I keep leftover BOO! Chocolate Peanut Butter Bars in an airtight container in the fridge. They stay fresh for up to 5 days, and honestly, they rarely make it that long in my house. Just make sure to store them separated by parchment paper layers to avoid sticking.
Freezing
Freeze these bars in a single layer on a baking sheet initially, then transfer to a freezer-safe container. Thawed bars keep their texture well and taste almost as fresh—perfect if you want to prep your treats ahead of time for an upcoming party.
Reheating
I don’t recommend heating these bars since the chocolate might soften too much and lose shape. However, bringing them to room temperature before serving gives the best melt-in-your-mouth texture without risking mess.
FAQs
-
Can I use crunchy peanut butter instead of creamy in the BOO! Chocolate Peanut Butter Bars Recipe?
You can, but creamy peanut butter helps the bars hold together better and provides a smoother texture. Crunchy peanut butter will add extra texture but might make the bars crumbly if not packed tightly.
-
What’s the best way to prevent the white chocolate ghosts from melting too quickly?
Make sure your white chocolate is fully melted but not overheated, and create the ghost shapes on a cool surface. Chilling immediately after decorating helps them set firmly and keeps them from melting.
-
Can I make these bars vegan-friendly?
Yes! Substitute honey with maple syrup only, use dairy-free chocolate, and make sure your peanut butter is free of additives. Your bars will still turn out delicious.
-
How long do the BOO! Chocolate Peanut Butter Bars last?
Stored properly in the fridge, they’ll stay fresh for about 5 days. I recommend eating them sooner for the best texture and flavor!
Final Thoughts
This BOO! Chocolate Peanut Butter Bars Recipe isn’t just a treat—it’s the kind of snack that brings smiles and a little seasonal magic to your kitchen. I discovered this recipe when I wanted something festive but simple for my kids’ Halloween party, and it quickly became a family favorite we make every year. You truly can’t go wrong with the rich chocolate, creamy peanut butter, and that playful ghost decoration—it’s dessert that feels both special and homemade. Give it a try and watch those ghosts disappear faster than you say BOO!
Print
BOO! Chocolate Peanut Butter Bars Recipe
- Prep Time: 20 minutes
- Cook Time: 5 minutes
- Total Time: 55 minutes
- Yield: Serves 24
- Category: Dessert
- Method: No-Cook
- Cuisine: American
Description
These BOO! Chocolate Peanut Butter Bars are a fun and spooky treat perfect for Halloween or any festive occasion. Crunchy corn flakes and brown rice krispies are combined with creamy peanut butter and a honey-maple syrup glaze, then topped with a luscious chocolate-peanut butter layer and decorated with whimsical white chocolate ghost shapes and candy eyes. Easy to make and sure to delight kids and adults alike!
Ingredients
Dry Ingredients
- 3 cup corn flakes cereal
- 2 cup brown rice krispies
- candy eyes, for decorating
- black sprinkles, for decorating
Wet Ingredients
- ¾ cup honey
- ¼ cup maple syrup
- 1 ¼ cup creamy peanut butter, divided
Chocolate Layers
- 8-12 oz semi-sweet or dark chocolate, melted
- 6 oz white chocolate, melted
Instructions
- Prepare Pan: Line a 9×13 inch baking dish with parchment paper to prevent sticking and allow easy removal of bars.
- Mix Cereal and Peanut Butter: In a large bowl, combine the corn flakes, brown rice krispies, and 1 cup creamy peanut butter, mixing until the cereals are evenly coated.
- Make Honey-Maple Syrup Mixture: In a pot over medium heat, combine the honey and maple syrup. Bring to a boil and cook for 2 minutes, stirring occasionally. Remove from heat.
- Combine Syrup with Cereal Mixture: Pour the hot honey-maple syrup into the cereal and peanut butter bowl, stirring well to coat everything thoroughly. Transfer the mixture into the prepared pan, pressing it down tightly and evenly. Chill in the refrigerator for 15 minutes to set.
- Prepare Chocolate-Peanut Butter Topping: Melt together the semi-sweet or dark chocolate with ¼ cup peanut butter in the microwave in short bursts, stirring until smooth. Spread this evenly over the chilled cereal base.
- Create Ghost Shapes: Melt the white chocolate, then spoon small dollops (about 1 teaspoon for small ghosts or 1 tablespoon for larger ghosts) spaced 1 inch apart onto the chocolate layer. Using a wooden skewer or the end of a spoon, drag the white chocolate outward to shape ghost figures. Imperfections add to their spooky charm.
- Add Details and Set: Place two mini candy eyes on each ghost shape. Optionally, sprinkle black sprinkles around for extra spooky effect. Return the pan to the refrigerator and chill for about 15 minutes to allow the chocolate to set completely.
- Cut and Serve: Cut around the ghost shapes to create irregular, fun edges. Keep bars refrigerated until ready to serve. Enjoy the spooky, delicious treat!
Notes
- Use creamy peanut butter for best texture; natural peanut butter may affect firmness.
- If you prefer nut-free, substitute peanut butter with sunflower seed butter.
- To melt chocolate smoothly, use short microwave bursts and stir frequently to avoid burning.
- Store the bars in an airtight container in the fridge to keep them fresh and maintain chocolate firmness.
- For extra festivity, use colored candy eyes or edible glitter.
Nutrition
- Serving Size: 1 bar (1/24th of recipe)
- Calories: 180
- Sugar: 15g
- Sodium: 90mg
- Fat: 10g
- Saturated Fat: 4g
- Unsaturated Fat: 5g
- Trans Fat: 0g
- Carbohydrates: 20g
- Fiber: 1g
- Protein: 4g
- Cholesterol: 0mg


