

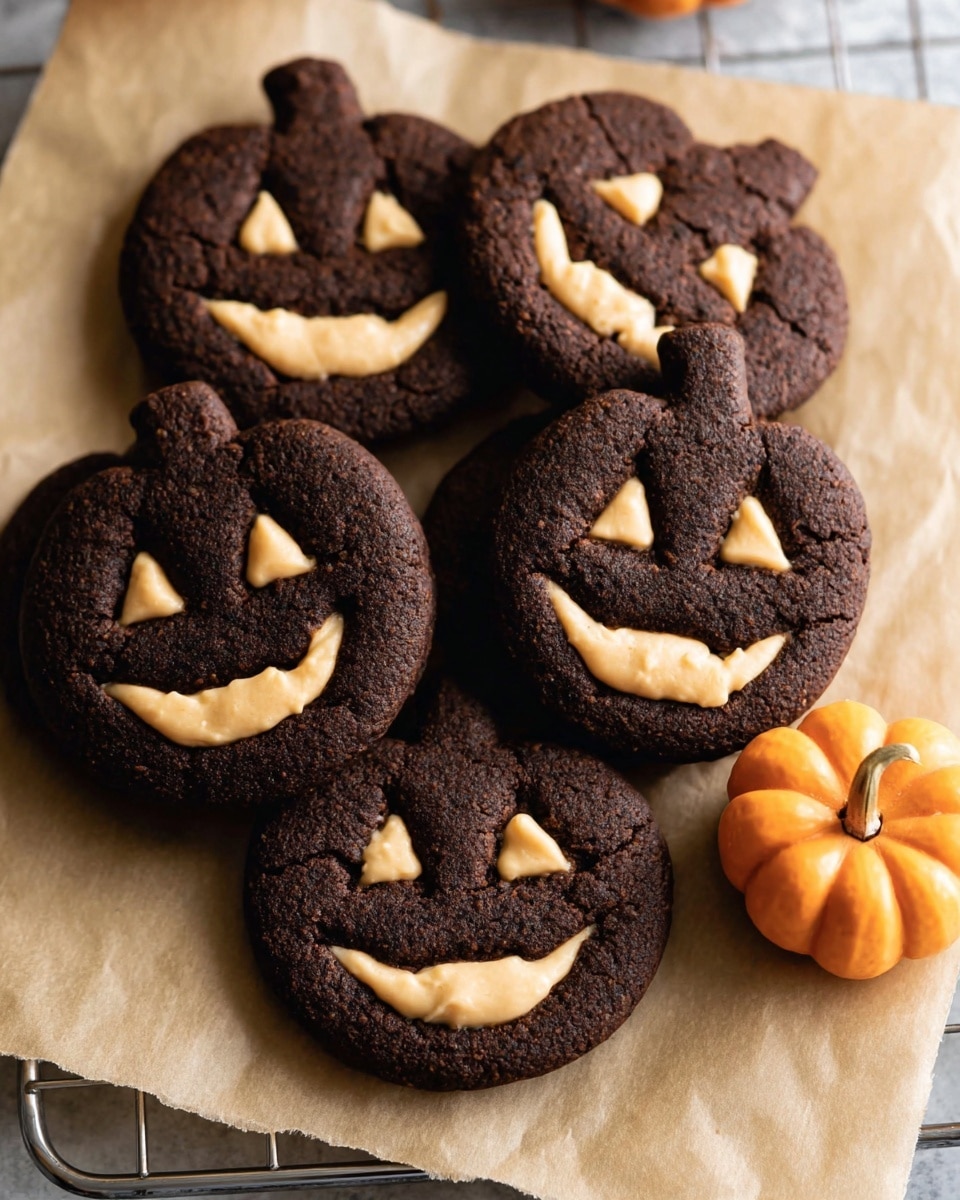
If you’re on the hunt for a festive treat that’s both indulgent and safe for gluten-free diets, you’re going to absolutely adore this Halloween Gluten-Free Chocolate Sugar Cookies with Peanut Butter Fluff Filling Recipe. It’s the perfect blend of rich chocolate, tender cookie, and a dreamy peanut butter fluff that’s sure to make your Halloween celebrations extra special. I promise, once you try these, you’ll want to make them year-round!
Why You’ll Love This Recipe
- Gluten-Free & Delicious: Finally, a sugar cookie that is tender, chocolaty, and safe for gluten-sensitive friends and family.
- Peanut Butter Fluff Filling: The creamy, sweet filling adds the perfect balance to the rich chocolate cookie—kids and adults rave about it.
- Perfect Texture & Flavor: Thanks to almond flour and Dutch process cocoa, these cookies have a soft crumb and deep chocolate flavor that feels fancy but is super easy to make.
- Fun for Halloween: You can roll out the dough and cut into festive shapes, making it a perfect activity to enjoy with your kids or friends before the big day.

Ingredients You’ll Need
These ingredients come together to create a gluten-free sugar cookie base that’s rich with chocolate flavor and paired with a silky peanut butter fluff filling. When shopping, fresh almond flour and Dutch process cocoa powder make a big difference in taste and texture, so keep an eye out for those.
- Blanched almond flour: Provides a tender crumb and nutty flavor, perfect for gluten-free baking.
- Tapioca flour: Helps give structure and chewiness to the cookies without gluten.
- Unsweetened cocoa powder (Dutch process): Adds deep chocolate richness and the perfect dark color; Dutch process is less acidic and mellower.
- Baking powder: For a little lift and lightness in the cookies.
- Salt: Balances and enhances all the sweet and chocolatey flavors.
- Unsalted butter: Room temperature for easy creaming and rich flavor.
- Organic cane sugar or granulated sugar: Simple sweetness without overpowering.
- Large egg yolk: Adds richness and helps bind the dough.
- Vanilla extract: Brings out the flavors beautifully.
- Marshmallow cream: Key for that fluffy, sweet filling texture.
- Creamy peanut butter: Use traditional creamy for smoothness and the right consistency.
- Pure maple syrup: Adds gentle sweetness and a hint of depth to the filling.
- Pinch of salt: Just enough to balance the sweetness of the filling.
Variations
I love making this recipe as is, but sometimes I like to switch things up a bit to suit different occasions or preferences. Don’t hesitate to customize it to your liking—this recipe is pretty forgiving and flexible.
- Nut-Free Option: I’ve swapped the peanut butter fluff for sunflower seed butter whipped with marshmallow cream, and it’s just as dreamy for little ones with allergies.
- Spiced Chocolate: Adding a pinch of cinnamon or pumpkin pie spice to the cookie dough makes it feel extra Halloween-y and cozy.
- Colorful Filling: Mix a drop of orange or purple food coloring into the peanut butter fluff for spooky festive vibes.
- Dairy-Free: Use vegan butter and a dairy-free marshmallow fluff to make these cookies suitable for dairy-sensitive guests.
How to Make Halloween Gluten-Free Chocolate Sugar Cookies with Peanut Butter Fluff Filling Recipe
Step 1: Whisk Together the Dry Ingredients
Start by mixing the blanched almond flour, tapioca flour, Dutch process cocoa powder, baking powder, and salt in a small bowl. Whisking them well ensures an even blend so your cookies have consistent flavor and texture when baked.
Step 2: Cream Butter and Sugar
In your stand mixer fitted with the smaller 3-quart bowl and the beater attachment, beat the room temperature butter and sugar together on medium-high speed until it’s light and fluffy—this usually takes about 3 to 4 minutes. Don’t forget to scrape down the bowl sides so everything gets evenly mixed.
Step 3: Add Egg Yolk and Vanilla
Mix in the egg yolk and vanilla extract at medium speed until it’s creamy and smooth. This will add richness to your cookies.
Step 4: Incorporate Dry Ingredients
Sprinkle the dry ingredient mixture over the wet, starting the mixer on low speed to combine without a mess. Then bump it to medium and mix until the dough pulls away from the bowl sides and no dry streaks remain. If it’s sticking too much, scrape the sides again to ensure everything’s incorporated perfectly.
Step 5: Chill the Dough
Pour the dough onto a piece of plastic wrap, form a disc, and wrap it tightly. Refrigerate for at least 1 hour. This resting time makes the dough easier to roll and helps your cookies keep their shape while baking.
Step 6: Prepare for Baking and Roll Out Dough
Preheat your oven to 350°F and line two baking sheets with parchment paper. Lightly dust your work surface with cocoa powder—not flour—to roll the dough. This little trick keeps your cookies from getting those pesky white streaks. Roll the dough to about 1/4-inch thickness, or thinner if you want daintier cookie sandwiches.
Step 7: Cut and Bake
Use your favorite cookie cutters to cut shapes, then place them about two inches apart on the baking sheets. Bake them for 8 to 9 minutes, until edges are set but the centers still look slightly soft. Let cookies cool on the sheet for at least 5 minutes, then transfer to wire racks to cool completely. This cooling method keeps the cookies tender.
Step 8: Make the Peanut Butter Fluff Filling
While the cookies cool, mix marshmallow cream, creamy peanut butter, pure maple syrup, and a pinch of salt in a small bowl. Pop it in the microwave for just 15 seconds to loosen the peanut butter and marshmallow—trust me, this little trick makes stirring way easier. Mix well until you have a smooth, fluffy filling.
Step 9: Assemble Your Cookie Sandwiches
Take a tablespoon of the peanut butter fluff and dollop it on the bottom half of a cookie. Gently press the matching top cookie over it—the filling will spread to the edges, creating that perfect sandwich mouthful. I love how these cookies look festive and taste amazing!
Pro Tips for Making Halloween Gluten-Free Chocolate Sugar Cookies with Peanut Butter Fluff Filling Recipe
- Use the Small Mixer Bowl: I learned the hard way that the larger stand mixer bowl makes ingredients stick to the sides—use the 3-quart bowl for better mixing results and less waste.
- Roll on Cocoa Powder, Not Flour: Using cocoa for dusting prevents those annoying white streaks on your rich chocolate cookies and keeps the flavor consistent.
- Don’t Overheat the Filling: Only microwave the fluff filling for 15 seconds. Overheating will thin it out and make the texture less dreamy.
- Chill Dough for Best Shape: Chilling helps the dough relax and prevents cookies from spreading too much during baking—making your cut-out shapes crisp and pretty.
How to Serve Halloween Gluten-Free Chocolate Sugar Cookies with Peanut Butter Fluff Filling Recipe
Garnishes
I like to sprinkle a little edible glitter or colored sugar over the peanut butter fluff just before sandwiching to add a magical Halloween sparkle. Mini chocolate chips or festive Halloween-themed sprinkles can be pressed lightly onto the filling for extra fun. These small touches make your cookies pop at any party!
Side Dishes
Pair these little beauties with a cold glass of milk, hot cocoa, or a pumpkin spice latte for the full fall vibe. If serving at a party, I love setting out fresh seasonal fruit or a simple cheese platter alongside for variety.
Creative Ways to Present
I’ve put together a Halloween cookie platter featuring these sandwiches alongside sugary bat and pumpkin-shaped sugar cookies. Another fun idea is stacking the sandwiches in a festive tin or pretty glass jar decorated with Halloween ribbons—great for gifting or making a centerpiece. Getting the kids involved in decorating toppings is a blast, too!
Make Ahead and Storage
Storing Leftovers
I usually store leftover cookies in an airtight container layered with parchment paper between them to keep the peanut butter fluff fillings from sticking. They last about 3 to 4 days at room temperature, and the cookies remain soft and gooey.
Freezing
If you want to make a big batch ahead of time, freeze the baked cookies (without filling) on a tray. Once solid, store in an airtight freezer bag. When ready to serve, thaw completely before filling. I find this keeps the cookies fresh—and you can make the filling fresh for best fluff texture.
Reheating
Reheat leftover assembled cookies briefly in the microwave (about 10 seconds) if you like them slightly warm and gooey—just don’t overdo it or the fluff will melt out. Otherwise, they taste great at room temperature too.
FAQs
-
Can I make this Halloween Gluten-Free Chocolate Sugar Cookies with Peanut Butter Fluff Filling Recipe nut-free?
Yes! You can substitute the almond flour with an oat-based gluten-free flour blend if you avoid nuts, but results will be slightly different in texture. For the filling, swap peanut butter with sunflower seed butter for a nut-free option while keeping that creamy peanutty flavor vibe.
-
Why use Dutch process cocoa powder?
Dutch process cocoa is less acidic and has a milder, smoother chocolate flavor, which pairs beautifully with the nutty almond flour. It also gives a deeper color without bitterness, perfect for rich chocolate sugar cookies like these.
-
Can I make these cookies vegan?
This recipe isn’t vegan as written because it uses butter, egg yolk, and marshmallow cream (which usually contains gelatin). However, you could experiment with vegan butter, aquafaba or flax egg, and vegan marshmallow fluff alternatives—but I haven’t tested that yet!
-
How thick should I roll the dough?
I recommend rolling the dough about 1/4 inch thick for perfect soft cookies. If you want thinner cookie sandwiches, roll a little more thinly, but thicker dough yields a tender bite that everyone loves.
-
Can I double this recipe?
Absolutely! This is a small batch recipe, so doubling it is easy and perfect for larger gatherings. Just blend all ingredients accordingly and chill the dough as usual.
Final Thoughts
I can’t tell you how many times my family has requested these Halloween Gluten-Free Chocolate Sugar Cookies with Peanut Butter Fluff Filling Recipe for holidays and impromptu celebrations. The combo of chocolate with that fluffy peanut butter center is irresistible, and the fact they’re gluten-free means everyone at the table can enjoy them without worry. If you’re looking for a show-stopping yet simple recipe this Halloween, give these a try—you’ll be so glad you did!
Print
Halloween Gluten-Free Chocolate Sugar Cookies with Peanut Butter Fluff Filling Recipe
- Prep Time: 30 minutes
- Cook Time: 9 minutes
- Total Time: 1 hour 39 minutes
- Yield: 12 cookies
- Category: Dessert
- Method: Baking
- Cuisine: American
- Diet: Gluten Free
Description
Delight in these Halloween-themed Gluten Free Chocolate Sugar Cookies featuring a rich cocoa flavor combined with a creamy peanut butter fluff filling. Perfect for festive cookie sandwiches that are both indulgent and suitable for gluten-free diets.
Ingredients
Gluten Free Chocolate Sugar Cookies
- ¾ cup, plus 2 tablespoons blanched almond flour
- ¼ cup tapioca flour
- 2 tablespoons unsweetened cocoa powder, Dutch process, plus more for rolling the dough
- ¼ teaspoon baking powder
- ⅛ teaspoon salt
- 2 ½ tablespoons unsalted butter, room temperature
- 6 tablespoons organic cane sugar or granulated sugar
- 1 large egg yolk, room temperature
- ½ teaspoon vanilla extract
Peanut Butter Fluff Filling
- ¼ cup marshmallow cream
- 3 tablespoons creamy peanut butter
- 1 tablespoon pure maple syrup
- 1 pinch salt
Instructions
- Mix dry ingredients: In a small mixing bowl, whisk together the almond flour, tapioca flour, cocoa powder, baking powder, and salt until evenly combined.
- Cream butter and sugar: In the bowl of a stand mixer fitted with the beater attachment (using the 3-quart mixing bowl), add the unsalted butter and sugar. Beat on medium-high speed until light and fluffy, scraping down the sides as needed.
- Add wet ingredients: Incorporate the egg yolk and vanilla extract into the creamed butter and sugar mixture, beating at medium speed until smooth and creamy, scraping the bowl sides as necessary.
- Combine dry and wet ingredients: Gradually sprinkle the dry flour mixture into the wet ingredients, start mixing on low speed to incorporate, then increase to medium speed to form a dough with no dry streaks that pulls away from the bowl sides. Scrape down the bowl during mixing.
- Chill the dough: Transfer the dough onto plastic wrap, shape into a flat disc, wrap tightly, and refrigerate for at least 1 hour to firm up.
- Preheat and prepare baking sheets: Preheat oven to 350°F (175°C). Line two baking sheets with parchment paper.
- Roll and cut cookies: Lightly dust a clean surface with Dutch process cocoa powder to prevent white streaks. Place chilled dough in the center and roll to ¼ inch thickness or thinner for sandwich cookies. Cut into desired shapes and place cookies 2 inches apart on prepared sheets.
- Bake cookies: Bake for 8-9 minutes until edges are set. Allow cookies to cool on the baking sheet on a wire rack for at least 5 minutes before transferring them directly to the wire rack to cool completely.
- Prepare peanut butter fluff filling: While cookies cool, in a small bowl, combine marshmallow cream, creamy peanut butter, maple syrup, and pinch of salt. Microwave for 15 seconds to loosen the mixture, then stir until smooth and creamy. Avoid overheating.
- Assemble cookie sandwiches: Spread about one tablespoon of filling onto the bottom half of a cookie, then press the top half gently on top, allowing the filling to spread to the edges.
Notes
- This is a small batch recipe that can easily be doubled if desired.
- Yield depends on cookie cutter size and dough thickness; rolling to ¼ inch yields about 12 cookies with recommended cutters.
- Use Dutch process cocoa powder for a richer, less acidic cocoa flavor and for avoiding white streaks when rolling the dough.
- Ingredient substitutions are not recommended except granulated white sugar in place of cane sugar.
- For rolling dough, use cocoa powder instead of flour to prevent white streaks on cookies.
- Use creamy, traditional peanut butter (e.g., Jif) for the filling to avoid greasiness from natural butters.
- Stand mixer use requires a 3-quart mixing bowl to prevent ingredients from sticking to the sides.
- Cookie cutters used in the recipe can affect yield; specific cutters linked in original recipe source.
Nutrition
- Serving Size: 1 cookie (with filling)
- Calories: 150
- Sugar: 10g
- Sodium: 45mg
- Fat: 9g
- Saturated Fat: 4g
- Unsaturated Fat: 5g
- Trans Fat: 0g
- Carbohydrates: 15g
- Fiber: 2g
- Protein: 3g
- Cholesterol: 35mg
