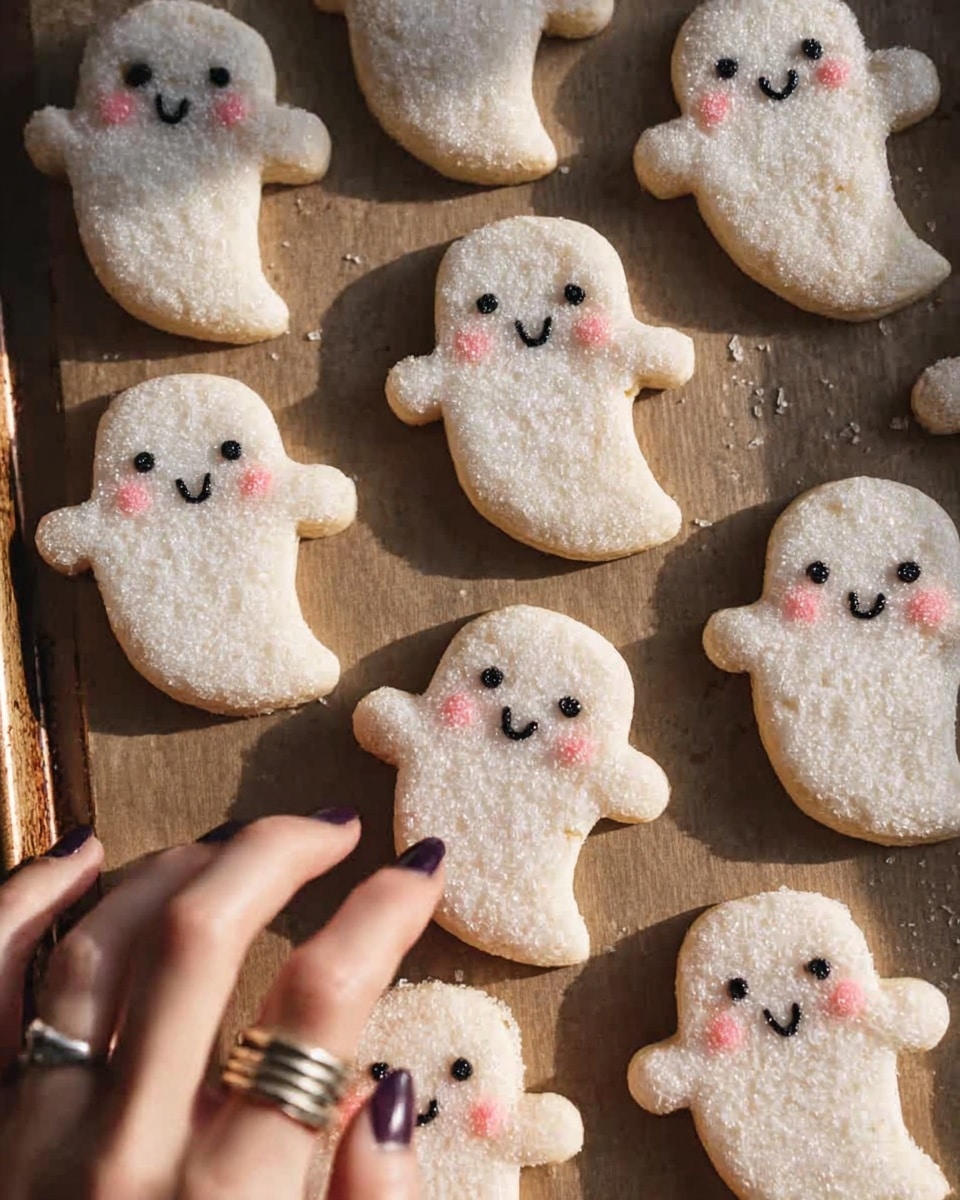
If you’re looking for a fun and festive way to celebrate with a sweet treat, you’re going to absolutely adore this Ghost Cookies Recipe. These soft-batch cream cheese cookies are not only tender and flavorful but also dressed up with delightful buttercream and spooky decorations that make them perfect for Halloween or anytime you want to bring a little whimsy to your cookie jar. Trust me, once you try this recipe, you’ll see why it’s become a favorite in my kitchen—and it’s so much easier than it looks!
Why You’ll Love This Recipe
- Soft, Tender Texture: Thanks to cream cheese and butter, these cookies are tender with the perfect soft-batch feel every time.
- Fun and Festive Decoration: The buttercream frosting and sanding sugar coating create a spooky ghost effect that delights kids and adults alike.
- Make-Ahead Friendly: You can chill or freeze the dough and cookies, making this recipe perfect for prepping in advance.
- Easy to Customize: Play around with colors, decorations, and shapes to make this recipe uniquely yours.
Ingredients You’ll Need
Each ingredient in this Ghost Cookies Recipe plays an important role in getting that irresistible texture and flavor balance. Plus, the buttercream frosting is perfectly smooth and sweet to complement the soft cookies. Here’s a quick rundown of why these ingredients work together so well, along with some helpful shopping tips.
- Unsalted Butter: Room temperature butter beats up nice and fluffy, which is key for light cookies and smooth frosting.
- Cream Cheese: Adds moisture and tenderizes the cookies for that soft-batch texture I love.
- Granulated Sugar: Sweetness plus helps with the slight crisp edge.
- Egg: Binds the dough and helps with structure but keeps cookies soft.
- Vanilla Extract or Vanilla Bean Paste: Gives a warm, rich flavor. I prefer vanilla bean paste for those little specks and extra aroma.
- All-Purpose Flour: The backbone of the cookie dough. Mixing in cornstarch helps keep the cookies tender.
- Cornstarch: A secret weapon for softness and preventing spread.
- Baking Powder: Just enough lift to keep the cookies light.
- Salt: Balances the sweetness and enhances all the flavors.
- Powdered Sugar: For the buttercream—creates a silky smooth, lump-free frosting.
- Heavy Whipping Cream: Adds creaminess and helps adjust frosting consistency.
- Coarse Sanding Sugar and Sprinkles: For that fun ghostly sparkle and whimsical expressions to decorate your cookies.
- Gel Food Coloring: Make those cute pink cheeks pop on the ghost faces.
Variations
I love making this Ghost Cookies Recipe just as written, but sometimes I like to switch things up depending on the occasion, dietary needs, or just my mood. Feel free to make it your own—here are a few ways I’ve tweaked it successfully.
- Gluten-Free Version: Swap the all-purpose flour with a 1:1 gluten-free baking flour. I tried this once, and the texture stayed tender, just be mindful if your mix contains xanthan gum.
- Dairy-Free Option: Use vegan butter and a dairy-free cream cheese alternative. I found this works well, but chilling time might vary, so keep an eye on dough firmness.
- Alternative Decorations: Instead of sanding sugar, you can dust the frosted cookies lightly with powder sugar or cocoa powder for a different look.
- Mini Ghosts: Use a smaller cookie cutter for bite-sized spooky treats—I did this for a Halloween party, and everyone loved grabbing them!
How to Make Ghost Cookies Recipe
Step 1: Cream Butter and Cream Cheese Until Smooth
This is where you build the base of your cookie dough. Using a hand or stand mixer, beat the softened butter and cream cheese together on medium speed until completely smooth—no lumps! The smoother this mix, the silkier your cookies will turn out. I like to scrape down the bowl occasionally to make sure everything blends well.
Step 2: Add Sugar, Egg, and Vanilla
Next, add the granulated sugar and beat at medium-high speed for a couple of minutes until pale and fluffy. This little step I learned really helps lighten the dough and keeps the cookies tender. Then, mix in the egg and vanilla extract or paste until combined.
Step 3: Combine Dry Ingredients and Incorporate
Whisk together the flour, cornstarch, baking powder, and salt in a separate bowl. Then add this dry mixture into your wet ingredients in two batches, mixing on low speed just until combined. Be careful here! Overmixing can make your cookies tough, which I learned the hard way. Always scrape the bowl to get everything evenly mixed without overworking.
Step 4: Chill the Dough
Divide the sticky dough into two portions, flatten each into a rectangle, wrap tightly in plastic, and chill in the fridge for at least 2 hours or overnight. Chilling helps the dough firm up so your ghosts keep their shape and bake evenly. If you’re in a rush, you can pop it in the freezer for about 30 minutes instead, but I prefer the slow chill overnight for the best texture.
Step 5: Roll, Cut, and Bake the Cookies
When ready, preheat your oven to 350°F (175°C) and line baking sheets with parchment or silicone mats. Roll out the dough between two floured surfaces or plastic wrap to 1/3-inch thickness. Use a ghost-shaped cookie cutter (about 2 1/2 inches) dusted with flour to cut out shapes. If you don’t have the cutter, a sharp knife works fine for freehand ghosts! Chill the cut cookies again for 15 minutes to prevent spreading, then bake one tray at a time for 12-14 minutes. Keep a close eye to pull them out right before the edges brown for that soft texture.
Step 6: Prepare the Buttercream Frosting
While the cookies cool, whip the butter on medium until smooth, then add vanilla and salt. Slowly mix in powdered sugar and cream until your frosting is fluffy yet pipeable. Adjust thickness with extra cream or powdered sugar as needed. Portion out some frosting, add pink gel food coloring, and prepare piping bags for decorating your ghosts later.
Step 7: Decorate Like a Pro
Once the cookies are completely cool, pipe frosting onto each cookie and press into coarse sanding sugar for that snowy, ghostly coating. Quickly add black round sprinkles for eyes and a sprinkle or two for the mouth. Use the pink frosting to add adorable rosy cheeks. I love how personal and creative you can get here—sometimes I switch up facial expressions or add funny little touches depending on the crowd!
Pro Tips for Making Ghost Cookies Recipe
- Avoid Overmixing: I’ve learned that mixing the dough just until combined keeps these cookies tender and light, so don’t overdo it after adding flour.
- Chill is Your Best Friend: Chilling dough and cut cookies helps them keep their shape and prevents spreading, which is key to those crisp ghost outlines.
- Use Plastic Wrap for Rolling: Rolling dough between sheets of plastic wrap keeps things tidy and helps stop dough from sticking—such a game changer!
- Watch Baking Time Closely: I learned to pull cookies out right before edges brown to keep them soft, as they continue to bake slightly once out of the oven.
How to Serve Ghost Cookies Recipe

Garnishes
I usually keep it simple with sanding sugar and black sprinkles for the eyes and mouth—it gives that classic ghostly sparkle and charming expression. For a fun twist, you could add edible glitter, colorful mini candies, or pipe tiny candy melts to create varied spooky faces. The pink cheeks from the gel-colored frosting add a sweet, friendly vibe that I think really brings the ghosts to life!
Side Dishes
These cookies are delightful on their own but if you’re hosting a spooky get-together, pairing them with warm drinks like spiced apple cider, hot chocolate, or a simple glass of cold milk really completes the treat experience. They are perfect little bites to balance a cup of something warm and cozy.
Creative Ways to Present
One of my favorite ways to present the Ghost Cookies is arranging them on a black or orange platter with small twinkling fairy lights around. For parties, I pipe the frosting onto large cookie pops and stick them upright in a decorated foam block—super cute and easy for guests to grab. You can also wrap individually in clear cellophane with themed ribbons to give as charming gifts.
Make Ahead and Storage
Storing Leftovers
Leftover Ghost Cookies keep beautifully in an airtight container—at room temperature for up to 2 days, in the fridge up to 5 days, or frozen for a lot longer. Just keep them separated with parchment paper to avoid the buttercream sticking together. I like chilling mine thoroughly before stacking because the frosting firms up nicely, but it won’t harden like royal icing, so gentle handling is key.
Freezing
I’ve frozen both the dough and baked cookies. For dough, wrap it tight in plastic wrap and then place in an airtight container or freezer bag—it freezes well for up to a month. When ready, thaw in the fridge overnight before rolling out. Baked but unfrosted cookies freeze great too; just thaw them at room temperature before decorating.
Reheating
For frozen baked cookies, I usually let them come to room temperature naturally to keep that soft texture intact. If you want a little warmth, a quick 5-10 seconds in the microwave on low power helps without drying them out. Just avoid heating frosted cookies directly as the buttercream can melt or lose its shape.
FAQs
-
Can I use store-bought frosting instead of making the buttercream?
Absolutely! While homemade buttercream adds that fresh, buttery flavor and perfect consistency, store-bought frosting works fine if you’re short on time. Just soften it a bit and add a touch of cream or milk if it’s too thick for piping.
-
What if I don’t have a ghost-shaped cookie cutter?
No worries! You can use a small sharp knife to cut freehand ghost shapes or get creative with other Halloween-themed cutters like pumpkins or bats. Size is flexible too; just adjust baking time accordingly.
-
Why is chilling the dough so important in this Ghost Cookies Recipe?
Chilling firms up the dough so the cookies hold their shape and don’t spread too much during baking. Plus, it enhances the texture, giving you soft, tender cookies with slightly crisp edges instead of flat, tough ones.
-
Can I make these cookies ahead of time for a party?
Yes! The cookie dough freezes well, and you can bake the cookies a day or two ahead. Decorate the day of the party for freshest results, or frost in advance and store in the fridge carefully layered with parchment.
Final Thoughts
I absolutely love how these Ghost Cookies turn out every time—the soft, creamy texture combined with the fun icing and spooky decorations just makes me smile. When I first tried this recipe, I was amazed at how simple it was to pull off a homemade cookie that looks so professional. My family goes crazy for them year after year, and I bet once you make these, you’ll want to keep this Ghost Cookies Recipe in your regular baking rotation too. So grab your mixer and let’s get baking these charming little ghosts—you won’t regret making memories (and cookies) together!
Print
Ghost Cookies Recipe
- Prep Time: 20 minutes
- Cook Time: 14 minutes
- Total Time: 2 hours 4 minutes
- Yield: 36 cookies
- Category: Cookies
- Method: Baking
- Cuisine: American
Description
Delightfully soft and creamy ghost-shaped cookies perfect for Halloween or any spooky occasion. These soft-batch cream cheese cookies are tender and buttery, topped with smooth vanilla buttercream frosting and decorated with festive sanding sugar and adorable facial details.
Ingredients
Soft-Batch Cream Cheese Cookies
- 3/4 cup (1 1/2 sticks) unsalted butter, room temperature (170g)
- 1/2 cup or 4 oz. full fat cream cheese, room temperature (113g)
- 1 1/2 cups granulated sugar (300g)
- 1 large egg, room temperature (56g)
- 2 tsp vanilla extract or vanilla bean paste (8g)
- 3 cups all-purpose flour (375g)
- 1 Tbsp cornstarch (8g)
- 1/2 tsp baking powder (2g)
- 1/2 tsp fine salt (3g)
Buttercream Frosting for Cookies
- 1 cup unsalted butter, room temperature (226g)
- 1 Tbsp vanilla extract or vanilla bean paste (12g)
- 1/4 tsp fine salt (2g)
- 3 1/2 cups powdered sugar (454g or 1 lb. box)
- 1/4 cup heavy whipping cream, room temperature (60g)
Decorations
- 1 cup coarse sanding sugar
- Black, 4mm round sprinkles (optional)
- Black strand sprinkles
- Pink gel food coloring
Instructions
- Prepare the Cookie Dough: In a large bowl or stand mixer, beat 3/4 cup butter and 1/2 cup cream cheese on medium speed until smooth. Add 1 1/2 cups granulated sugar and mix on medium-high until lighter in color. Add 1 egg and 2 tsp vanilla extract; mix until incorporated.
- Mix Dry Ingredients: In a separate bowl, whisk together 3 cups flour, 1 Tbsp cornstarch, 1/2 tsp baking powder, and 1/2 tsp salt.
- Combine Ingredients: Add dry mixture to butter mixture in two additions, mixing on low speed until just combined. Scrape sides with spatula after each addition. Dough will be sticky.
- Chill Dough: Divide dough in half, wrap in plastic wrap, flatten into rectangles about 1/2 inch thick. Chill in fridge for 2 hours, freezer for 30 minutes, or overnight in fridge. If overnight, let sit for 10 minutes before rolling.
- Preheat Oven and Prepare Baking Sheets: Preheat oven to 350°F (175°C) about 30 minutes before baking. Line two baking sheets with silicone mats or parchment paper.
- Roll and Cut Dough: Remove one dough portion from fridge/freezer, unwrap onto floured plastic wrap. Dust dough and rolling pin with flour. Roll to 1/3 inch thickness. Cut out 2 1/2-inch ghost shapes using cookie cutter or knife.
- Chill Cut Cookies: Brush excess flour off cookies. Place on baking sheet about 1 inch apart. Chill cookies for 15 minutes in fridge or 5 minutes in freezer to keep shape.
- Bake Cookies: Bake one sheet at a time on top rack for 12-14 minutes. Watch closely and remove before edges brown.
- Cool Cookies: Let cookies cool on pan 15 minutes, then transfer to wire rack. While cooling, knead scraps, rewrap, and chill to reuse.
- Repeat Baking: Repeat rolling, cutting, chilling, and baking with second dough portion and scraps until all dough is used.
- Prepare Buttercream Frosting: Beat 1 cup butter on medium for 30 seconds until smooth. Mix in 1 Tbsp vanilla and 1/4 tsp salt on low speed. Gradually add 3 1/2 cups powdered sugar and 1/4 cup heavy cream, scraping bowl as needed. Adjust consistency by adding cream or sugar.
- Color Frosting: Scoop 1/4 cup frosting, color with pink gel, and fill small piping bag fitted with small round tip (Wilton 5). Fill larger piping bag with remaining frosting and fit with medium round tip (Wilton 10).
- Decorate Cookies: Pour 1 cup white sanding sugar in bowl. Pipe frosting on a cookie, gently press into sugar to coat evenly. Use black round sprinkles or mini chocolate chips for eyes, black strand sprinkles for mouth. Pipe pink cheeks with pink frosting. Repeat for remaining cookies.
Notes
- This recipe yields about 36, 2 1/2-inch ghost cookies, though yield and bake time vary based on cutter size.
- Recipe can be halved for fewer cookies; use half an egg if halving.
- Store frosted cookies airtight up to 2 days at room temperature, 5 days refrigerated, or 1 month frozen.
- Chill cookies thoroughly before stacking with parchment between to prevent sticking.
- Cookie dough can be frozen up to 1 month; thaw in fridge overnight before rolling and baking.
- Baked unfrosted cookies freeze well for up to 1 month; decorate after thawing at room temperature.
- Do not overwork dough to avoid tough cookies; chill dough to prevent spreading and promote soft texture.
- Roll dough evenly to 1/3 inch thickness for uniform baking.
- Avoid overbaking; remove cookies before edges brown for softness.
- Get creative with decorations using fondant or alternative sprinkles if desired.
Nutrition
- Serving Size: 1 cookie
- Calories: 190
- Sugar: 18g
- Sodium: 85mg
- Fat: 10g
- Saturated Fat: 6g
- Unsaturated Fat: 3.5g
- Trans Fat: 0g
- Carbohydrates: 23g
- Fiber: 0.5g
- Protein: 2g
- Cholesterol: 35mg

