

If you’re on the hunt for a show-stopping, fun, and festive cookie to bake this season, you’re going to absolutely adore this Halloween Sugar Cookies Recipe. I first made these for a neighborhood party, and trust me when I say everyone went nuts for the striking colors and that perfect buttery, melt-in-your-mouth texture. Whether you’re baking with kids or just want a super simple way to amp up your Halloween treats, these sugar cookies make the ultimate spooky centerpiece.
Why You’ll Love This Recipe
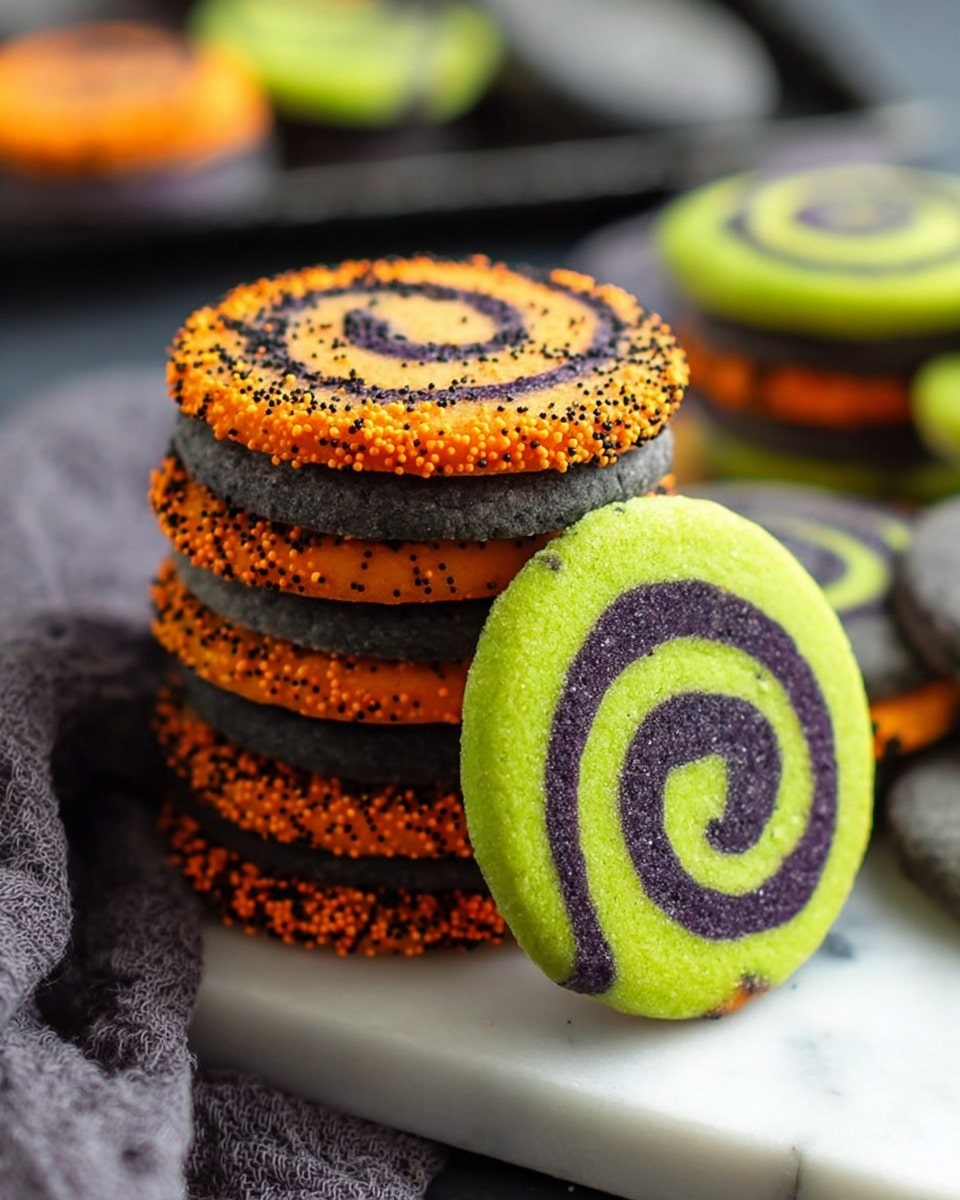
- Vibrant Halloween Colors: The gel food coloring gives these cookies those bright, intense hues that really pop on any dessert tray.
- Buttery and Tender Texture: They’re soft yet sturdy enough to hold their shape, perfect for fancy shapes or simple rounds.
- Fun to Make: Dividing and tinting the dough lets you get hands-on with Halloween creativity, especially if you’re baking with kids.
- Customizable and Versatile: You can easily swap food coloring combos to create your own spooky-themed masterpieces.

Ingredients You’ll Need
These ingredients are simple staples, but they come together beautifully to create the ideal sugar cookie canvas. I like to use gel food coloring for that punch of color without messing with the dough’s texture — you’ll see how it makes all the difference!
- All-purpose flour: The base for a tender, yet firm cookie that holds vibrant color well.
- Baking powder: Just enough leavening to give a slight lift without fluffing out the dough too much.
- Salt: Balances sweetness and enhances flavor.
- Butter at room temperature: Creams with sugar beautifully for that classic rich sugar cookie taste.
- Granulated sugar: Sweetness and a bit of crunch on the edges when baked.
- Large eggs: Bind everything together and add moisture.
- Vanilla extract: Adds warmth and depth of flavor.
- Orange gel food coloring: I used electric orange for that glowing Halloween vibe.
- Black gel food coloring: Super black is key to get that deep, midnight shade.
- Halloween sprinkles (optional): Because a little sparkle or spooky confetti never hurt anyone!
Variations
I love playing around with color combos depending on the vibe I want for the season. This recipe is a fantastic base because it’s so easy to customize according to your spooky mood or party theme.
- Color swaps: I’ve experimented with black & green for a creepy graveyard look and purple & green for a witchy appeal — both were crowd-pleasers!
- Sprinkle toppings: Adding different seasonal sprinkles or sanding sugar on the edges before rolling makes it extra festive and fun for kiddos to help with.
- Flavored extracts: Try almond or pumpkin spice instead of vanilla to tailor the cookies for a more autumnal twist.
- Gluten-Free: I haven’t tested this recipe gluten-free myself, but swapping with your favorite 1:1 gluten-free flour blend should work; just check consistency when mixing.
How to Make Halloween Sugar Cookies Recipe
Step 1: Mix the Dry Ingredients
Start by whisking together the flour, baking powder, and salt in a bowl. This ensures even distribution of all your dry leavening agents and seasoning. I always sift or at least break up any lumps here because it saves headaches later when you want a silky-smooth dough.
Step 2: Cream Butter and Sugar
In a separate large mixing bowl, beat the softened butter and granulated sugar until you get a light and fluffy mixture. This takes a few minutes — I like to take my time here because it creates the perfect base for that tender crumb. Don’t rush it or you’ll lose the airiness you’re aiming for.
Step 3: Add Eggs and Vanilla
Once your butter and sugar are blended, add the eggs and vanilla extract. Beat well until everything is fully incorporated. This is where your cookie dough starts to come alive, so make sure it’s silky smooth with no streaks.
Step 4: Incorporate Dry Ingredients
Slowly add in your flour mixture in small batches while mixing on low. This prevents a floury mess and helps your dough come together without overworking it. Once everything is combined and the dough feels smooth, you’re ready for the fun part — dividing and coloring.
Step 5: Divide and Color Your Dough
Separate the dough into two equal parts. I recommend coloring one portion orange and the other black to get that classic Halloween look — but of course, you can pick any colors you want! Use gel food coloring for intense shades without altering the dough’s texture. I learned to rinse the bowl and beaters between colors so there’s no sneaky blending that muddies your colors.
Step 6: Chill and Shape
After your dough is tinted, form each color into a ball, then flatten into a patty, reshaping to rectangles. Wrapping them tightly in plastic wrap and chilling for 1-2 hours is crucial — this firms up the dough, making it way easier to slice and shape later on.
Step 7: Roll, Stack, and Prepare for Baking
Roll each dough rectangle out to about ⅛ to ¼ inch thickness, stacking one on top of the other (orange bottom, black on top works great!). Trim edges with a pizza cutter for clean, straight sides. Then, lightly brush the outside with water, sprinkle on your Halloween sprinkles if you’re using them, and gently press them in. After that, roll the dough stack into a log, wrap it again, and chill for at least an hour so it holds its shape when sliced.
Step 8: Bake to Perfection
Preheat your oven to 350°F (175°C). Slice your chilled dough log into ¼ to ½ inch rounds with a thin, sharp knife or blade to avoid squishing the dough. Place cookies about 2 inches apart on a parchment-lined baking sheet. Bake for 10-12 minutes or until the tops lose their shine and edges start to firm up. I find that pulling them out right before golden keeps them soft and chewy!
Pro Tips for Making Halloween Sugar Cookies Recipe
- Use Gel Food Coloring: I found liquid food coloring thins out dough and dulls color, but gel keeps your dough firm and colors vibrant.
- Chill, Chill, Chill: Don’t skip the chill time—it stops cookies from spreading and keeps your layers neat for slicing.
- Thin Slices Are Better: Thin cookie slices mean crisp edges with a soft center—thicker slices sometimes bake unevenly.
- Clean Mixing Tools Between Colors: Avoid muddled colors by washing your mixer bowl and beaters between batches.
How to Serve Halloween Sugar Cookies Recipe
Garnishes
I usually stick with Halloween-themed sprinkles pressed on the edges — they add a playful pop and a slight crunch that kids and adults both love. You could also drizzle royal icing in spooky patterns or use edible markers for fun faces!
Side Dishes
These cookies pair beautifully with a warm cup of apple cider or a classic pumpkin spice latte. For parties, I like to set them alongside a cheese board or fruit to balance the sweetness.
Creative Ways to Present
For a fun Halloween twist, I’ve rolled the dough into spiral logs making a candy-cane style effect—slicing these creates mesmerizing black and orange swirls. Serving them on black or orange platters with some flickering candles really sets a festive mood!
Make Ahead and Storage
Storing Leftovers
I keep leftover cookies in an airtight container at room temperature, layering with parchment paper to keep them from sticking together. They usually stay fresh and soft for up to 4 days, though I don’t often get leftovers!
Freezing
If you want to prep ahead, you can freeze the dough logs wrapped tightly in plastic wrap. When you’re ready, thaw them in the fridge overnight before slicing and baking. Alternatively, baked cookies freeze well too—just make sure they’re completely cooled before freezing in an airtight container.
Reheating
To warm leftovers, I pop them in the microwave for about 10 seconds or sprinkle a little water on top and heat in the oven at 300°F for 5-7 minutes. This refreshes the softness without drying them out.
FAQs
-
Can I use regular liquid food coloring instead of gel?
While you can use liquid food coloring, gel is highly recommended because it provides more intense color without affecting the dough’s consistency. Liquid coloring can thin the dough and make rolling or shaping tricky.
-
How long should I chill the dough before baking?
Chilling the dough at least one to two hours helps firm it up so you can slice the logs cleanly and prevents spreading in the oven. If pressed for time, 1 hour works, but longer is better for shape retention.
-
Can I freeze baked Halloween sugar cookies?
Yes! After cooling completely, place cookies in an airtight container or freezer bag. They’ll keep well for up to three months. Thaw at room temperature before serving.
-
What if my dough is too sticky after adding color?
If your dough gets a bit sticky, pop it back in the fridge to firm up before rolling. Adding color occasionally warms the dough and softens butter, so chilling is key to handling it easily.
Final Thoughts
This Halloween Sugar Cookies Recipe quickly became one of my absolute favorites for fall — they’re fun to make, stunning to look at, and irresistibly delicious. What makes them extra special for me is how easy it is to involve family or friends in the decorating and rolling process, creating memories along with tasty treats. When you bake these, you’re not just making cookies; you’re turning the kitchen into a Halloween celebration. Give them a try — I promise you’ll want to make them year after year!
Print
Halloween Sugar Cookies Recipe
- Prep Time: 15 minutes
- Cook Time: 10 minutes
- Total Time: 2 hours 25 minutes
- Yield: 20 cookies
- Category: Dessert
- Method: Baking
- Cuisine: American
Description
These festive Halloween Sugar Cookies feature colorful dough tinted with vibrant gel food colorings and can be rolled into logs with sprinkles for a spooky, fun treat. The recipe yields soft, buttery cookies perfect for Halloween celebrations, offering creative color combinations and a delightful sweetness.
Ingredients
Dry Ingredients
- 3 cups all-purpose flour
- 1 tsp baking powder
- ½ tsp salt
Wet Ingredients
- 1 cup butter at room temperature
- 1½ cups granulated sugar
- 2 large eggs
- 2 tsp vanilla extract
Colorings & Decorations
- 1 tsp orange gel food coloring (electric orange)
- 1 tsp black gel food coloring (super black)
- Halloween sprinkles (optional)
Instructions
- Mix dry ingredients: In a bowl, combine the all-purpose flour, baking powder, and salt. Stir well and set aside.
- Cream butter and sugar: In a large mixing bowl, cream together the softened butter and granulated sugar until smooth and fluffy.
- Add wet ingredients: Beat in the eggs one at a time along with the vanilla extract until well incorporated.
- Combine flour mixture: Gradually add the flour mixture to the butter mixture a little at a time, mixing continuously until the dough is smooth and the flour is fully incorporated.
- Divide and color dough: Split the dough into two equal portions. Tint one portion with orange gel food coloring and the other with black gel food coloring. Use a mixer to evenly blend the colors into each portion of dough, rinsing the bowl and beater between colors to avoid contamination.
- Shape and chill dough: Form each colored dough into a ball, then flatten into a patty and reshape edges to make a rectangle. Wrap each dough rectangle in plastic wrap and refrigerate for 1 to 2 hours to firm up.
- Roll and stack dough: Roll out each chilled dough rectangle to about 1/8 to 1/4 inch thick. Stack the dough layers, orange on the bottom and black on top.
- Add sprinkles (optional): Brush the outside edges of the dough stack lightly with water, then press Halloween sprinkles onto the edges if desired.
- Form dough log and chill: Roll the layered dough into a log, wrap tightly in plastic wrap, and refrigerate for at least 1 hour to firm up.
- Preheat the oven: Set oven temperature to 350°F (175°C).
- Slice and bake: Using a sharp thin blade, cut the dough log into 1/4 to 1/2 inch thick cookies. Place the rounds spaced about 2 inches apart on a parchment-lined baking sheet.
- Bake cookies: Bake in the preheated oven for 10-12 minutes or until the cookie surfaces are no longer shiny and edges are set.
- Cool and serve: Remove cookies from oven and allow to cool on the baking sheet for a few minutes before transferring to a wire rack to cool completely.
Notes
- For different color combinations, try the following gel food coloring blends: Black/Green (1 tsp black + 1 tsp electric green), Purple/Green (3 tsp electric purple + 1 tsp electric green).
- This recipe makes dough sufficient for one color combination; to make multiple colors, prepare multiple batches.
- Use a very sharp, thin knife or blade to slice the chilled dough logs for clean, uniform cookies without squishing.
- Chilling the dough thoroughly is crucial for easier slicing and cookies that retain shape while baking.
Nutrition
- Serving Size: 1 cookie
- Calories: 140
- Sugar: 10g
- Sodium: 90mg
- Fat: 7g
- Saturated Fat: 4.5g
- Unsaturated Fat: 2g
- Trans Fat: 0g
- Carbohydrates: 18g
- Fiber: 0.5g
- Protein: 1.5g
- Cholesterol: 35mg
