

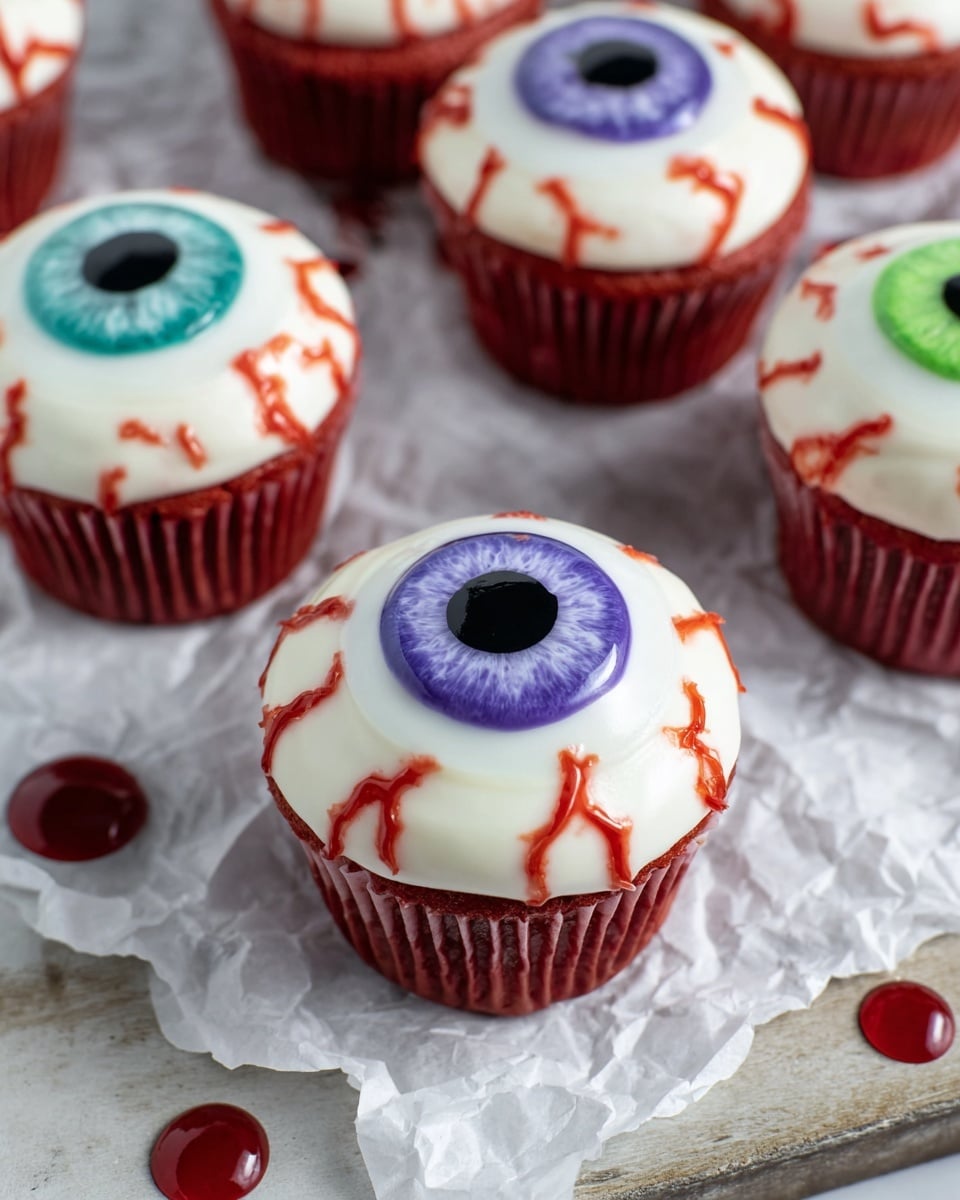
If you’re hunting for a Halloween treat that’s as fun to make as it is to eat, you’re going to adore this Eyeball Cupcakes Recipe. I absolutely love how these spooky red velvet cupcakes with edible “eyeball” decorations turn out—my family goes crazy for them every year! From the perfectly tender cupcakes to the striking fondant irises and the deliciously creepy raspberry “blood,” you’re in for a fan-freaking-tastic baking adventure. So grab your apron and let’s get started!
Why You’ll Love This Recipe
- Striking Visual Appeal: These cupcakes look insanely cool with their realistic fondant eyeballs and vivid “blood” detail.
- Delicious Red Velvet Base: The tender, moist red velvet cupcakes are a crowd-pleaser, perfect for any spooky occasion.
- DIY Fondant Decoration: Creating your own edible irises is easier than you’d expect and super rewarding.
- Versatile and Customizable: You can tweak colors, flavors, and even make mini cupcakes for parties or kids.

Ingredients You’ll Need
Getting your ingredients right is the first secret to success here. I always make sure my butter and eggs are at room temperature so they blend beautifully, and I trust using cake flour to keep these cupcakes tender. Plus, the mix of real jam in the edible blood gives it a sweet, natural taste that’s not too artificial.
- Cake Flour: Ensures your cupcakes are soft and tender rather than dense.
- Unsweetened Cocoa Powder: Adds subtle chocolate undertones that perfect red velvet’s flavor.
- Baking Powder: Gives your cupcakes the perfect rise without collapsing.
- Unsalted Butter: Room temp for easy creaming with sugar—this locks in moisture.
- Granulated Sugar: Sweetness that balances against the cocoa and tang.
- Eggs: Also bring structure and moisture; be sure they’re not cold.
- Buttermilk: Adds that classic tangy flavor and contributes to tenderness.
- Vegetable or Canola Oil: Keeps cupcakes moist and soft.
- Vanilla Extract or Bean Paste: Gives rich, aromatic depth to the batter and frosting.
- Red Gel or Liquid Food Coloring: For that vibrant red velvet hue that makes these cupcakes pop.
- Powdered Sugar: For luscious, smooth vanilla buttercream frosting.
- Heavy Whipping Cream: Used in frosting for a creamy, spreadable texture.
- Seedless Raspberry or Strawberry Jam: The base for delicious edible “blood” with a natural fruity kick.
- White and Black Fondant: To craft the spooky eyeball irises and pupils.
- Gel Food Coloring (Blue, Purple, Green): Coloring the iris to make those eyeballs extra eerie.
Variations
One thing I love about this Eyeball Cupcakes Recipe is how easy it is to make it your own. Whether you want to switch up the colors or even adapt it for dietary needs, these cupcakes are a fantastic canvas.
- Gluten-Free Version: I swapped in my favorite gluten-free flour blend once, and honestly, these still baked up perfectly fluffy after letting the batter rest a bit—your best bet for amazing texture!
- Mini Eyeball Cupcakes: If you’re throwing a party, I highly recommend going mini—just adjust the bake time to 9–10 minutes and you get way more eyeball fun!
- Flavor Twists: Vanilla buttercream is classic, but I’ve also tried cream cheese frosting with these, which adds a tangy contrast that’s divine.
How to Make Eyeball Cupcakes Recipe
Step 1: Craft the Creepy Fondant Irises
I always start with the fondant eyeballs because they need some drying time. First, knead white fondant until it’s pliable, then roll it out and cut 12 circles about an inch wide. My trick is using a small circle cutter or even a bottle cap—anything that’s about right size will work. If it starts sticking, just dust a little cornstarch on your surface.
Next, mix gel food coloring with a bit of clear alcohol or extract to create a paint mixture. I love having a variety of eye colors—blue, purple, and green really make these pop! Using a small brush, paint thick layers on the white fondant circles. Don’t worry if it looks streaky; that will add to the spooky vibe.
Then roll out black fondant and cut smaller circles for the pupils—about a third of an inch wide. Pop those on the center of each painted iris. Now, here’s a cool tip I discovered: let the paint thicken slightly, then use your brush to pull the paint from the pupil outward toward the edges, creating eerie streaks. If it’s too wet, give it a few more minutes to dry and try again.
Set these aside to dry fully while you prep the cupcakes.
Step 2: Whip Up the Red Velvet Cupcake Batter
Preheat your oven to 350°F (175°C) and line a 12-cup muffin tin with paper liners. Sifting the cake flour, cocoa powder, baking powder, and salt together really helps keep your cupcakes light—don’t skip it!
Then, cream your room temperature butter and sugar with an electric mixer for about a minute until the mixture is pale and fluffy. This is one of those moments where your kitchen fills with cozy smells—it gets you excited to bake!
Add in the eggs one at a time, mixing thoroughly, and scrape down the sides as needed so everything is mixed well. Pour in the buttermilk, oil, vanilla, and food coloring and blend on low until the batter looks smooth and evenly red.
Finally, add your dry ingredients in two goes, mixing just until the flour disappears—overmixing can make your cupcakes tough, so watch out for that.
Using a cookie scoop makes filling muffin cups a breeze and means your cupcakes bake up evenly. Fill each liner about two-thirds full, then give the pan a quick “bang” on the counter to release any trapped air bubbles.
Bake 17–20 minutes, or until a toothpick comes out with moist crumbs attached, then cool in the pan for 10 minutes before transferring to a rack.
Step 3: Make the Vanilla Buttercream Frosting
Cream softened butter on medium speed for about 30 seconds with a paddle attachment until smooth. Then add vanilla and salt, and mix gently.
Slowly add powdered sugar, alternating halfway through by adding the heavy cream to keep your frosting perfectly creamy and easy to pipe. I’ve found adjusting with a little more cream or sugar helps get it just right for spreading or piping.
Beat the frosting for another minute or two till it’s ultra smooth, then spoon it into a piping bag fitted with a large round tip. Keep it sealed with a rubber band so it doesn’t dry out or spill.
Step 4: Mix the Edible “Blood” for Creepy Veins
Combine seedless raspberry jam, water, and optional red gel food coloring until you get a thin, bright red “blood” mixture. Transfer this to a small piping bag with a tiny round tip—or just snip a small opening if you don’t have one. Keep the tip propped up to avoid drips, you don’t want a messy bloodbath!
Step 5: Assemble the Eyeball Cupcakes
Once your cupcakes are fully cool, pipe a generous mound of buttercream on top. I like to gently tap each cupcake on the counter so the frosting settles into a smooth mound—this helps the fondant stick better.
Use a small spatula to carefully place one fondant iris in the center of each cupcake. Pop the cupcakes in the fridge for about 15 minutes so the frosting firms up—this is key for piping the blood veins without smudging.
Finally, pipe the raspberry blood in thin “veins” radiating out from the eyeball for an extra creepy effect. Then step back and admire your ghastly masterpiece before enjoying!
Pro Tips for Making Eyeball Cupcakes Recipe
- Keep Ingredients at Room Temperature: I’ve learned this tip the hard way—cold eggs or butter can mess with your cupcake rise and texture.
- Don’t Overmix the Batter: Just mix until combined. Overmixing toughens cupcakes, and you want that melt-in-your-mouth softness.
- Seal Your Piping Bags Tight: Using rubber bands to close the top prevents drips and makes piping easy-peasy, especially for the blood veins.
- Let Fondant Paint Dry Properly: Patience here makes the difference; rushing this step can smudge your spooky eye effect.
How to Serve Eyeball Cupcakes Recipe
Garnishes
I typically keep the decoration simple—those painted fondant eyeballs do all the heavy lifting! But if you want to go extra spooky, a few edible silver dragées or red sanding sugar around the base of the frosting can add some eerie shimmer.
Side Dishes
Serve these with a big batch of punch or a themed cocktail for your Halloween party. I’ve found they pair perfectly with rich hot chocolate or even a tart cranberry spritzer—something to balance the sweetness.
Creative Ways to Present
One year I arranged these Eyeball Cupcakes Recipe on a “blood-spattered” platter lined with red cellophane and a few plastic spider rings. It was such a hit! You could also place them on a tiered stand with cobwebs or serve in little cauldrons for a fun surprise.
Make Ahead and Storage
Storing Leftovers
I usually store unfrosted cupcakes in an airtight container at room temperature for up to two days. They stay moist and tender longer in the fridge—up to a week—but I always bring them back to room temp before frosting. The less moisture in frosting, the better it pipes!
Freezing
If you want to freeze, I separate cupcakes from frosting. Freeze unfrosted cupcakes wrapped individually in plastic wrap and placed in a freezer bag for up to 3 months. I also freeze leftover frosting in an airtight jar. When thawed, stir it well before piping—it’s still delicious!
Reheating
To refresh frozen cupcakes, I thaw them overnight in the fridge and then bring them to room temperature before frosting. If you need to warm them a bit, a quick 10-second zap in the microwave does the trick without drying them out.
FAQs
-
Can I make the eyeball decorations ahead of time?
Absolutely! The fondant irises can be made a day or two in advance and stored in an airtight container at room temperature. Just be sure the painted gel coloring is completely dry before storing to prevent smudging.
-
What if I don’t have fondant for the eyeballs?
You can get creative using white chocolate discs or even candy eyeballs from a store if you want to skip making fondant. However, custom fondant eyes let you play with colors and size, making the effect way spookier and more personalized.
-
Is there a vegan or dairy-free version of this Eyeball Cupcakes Recipe?
While this recipe uses dairy and eggs, you can substitute vegan butter and a flax egg in your cupcake batter, and swap heavy cream with coconut cream in the frosting. Keep in mind the texture and flavor will vary slightly, but the spooky look can still shine!
-
How do I prevent the blood from running all over?
Chilling your cupcakes after piping the buttercream and before adding the raspberry blood veins really helps the “blood” stay in place. Also, keep your piping tip very small for better control over the lines.
-
Can I use alternative flavors for the filler instead of raspberry jam?
Yes! Strawberry jam works wonderfully too. If you want to experiment, try cherry preserves or even a thick pomegranate molasses diluted slightly with water for a more tart, rich “blood” effect.
Final Thoughts
This Eyeball Cupcakes Recipe has become my go-to for Halloween because it strikes the perfect balance between creepy and delicious. The first time I made them, I was amazed at how impressed my friends were—not just by the appearance but the rich, moist cupcakes underneath it all. I really hope you’ll try making these too, because there’s just something magical about biting into a sweet cupcake that looks like a spooky eyeball staring back at you. Happy baking, and may your treats be as delightfully eerie as mine!
Print
Eyeball Cupcakes Recipe
- Prep Time: 10 minutes
- Cook Time: 18 minutes
- Total Time: 58 minutes
- Yield: 12 cupcakes
- Category: Dessert
- Method: Baking
- Cuisine: American
Description
These Eyeball Cupcakes are a spooky and fun treat perfect for Halloween or any eerie occasion. Featuring moist red velvet cupcakes topped with creamy vanilla buttercream, each cupcake is decorated with handmade fondant irises painted in vibrant colors and finished with edible fake blood to resemble creepy eyeballs. The recipe combines classic baking techniques with creative decoration for a frightfully delightful dessert.
Ingredients
Red Velvet Cupcakes
- 1 1/3 cups cake flour (160g)
- 1 Tbsp unsweetened cocoa powder, sifted (5g)
- 1 1/2 tsp baking powder (6g)
- 1/4 tsp fine salt (2g)
- 4 Tbsp (1/2 stick) unsalted butter, room temperature (56g)
- 2/3 cup granulated sugar (133g)
- 2 large eggs, room temperature (112g)
- 1/2 cup buttermilk, room temperature (120g)
- 1/3 cup vegetable or canola oil (73g)
- 1 tsp vanilla extract or vanilla bean paste (4g)
- 1/2 tsp red gel food coloring or 1 Tbsp liquid food coloring
Vanilla Buttercream Frosting
- 1/2 cup (1 stick) unsalted butter, room temperature (113g)
- 1 tsp vanilla extract or vanilla bean paste (4g)
- 1/4 tsp fine salt (2g)
- 2 cups powdered sugar (250g)
- 2 Tbsp heavy whipping cream, room temperature (30g)
Edible Fake Blood
- 1/3 cup seedless raspberry or strawberry jam (95g)
- 2 Tbsp water (30g)
- 1/4 tsp red gel food coloring or 1 tsp liquid food coloring (optional)
Suggested Tools / Decoration
- 1/3 cup White Fondant
- 2 Tbsp Black Fondant
- Small Paint Brush
- Gel Food Coloring: blue, purple, and/or green
- Electric hand mixer or stand mixer
- Muffin tin
- Cupcake liners
- Small Whisk
- Large Piping Bag
- Large Round Piping Tip (like a Wilton 2A)
- Small Piping Bag
- Small Round Piping Tip (like a Wilton 3)
Instructions
- Prepare Fondant Iris: Knead white fondant until warm, roll it out, and cut 12 one-inch circles. Dust counter with cornstarch if fondant sticks. Mix gel food coloring with clear alcohol or extract and paint each white circle’s top. Cut 12 black fondant pupils about one-third inch in diameter and place in the center of each painted iris. Use a paintbrush to streak the paint from the pupil edges to the iris edges for a spooky look, letting the paint dry as needed.
- Make Red Velvet Cupcakes: Preheat oven to 350°F (175°C) and line a muffin tin with 12 liners. Sift together cake flour, cocoa powder, baking powder, and salt. Cream butter and sugar with a mixer at medium-high speed for one minute until lightened. Add eggs one at a time at medium speed, scraping bowl as needed. Mix in buttermilk, oil, vanilla, and red food coloring on low speed. Add dry ingredients in two parts on low speed, mixing just until flour is incorporated. Divide batter evenly and bake 17-20 minutes or until a toothpick inserted comes out with moist crumbs. Cool in the pan for 10 minutes, then transfer to wire rack to cool completely.
- Prepare Vanilla Buttercream Frosting: Beat butter for 30 seconds with a paddle attachment until smooth. Add vanilla extract and salt, beating on low until combined. Gradually add powdered sugar on very low speed, mixing in heavy cream halfway to ease blending. Continue mixing on low for 1-2 minutes until smooth. Adjust consistency with more cream or powdered sugar if needed. Fill a large piping bag fitted with a round tip and seal.
- Make Edible Fake Blood: Whisk seedless raspberry jam, water, and optional red gel food coloring until thin and smooth. Transfer to a small piping bag fitted with a small round tip and seal. If a small tip is unavailable, cut a tiny opening in the bag’s tip. Prop the tip upward to prevent dripping.
- Decorate Cupcakes: Once cooled, pipe a large round mound of buttercream on each cupcake and gently tap to smooth. Place a fondant iris atop the buttercream center. Chill cupcakes in the refrigerator for 15 minutes to firm frosting. Carefully pipe veins of edible blood around the sides of each cupcake. Serve and enjoy your eerie eyeball cupcakes!
Notes
- For mini eyeball cupcakes, use mini muffin tins to make about 40 mini cupcakes and bake for 9-10 minutes at 350°F (175°C).
- Use room temperature ingredients for better mixing and texture.
- Measure flour by spooning into the cup and leveling or use a kitchen scale.
- Mix batter only until combined to keep cupcakes tender and fluffy.
- Use a large cookie scoop to ensure even cupcake heights.
- Banging the cupcake pan on the counter before baking removes air bubbles for a smoother bake.
- Seal piping bags with rubber bands to prevent frosting leakage and ease piping.
- For gluten-free cupcakes, substitute the cake flour with a gluten-free flour blend and allow the batter to rest for 30 minutes before baking.
- Store unfrosted cupcakes in an airtight container at room temperature for up to 2 days, in the fridge for up to 1 week, or in the freezer for up to 3 months.
- Buttercream frosting can be stored refrigerated or frozen; stir well upon thawing.
- Frost cupcakes just before serving for best texture, but frosted cupcakes can be refrigerated up to 3 days or left out 3 hours.
Nutrition
- Serving Size: 1 cupcake
- Calories: 320 kcal
- Sugar: 32 g
- Sodium: 190 mg
- Fat: 18 g
- Saturated Fat: 8 g
- Unsaturated Fat: 7 g
- Trans Fat: 0 g
- Carbohydrates: 38 g
- Fiber: 1 g
- Protein: 3 g
- Cholesterol: 55 mg


