

If you’re on the hunt for a cookie recipe that’s as fun to make as it is to devour, you’ve hit the jackpot. I absolutely love this Zombie Cookies Recipe because it brings vibrant colors, a deliciously soft texture, and a little spooky flair with candy eyeballs that my family seriously goes crazy for. Whether you’re baking for a Halloween party or just want a batch of cookies that stand out, this recipe has got your back — and a few tricks I’m excited to share that’ll make your cookies the star of the show.
Why You’ll Love This Recipe
- Super Simple Ingredients: You probably have most of these in your pantry, making it easy to bake on a whim.
- Fun and Festive: The colorful dough and candy eyeballs bring a playful touch that’s perfect for any occasion.
- Soft, Chewy Texture: Unlike typical crunchy cookies, these stay tender and melt in your mouth.
- Kid-Approved: I discovered that kids especially love helping with the rolling and decorating steps!

Ingredients You’ll Need
These ingredients come together in such a magical way. The cream cheese adds richness and moisture, the cake mix simplifies the process (and adds flavor), and the food coloring lets your creativity run wild. Pro tip: go for a white cake mix because it gives you a perfect blank canvas for those zombie-inspired colors.
- Cream cheese: Make sure it’s fully softened to avoid lumps and get that silky texture in your dough.
- Butter: Also room temperature; this helps everything blend smoothly and your cookies bake evenly.
- Egg: This binds the dough together—don’t skip it!
- Vanilla extract: Adds a lovely warmth and depth that complements the cake mix perfectly.
- White cake mix: The base of the cookie – fun and easy to work with.
- Food coloring (purple and green): The signature zombie colors! You can experiment with shades here to get your favorite scary look.
- Sprinkles (optional): Adds texture and a pop of whimsy if you want, especially festive ones that match the vibe.
- Confectioner’s sugar: For rolling—this gives the cookies a pretty, snowy coating and helps them keep their shape.
- Candy eyeballs: The pièce de résistance! These add personality and definitely nail the zombie vibe.
Variations
One of the best things about this Zombie Cookies Recipe is how easy it is to switch things up for your own spin. I love experimenting with different colors and add-ins (because who says zombies can’t be pink?). Feel free to get creative—it’s your cookie apocalypse after all!
- Color combos: I once made a batch with neon green and bright orange—totally eye-catching and a hit at a kids’ party.
- Sprinkle mix-ins: Using Halloween-themed sprinkles or edible glitter ups the fun factor and adds texture.
- Chocolate twist: Swap out the white cake mix for chocolate or add mini chocolate chips to the batter for a deeper flavor.
- Gluten-free option: Choose a gluten-free cake mix—just know that texture might change slightly but still delicious.
How to Make Zombie Cookies Recipe
Step 1: Make the Creamy Base
Start by beating the softened cream cheese and butter together until the mixture is light and fluffy. I like using a stand mixer for this because it gets the texture perfect quickly, but a hand mixer works fine too. Adding an egg and the vanilla extract next helps everything blend harmoniously. This step creates the rich, soft foundation your cookies will love.
Step 2: Add the Cake Mix and Color
Gently stir in the white cake mix until just combined—you don’t want to overmix here or your cookies could become tough. Then, split the dough into two bowls. This is when the magic happens: add your chosen food coloring (purple in one bowl, green in the other) and any sprinkles if you’re adding them. Mix each bowl well until the colors and textures are consistent.
Step 3: Chill and Shape
Cover the bowls and chill the dough for at least 30 minutes. This makes shaping easier and prevents cookies from spreading too much. Once chilled, scoop out 2-3 tablespoon-sized portions, roll them into balls, and then roll those in confectioner’s sugar for a frosted effect. Place them on a parchment-lined baking sheet, pressing down gently but not flattening completely—these cookies keep a great shape when baked this way.
Step 4: Bake and Decorate
Bake the cookies at 350°F (175°C) for 10-12 minutes. Right after pulling them from the oven, press candy eyeballs into each cookie before they cool—that way, the eyes stick perfectly without falling off later. Let the cookies cool completely on a wire rack before enjoying or storing.
Pro Tips for Making Zombie Cookies Recipe
- Room Temperature Ingredients: I learned the hard way that cold cream cheese or butter can make mixing harder and the texture off; always soften them fully.
- Don’t Overmix the Dough: Stir just until combined to keep the cookies tender and avoid toughness.
- Chill Before Baking: This step is crucial – chilled dough shapes better and results in thicker, chewier cookies.
- Add Eyeballs Immediately: Put candy eyes in right out of the oven so they adhere properly and don’t fall off after cooling.
How to Serve Zombie Cookies Recipe
Garnishes
For garnishes, I like to add a light dusting of extra confectioner’s sugar to bring out that eerie, misty effect—kind of like a creepy fog hovering over your zombies. You can also try edible glitter for a subtle shine, which kids think is totally magical.
Side Dishes
These cookies pair wonderfully with a tall glass of cold milk, but for spooky parties, I often set them alongside a bowl of green punch or blood-red cranberry juice. They also look amazing with a scoop of vanilla ice cream for a fun dessert twist.
Creative Ways to Present
For Halloween, I like to arrange these Zombie Cookies in a large circular pattern on a black platter with fake spider webs and mini plastic spiders scattered around. Another fun idea is to stack them on a cake stand, layering with green and purple colored napkins in between to accentuate the colors.
Make Ahead and Storage
Storing Leftovers
I store leftover Zombie Cookies in an airtight container at room temperature. They stay soft and delicious for about 4-5 days, but honestly, they never last that long in my house! Placing parchment paper between layers keeps them from sticking together.
Freezing
You can freeze these cookie dough balls before baking—just shape them, wrap tightly, and freeze for up to 2 months. When ready to bake, let them thaw slightly and bake as usual. I’ve found that freezing the dough preserves the color and texture better than freezing baked cookies.
Reheating
If you have leftover baked cookies, warming them in the microwave for about 10 seconds helps bring back their soft, fresh-baked feel. Just be sure not to overdo it or they’ll get chewy in the wrong way.
FAQs
-
Can I make Zombie Cookies without cream cheese?
While cream cheese gives these cookies their signature softness and richness, you could try substituting with full-fat Greek yogurt or sour cream, but expect a slightly different texture and flavor. For best results, stick to the cream cheese if you can.
-
What’s the best way to keep candy eyeballs from falling off?
Press the candy eyeballs into the cookies immediately after you take them out of the oven, while the cookies are still warm but not too hot to handle. This helps them stick in place as the cookies cool and set.
-
Can I use different colors for the dough?
Absolutely! Feel free to swap in any colors you like. I’ve tried blues, reds, and even a rainbow mix just for fun — each gives a unique flair to your Zombie Cookies.
-
How do I prevent the cookies from spreading too much?
Chilling the dough for about 30 minutes is crucial here. It firms up the dough so that when it bakes, the cookies retain their shape and don’t flatten into mystery blobs.
Final Thoughts
Honestly, this Zombie Cookies Recipe has become a household favorite around here. I love how it combines the nostalgic fun of cake mix cookies with a little creative spin that makes every batch feel special. The colors, the candy eyes, and that irresistible texture mean you end up with more than just a treat — it’s an experience you’ll want to share. So go ahead, give it a try, and make some spooky memories in your kitchen. You’ll be glad you did!
Print
Zombie Cookies Recipe
- Prep Time: 10 minutes
- Cook Time: 12 minutes
- Total Time: 52 minutes
- Yield: 24 cookies
- Category: Dessert
- Method: Baking
- Cuisine: American
Description
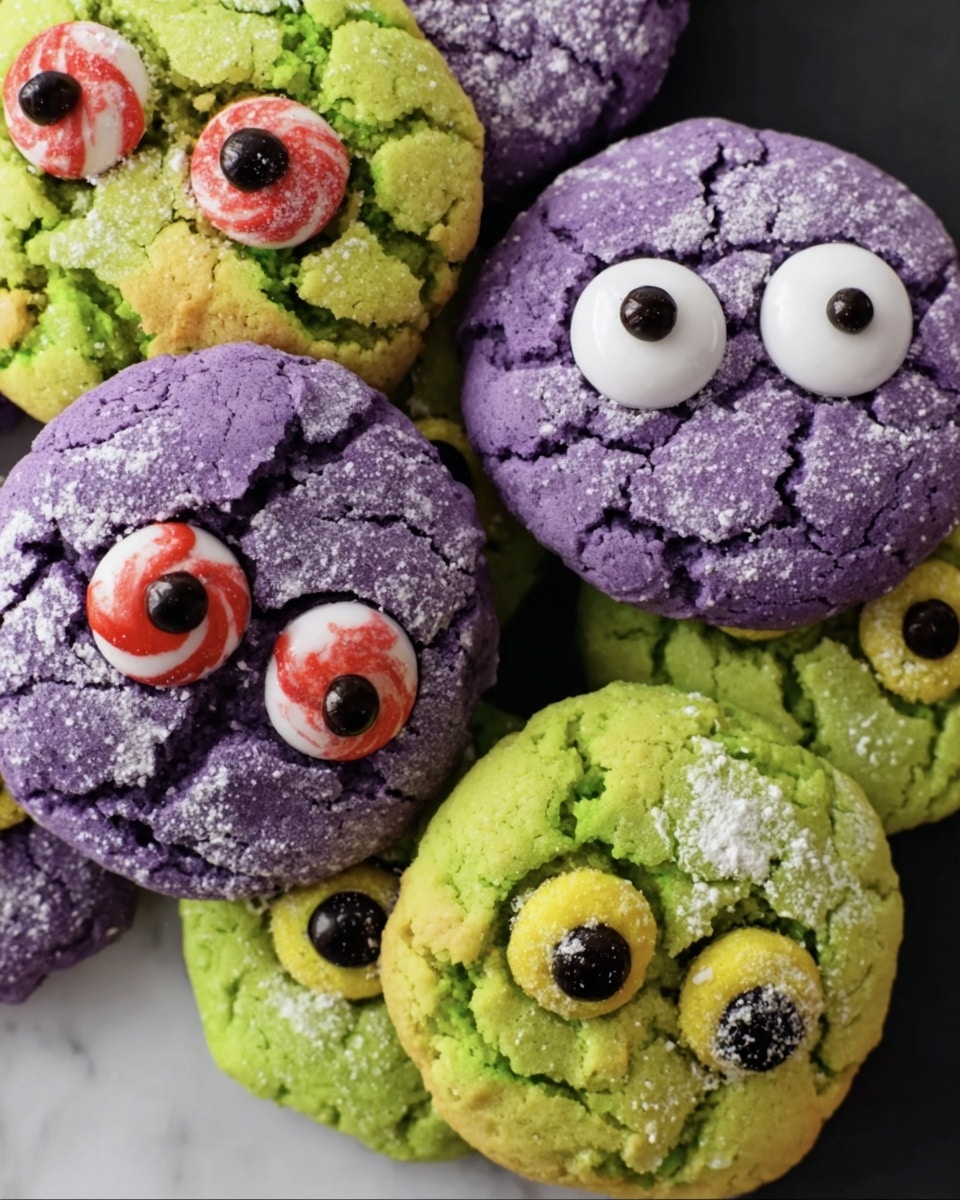
Delightfully spooky and colorful Zombie Cookies made with a creamy cake mix batter dyed in vibrant hues, coated in confectioner’s sugar, and decorated with candy eyeballs. Perfect for Halloween or any fun-themed occasion, these cookies are soft, fluffy, and irresistibly festive.
Ingredients
Base Ingredients
- 8 ounces cream cheese – room temperature
- 1/2 cup butter – room temperature
- 1 egg
- 1 tsp vanilla extract
- 1 box white cake mix
Color and Decoration
- Food coloring – purple and green
- Sprinkles (optional)
- Confectioner’s sugar, for coating
- Candy eyeballs, for decoration
Instructions
- Prepare the batter: Combine the cream cheese, butter, egg, and vanilla extract in a large mixer bowl. Beat together until the mixture is light and fluffy, ensuring a smooth base for the cookies.
- Add cake mix: Gradually add the white cake mix to the creamy mixture and stir slowly until just combined. Avoid overmixing to keep the batter tender.
- Divide and color dough: Split the batter evenly into two bowls. Add purple food coloring and sprinkles to one bowl and green food coloring and sprinkles to the other. Mix each until the colors and sprinkles are evenly distributed.
- Chill the dough: Cover each bowl and refrigerate for 30 minutes. Chilling firms the dough for easier handling and better texture when baked.
- Preheat oven and prep pans: Preheat your oven to 350°F (175°C). Line baking sheets with parchment paper to prevent sticking.
- Shape and coat cookies: Roll 2-3 tablespoon portions of dough into balls, then roll each ball in confectioner’s sugar to coat thoroughly. Place them on the prepared baking sheets and gently press down without flattening completely.
- Bake the cookies: Bake in the preheated oven for 10-12 minutes until cookies are set but still soft.
- Add candy eyes: Immediately after removing the cookies from the oven, press candy eyeballs gently into each cookie before they cool to ensure they stick well.
- Cool and store: Allow the cookies to cool completely on the baking sheet before transferring them to an airtight container for storage.
Notes
- Ensure cream cheese and butter are room temperature for smooth mixing.
- You can use any food coloring shades to customize your zombie cookies.
- Optional sprinkles add festive texture and fun, but can be omitted if preferred.
- Rolling cookies in confectioner’s sugar creates a slightly crisp exterior with a soft inside.
- Press candy eyes in while cookies are warm for best adhesion.
- Store cookies in an airtight container to maintain freshness for up to 5 days.
Nutrition
- Serving Size: 1 cookie
- Calories: 110
- Sugar: 13g
- Sodium: 110mg
- Fat: 5g
- Saturated Fat: 3g
- Unsaturated Fat: 2g
- Trans Fat: 0g
- Carbohydrates: 15g
- Fiber: 0.3g
- Protein: 1g
- Cholesterol: 20mg


