

If you’re searching for a show-stopping dessert that’s equal parts fun and delicious, then you are going to adore this Brain Cake Recipe. I absolutely love how this cake looks spooky yet tastes incredible, making it a perfect centerpiece for Halloween or any quirky celebration. Trust me, once you try this, you’ll find yourself wanting to make it again and again—plus, it’s surprisingly approachable to bake at home. Ready to get into some brainy baking? Let’s dive in!
Why You’ll Love This Recipe
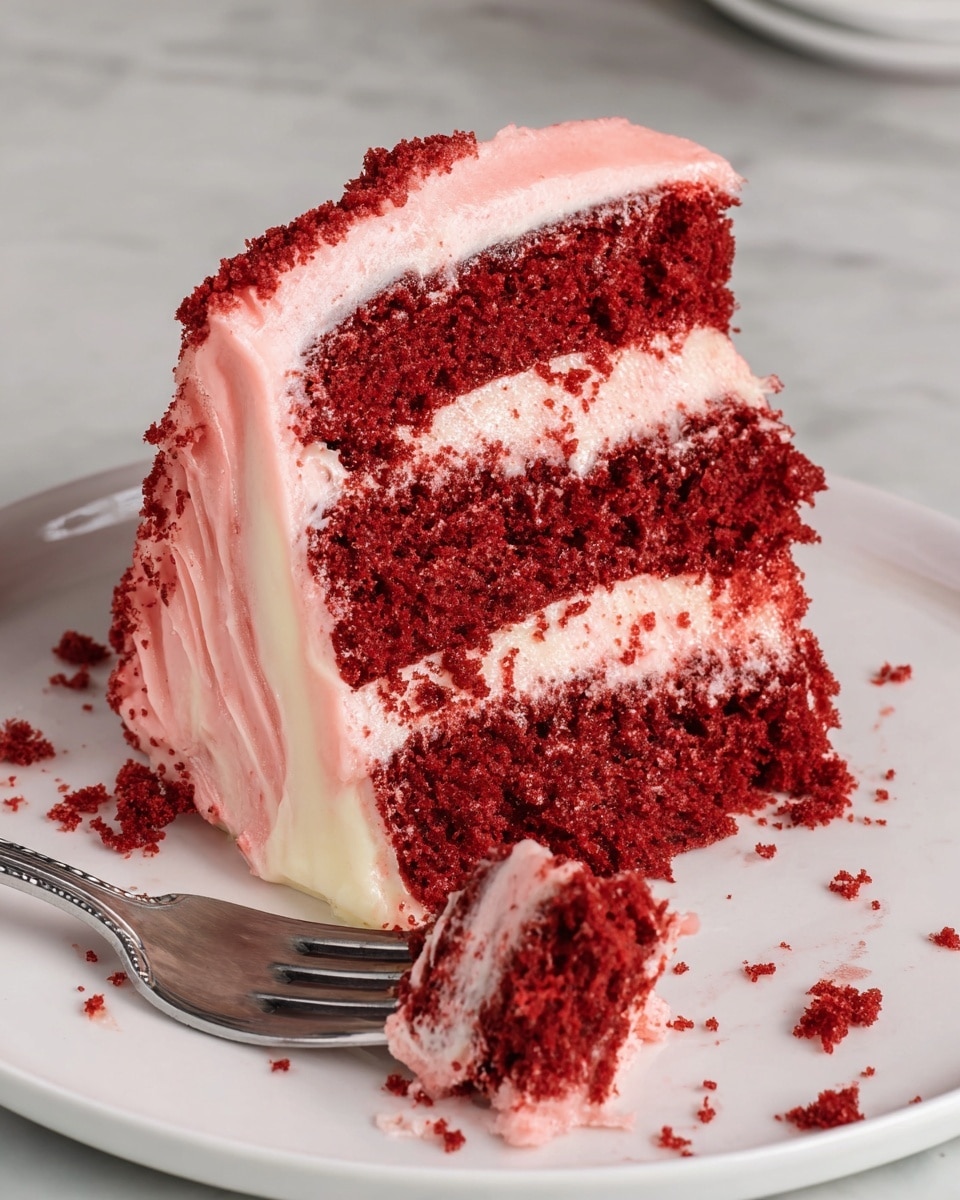
- Stunning & Fun Design: The brain-shaped cake with “blood” jam is a conversation starter at any party.
- Moist Red Velvet Layers: This cake strikes the perfect balance of rich, tender, and slightly tangy.
- Cream Cheese Buttercream: Smooth, light, and with a delicate hint of pink, it’s just the right frosting for this cake.
- Make-Ahead Friendly: You can bake the layers in advance and freeze, making party prep way less stressful.

Ingredients You’ll Need
Each ingredient plays a key role in bringing this Brain Cake Recipe to life—moist cake layers, rich frosting, and the dramatic edible “blood.” I recommend looking for high-quality butter and cream cheese as they really shine in this cake, plus go for gel food coloring for the best vibrant hues without affecting texture.
- Cake Flour: Gives the cake its soft, tender crumb, essential for velvety red velvet texture.
- Unsweetened Cocoa Powder: Adds that hint of chocolate flavor that makes red velvet so special.
- Baking Soda & Salt: The perfect leavening and seasoning balance for the cake layers.
- Unsalted Butter: Room temperature butter helps make the batter fluffy and smooth.
- Granulated Sugar: Sweetens the cake while helping it keep a tender structure.
- Eggs: Provides structure and richness; use room temperature for best mixing.
- Buttermilk: Adds tanginess and moisture to keep the cake tender.
- Vegetable or Canola Oil: Keeps cake moist and tender without flavor interference.
- Vanilla Extract or Vanilla Bean Paste: Elevates the flavor complexity in both cake and frosting.
- White Vinegar: Reacts with baking soda to lighten the cake’s crumb and deepen color.
- Red Gel or Liquid Food Coloring: The iconic bright red shade crucial for red velvet.
- Full-Fat Cream Cheese: The star of the frosting, adding tangy smoothness.
- Powdered Sugar: Sweetens and thickens the buttercream to pipeable perfection.
- Heavy Whipping Cream: Lightens the frosting texture, making it easier to spread and pipe.
- Seedless Raspberry or Strawberry Jam: Creates the realistic edible “blood” effect that makes this cake so memorable.
- Water and Optional Food Coloring: Used to thin the jam for spreading and intensifying color.
Variations
One of my favorite things about this Brain Cake Recipe is how easy it is to make your own. I’ve played around with flavors and colors, and honestly, the possibilities feel endless. Here are a few tweaks I love or recommend you try!
- Vegan/Dairy-Free Version: I swapped in plant-based milks and vegan butter once, and it turned out surprisingly delicious without sacrificing texture or flavor.
- Different Colors: Tried purple or green food coloring for a “mad scientist” vibe—fun for parties beyond Halloween!
- Flavor Boost: Adding a teaspoon of almond extract to the frosting gave it a lovely complementary note that everyone loved.
- Mini Brain Cakes: Making cupcakes and decorating them with piped “brain” swirls is perfect for smaller gatherings or kids’ parties.
How to Make Brain Cake Recipe
Step 1: Prepare Your Cake Layers
First things first—preheat that oven to 350°F (175°C). Prepare your cake pans by spraying with non-stick baking spray and lining with parchment paper; this step is a game-changer for easy cake removal later. Next, sift together your cake flour, cocoa powder, baking soda, and salt into a medium bowl—this ensures even distribution and no clumps. In your stand mixer or with a hand mixer, cream the butter and granulated sugar at medium-high speed until lighter and fluffy; this takes about 1-2 minutes and really helps your cake be tender. Add the eggs one at a time, mixing so everything combines beautifully.
Step 2: Combine Wet and Dry Ingredients
Now comes the fun part: mix in the buttermilk, oil, vanilla, vinegar, and red food coloring. It might look a little separated or “broken,” but don’t worry! Slowly fold in your dry ingredients in two batches on low speed, just until you can’t see streaks of flour anymore. This method makes sure your batter stays light and your cake tender. Divide the batter evenly into your pans, about 415g per pan, and pop them into the oven for about 24-28 minutes. A toothpick inserted into the centers should come out with a few moist crumbs when done.
Step 3: Cool and Carve Your Brain Shape
After baking, let your cakes cool in the pans for 10 minutes, then gently loosen the edges with a small offset spatula and flip onto wire racks to cool completely. Here’s a trick I learned: if your cakes seem too delicate or soft for carving, stash them in the freezer for 20 minutes—it firms them up and makes shaping much easier. To create that realistic brain form, stack your layers and trim about an inch off two sides to create an oval shape. Use a sharp, small knife to round off the top edges. If you’re prepping in advance, wrap each layer well and freeze them now.
Step 4: Whip Up the Cream Cheese Buttercream
Using softened butter and cream cheese, beat them together at medium speed for about 30 seconds until smooth. Stir in vanilla and salt, then add powdered sugar slowly to avoid messy sugar clouds—cover your mixer with a kitchen towel if you can! Add in heavy cream in small amounts until the frosting reaches that perfect creamy, pipe-able consistency. A splash of red food coloring turns it a pretty pink, which is what gives this cake its striking look. Cover it with plastic wrap while you work on assembly to keep it fresh.
Step 5: Assemble and Decorate Your Brain Cake
Start stacking your cake layers with big dollops of frosting in between to hold it all together. Use a little frosting on your cake board to anchor the first layer too. Once stacked, trim and smooth the cake edges as needed to perfect the shape. Apply a crumb coat—a thin layer of frosting covering the whole cake—to lock in crumbs and chill it until firm (20 min fridge or 5 min freezer). Then, load your piping bag with frosting and pipe wiggly lines all over to mimic brain folds. Don’t stress perfection here; the raspberry jam you spread later covers imperfections. Chill again to firm up.
Step 6: Add the Edible “Blood” Glaze
Whisk seedless raspberry jam with water and optionally extra red food coloring to make a smooth, vibrant red glaze. Use a pastry brush to coat your piped frosting thoroughly—the jam seeps into every nook, creating the ooey-gooey bloody effect that makes this brain cake literally pop. Don’t hold back around the base for an extra gruesome vibe. Chill once more to set the glaze, then invite everyone over to admire (and devour) your masterpiece!
Pro Tips for Making Brain Cake Recipe
- Even Batter Dividing: Use a kitchen scale to divide your batter equally into pans; this ensures even baking and layers.
- Chill for Easier Shaping: Freezing your cooled layers for 20 minutes before carving makes trimming neater and less crumbly.
- Use Gel Food Coloring: It delivers bold color without altering batter consistency or flavor, unlike some liquid colorings.
- Patience with Piping: Don’t worry if your brain squiggly lines aren’t perfect; the jam “blood” covers irregularities beautifully.
How to Serve Brain Cake Recipe
Garnishes
I usually keep garnishes simple so the brain cake is the star—sometimes a few fresh raspberries or edible rose petals scattered around the base add a little elegance. If you’re feeling adventurous, you can add some black fondant spiders or edible glitter for spooky sparkle.
Side Dishes
This cake pairs wonderfully with lightly whipped cream or a dollop of vanilla ice cream. For drinks, I like to serve with rich hot chocolate or a fruity punch to complement the tangy cream cheese frosting.
Creative Ways to Present
For Halloween parties, I’ve presented the brain cake on a platter surrounded by dry ice for a spooky fog effect—absolutely loved by guests! Another time, I placed it on a vintage silver stand with dark red tablecloth and flickering candles for an eerie-chic vibe.
Make Ahead and Storage
Storing Leftovers
I wrap leftover slices tightly in plastic wrap or store in an airtight container in the fridge. Covering exposed parts with a bit of leftover frosting keeps the cake moist and fresh. Leftovers tend to stay delicious for up to a week when refrigerated.
Freezing
I’ve had great success freezing both unfrosted cake layers and fully frosted brain cake. Just wrap layers in plastic wrap and foil before freezing. For best taste and texture, thaw in the fridge overnight before decorating or serving.
Reheating
Reheating is usually not necessary for this cake, but if you want to warm a slice, I recommend a quick 10-15 second zap in the microwave at low power. This softens the cream cheese frosting without melting it completely.
FAQs
-
Can I use regular milk instead of buttermilk in this Brain Cake Recipe?
Yes, you can substitute regular milk mixed with a tablespoon of white vinegar or lemon juice to create a buttermilk substitute. Let it sit for 5-10 minutes before using. This will provide similar acidity and tenderness for your cake.
-
How do I prevent the buttercream frosting from being too runny or too stiff?
Start by adding powdered sugar slowly and mixing on low speed to avoid clouds. If the frosting is too thick, add heavy cream a tablespoon at a time. If too thin, add powdered sugar in small increments. Room temperature ingredients also help achieve the right consistency.
-
Can I make this Brain Cake Recipe ahead of time?
Definitely! You can bake and freeze the cake layers ahead of time, make the frosting in advance, or even assemble the cake a day before your event. Just keep it well wrapped and chilled for best freshness.
-
What if I don’t have a piping bag or tip for the brain folds?
No problem! You can use a sturdy zip-top bag with a small corner snipped off or even a butter knife or spoon to create the squiggly “brain” lines. The edible “blood” glaze helps cover any imperfections.
Final Thoughts
This Brain Cake Recipe has quickly become one of my favorite desserts to bake when I want to impress without stress. It’s fun to make, looks incredible, and tastes just as amazing as it looks. I hope you enjoy making it as much as I do—don’t be shy about experimenting with your own twists, and most importantly, have loads of fun with it. When you slice into that realistic brain, and your friends go wild, you’ll know it was all worth it!
Print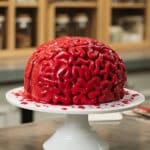
Brain Cake Recipe
- Prep Time: 20 minutes
- Cook Time: 27 minutes
- Total Time: 1 hour 17 minutes
- Yield: 20 servings
- Category: Cakes
- Method: Baking
- Cuisine: American
Description
This Brain Cake is a spooky and delicious red velvet cake masterpiece, perfect for Halloween or themed parties. It features moist red velvet layers with rich cream cheese buttercream frosting, shaped and decorated to resemble a realistic brain, complete with edible fake blood for an extra creepy effect.
Ingredients
Red Velvet Cake
- 2 1/2 cups cake flour (300g)
- 2 Tbsp unsweetened cocoa powder, sifted (10g)
- 1 tsp baking soda (6g)
- 1/2 tsp fine salt (3g)
- 1/2 cup (1 stick) unsalted butter, room temperature (113g)
- 1 3/4 cups granulated sugar (350g)
- 2 large eggs, room temperature (112g)
- 1 1/4 cups buttermilk, room temperature (300g)
- 1/2 cup vegetable or canola oil (120g)
- 2 tsp vanilla extract or vanilla bean paste (8g)
- 1 tsp white vinegar (4g)
- 1 tsp red gel food coloring or 1 Tbsp liquid food coloring
Cream Cheese Buttercream Frosting
- 1 1/2 cups (3 sticks) unsalted butter, room temperature (339g)
- 1 cup (8 oz) full-fat cream cheese, room temperature (226g)
- 1 Tbsp vanilla extract or vanilla bean paste (12g)
- 1 tsp fine salt (6g)
- 7 cups powdered sugar (904g) or a 2lb. bag
- 3 Tbsp heavy whipping cream, room temperature (45g)
- small squirt of red gel food coloring or 1 tsp liquid food coloring
Edible Fake Blood
- 1/2 cup seedless raspberry or strawberry jam
- 3 Tbsp water (45g)
- 1/4 tsp red gel food coloring or 1 tsp liquid food coloring (optional)
Instructions
- Prepare Cake Pans: Preheat your oven to 350°F (175°C). Grease three 8-inch or three 7-inch cake pans with non-stick spray and line with parchment paper to prevent sticking.
- Mix Dry Ingredients: In a medium bowl, sift together cake flour, unsweetened cocoa powder, baking soda, and salt. Set aside to combine the flavors.
- Cream Butter and Sugar: In a large bowl or stand mixer bowl, cream the butter and granulated sugar with a mixer on medium-high speed for 1-2 minutes until lighter in color, scraping the bowl to combine fully.
- Add Eggs: Incorporate the eggs one at a time on medium speed until fully combined, ensuring a smooth batter.
- Add Wet Ingredients: Slowly mix in buttermilk, oil, vanilla extract, white vinegar, and red food coloring on low speed. The batter might appear broken but it will come together after adding dry ingredients.
- Combine Dry and Wet Ingredients: Gradually add the dry mixture into the wet ingredients in two additions, mixing on low speed just until fully combined with no visible streaks.
- Bake the Cakes: Divide the batter evenly among the prepared pans (~415g each). Bake for 24-28 minutes or until a toothpick inserted in the center comes out clean or with a few moist crumbs.
- Cool Cake Layers: Remove from oven and cool for 10 minutes, then loosen edges with an offset spatula and invert onto wire racks to cool completely. Optionally, freeze layers for easier cutting.
- Shape the Brain: Stack cooled layers and trim two sides of each layer to create an oval brain shape, about 1 inch off each side. Round the top edges with a sharp knife for realism.
- Make the Frosting: Beat butter and cream cheese together on medium speed until smooth. Add vanilla and salt, then incorporate powdered sugar and heavy cream slowly on low speed, adjusting cream or sugar to desired consistency.
- Add Color to Frosting: Mix in a small amount of red food coloring until the frosting is light pink and evenly colored. Cover and set aside.
- Prepare Edible Blood: Whisk together seedless jam, water, and red food coloring until a thin, vibrant red mixture forms. Set aside for decorating.
- Assemble Cake: Stack the cake layers on a greaseproof board, adhering layers with frosting. Apply a thin crumb coat and chill until firm.
- Decorate Brain Details: Use a piping bag with a large round tip to pipe squiggly lines mimicking brain folds on both hemispheres. Chill until frosting firms again.
- Apply Fake Blood: Brush the edible blood mixture over the piped frosting to fill gaps and create a realistic bloody appearance, adding extra around the cake base for effect.
- Serve: Let the cake come to room temperature before serving for best flavor and texture.
Notes
- This recipe yields about 20 servings due to the trimming and shaping of the cake.
- You can prepare the cake layers ahead by baking and freezing; similarly, frosting can be made in advance and stored refrigerated or frozen.
- Use gel food coloring to prevent altering cake and frosting texture and taste.
- Make vegan or dairy-free substitutions by using plant-based milk, vegan butter, and egg replacer.
- Freezing cake layers before cutting makes shaping easier and cleaner.
- Leftover cake trimmings can be repurposed into cake pops or used as dessert toppings.
- Ensure frosting consistency is ideal for piping; adjust with cream or powdered sugar as needed.
- The cake can be stored in the fridge up to one week and frozen up to one month after assembly.
Nutrition
- Serving Size: 1 slice (1/20th of cake)
- Calories: 420 kcal
- Sugar: 35 g
- Sodium: 260 mg
- Fat: 25 g
- Saturated Fat: 14 g
- Unsaturated Fat: 8 g
- Trans Fat: 0.2 g
- Carbohydrates: 45 g
- Fiber: 1 g
- Protein: 4 g
- Cholesterol: 65 mg


