

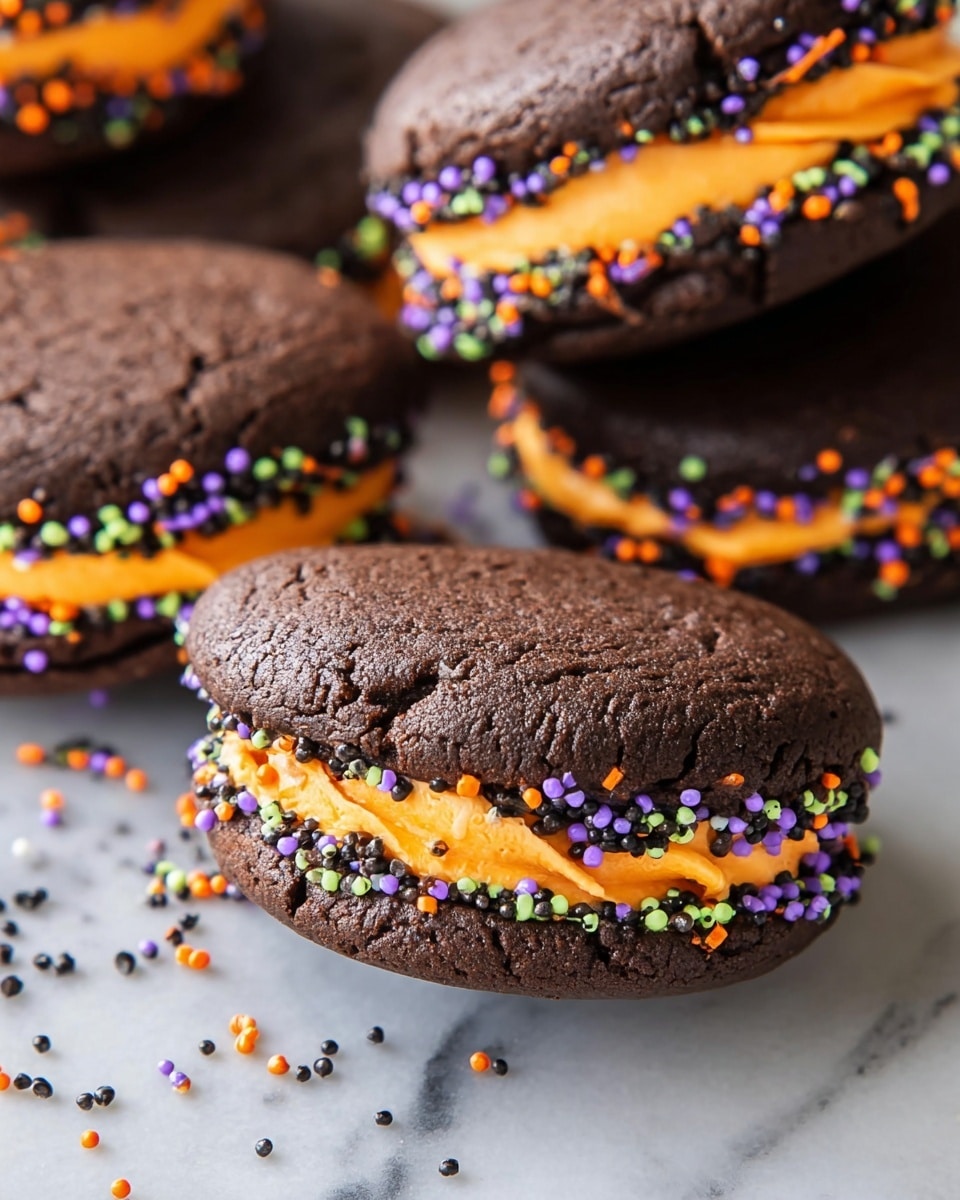
If you’re looking to wow your friends and family this spooky season, I’ve got the perfect crowd-pleaser for you. This Halloween Whoopie Pies Recipe is insanely delicious and fun to make—think soft, chocolatey cookies sandwiched around a creamy, festive buttercream that will have everyone asking for seconds. I absolutely love how these turn out every time, with just the right balance of rich cocoa and fluffy frosting. Stick with me and I’ll share all my tips and tricks so your whoopie pies come out bakery-perfect, even if it’s your first time tackling them!
Why You’ll Love This Recipe
- Perfectly Moist and Fluffy: The combination of hot water and oil makes these whoopie pies incredibly tender and soft every time.
- Customizable Buttercream: You can tint the frosting any Halloween color you want and add plenty of fun sprinkles for that festive flair.
- Easy to Make: No fancy tools required, and the batter comes together quickly, so you won’t be stuck in the kitchen for hours.
- Kid-Friendly and Crowd-Pleasing: These treats disappear fast—my family absolutely goes crazy for them every Halloween!

Ingredients You’ll Need
The ingredients here work together to create that classic chocolate-and-cream flavor combo that everyone loves in a whoopie pie. You’ll want to make sure you have good-quality cocoa powder for the best chocolate flavor, and fresh butter will make your buttercream dreamy and smooth.
- Vegetable Oil: Keeps the whoopie pies moist and tender without making them greasy.
- Brown Sugar: Adds a deep, caramel-like sweetness and rich moisture.
- Granulated White Sugar: Balances the sweetness and helps with structure.
- Egg: Binds everything together and adds richness.
- Vanilla Extract: Enhances the flavor in both the batter and frosting.
- Whole Milk: Provides moisture and richness; feel free to use buttermilk for a slight tangy twist.
- All-Purpose Flour: The base that holds the whoopie pies together; spoon and level it for accuracy.
- Cocoa Powder: Use unsweetened for a classic dark chocolate taste.
- Baking Soda & Baking Powder: For perfect rise and fluffiness.
- Salt: Balances sweetness and enhances flavor.
- Hot Water: I learned that adding hot water activates the cocoa and helps the batter stay smooth.
- Unsalted Butter: Essential for creamy, rich buttercream frosting.
- Powdered Sugar: For that silky, sweet frosting texture.
- Heavy Cream: Makes the buttercream light and fluffy.
- Halloween Sprinkles: For that festive finishing touch—the more colorful, the better!
Variations
I love how versatile this Halloween Whoopie Pies Recipe is. Once you get comfortable with the basic version, you can easily make tweaks to fit your mood, taste cravings, or dietary needs. Feel free to experiment—it’s part of the fun!
- Pumpkin Spice Whoopie Pies: Adding pumpkin pie spice and a bit of pumpkin puree to the batter makes for a lovely fall twist that my kids adored last year.
- Vegan Version: Swap vegetable oil for coconut oil, use flax eggs, and replace the butter with plant-based butter; the frosting can be done with vegan shortening and non-dairy milk.
- Peanut Butter Filling: Try mixing peanut butter into your buttercream for a salty-sweet surprise that’s always a hit at parties.
- Colorful Frosting Variations: Make multiple colors of frosting and assemble different Halloween character whoopie pies—my nieces loved the creativity!
How to Make Halloween Whoopie Pies Recipe
Step 1: Prepping the Batter
Begin by heating your oven to 350°F. I always line my baking sheets with parchment paper—it’s a little trick I discovered that makes the clean-up so much easier and prevents sticking. Then, stir together the vegetable oil, brown sugar, and white sugar until nice and smooth. Add your egg, vanilla, and milk, mixing just until you don’t see streaks of flour or sugar—don’t overmix, or the whoopie pies might get a bit tough. In another bowl, whisk your dry ingredients—flour, cocoa, baking powder, baking soda, and salt—then gradually add them to the wet mixture. Last but not least, stir in the hot water; it thins the batter just enough and unlocks a deeper cocoa flavor. Your batter should be smooth but thick enough to hold shape.
Step 2: Baking the Whoopie Pies
Scoop 1 ½ tablespoons of batter onto your lined baking sheets, spacing them about 2 inches apart because they spread out quite a bit while baking. This is where a cookie scoop comes in handy—makes sizing so much more consistent. Bake for about 9 to 11 minutes. You’ll know they’re ready when the tops look set and a toothpick inserted in the middle comes out clean. Let them cool on the pan for a bit before transferring them to wire racks to cool completely—I learned that moving them too soon can make them fall apart!
Step 3: Making the Festive Buttercream
While the whoopie pies cool, whip up your buttercream. Beat together the butter and powdered sugar on a low speed until roughly combined, then add the heavy cream, vanilla, and salt. Crank the mixer to medium speed and beat for 3-4 minutes until your frosting is light, airy, and fluffy. Don’t rush this part—properly whipped buttercream makes all the difference in texture. Then add a few drops of orange (or mix red and yellow) food coloring and gently fold it in for a perfect Halloween vibe. Transfer the frosting into a piping bag or a ziplock bag with the tip snipped off for easy assembly.
Step 4: Assembling Your Halloween Whoopie Pies
Flip one cookie over, so the flatter “bottom” is facing up, and pipe a generous amount of frosting onto it. The thickness is totally up to you—I like a generous layer because it balances the rich chocolate perfectly. Top with a matching cookie, domed side facing up, to sandwich everything. For a festive pop, pour some Halloween sprinkles on a shallow plate and gently roll the edges of the frosting in them. I love how it adds that extra crunch and color, making them totally party-ready. Pop the whoopie pies back onto your sheet tray and refrigerate for about an hour if you want the frosting to set firm. Or just dive right in—warm or chilled, they’re fantastic!
Pro Tips for Making Halloween Whoopie Pies Recipe
- Use Hot Water Wisely: Adding hot water to the batter really helps deepen the chocolate flavor and creates a tender crumb—you’ll notice the difference!
- Don’t Overmix Batter: Overworking the batter can make the whoopie pies dense, so mix just until combined.
- Pipe Your Frosting: Using a piping bag ensures a neater, more attractive filling and makes rolling in sprinkles much easier.
- Cool Before Assembling: Always wait until the whoopie pies are completely cool before adding frosting to prevent melting and sliding.
How to Serve Halloween Whoopie Pies Recipe
Garnishes
I love topping these whoopie pies with classic Halloween sprinkles—think mini pumpkins, bats, and orange-and-black nonpareils. Sometimes I’ll add edible glitter or tiny candy eyeballs for a quirky twist my friends adore. These little touches turn a simple dessert into an unforgettable Halloween centerpiece.
Side Dishes
Pair your Halloween Whoopie Pies with warm apple cider or a rich hot chocolate for the ultimate seasonal treat spread. I also love serving them alongside simple pumpkin muffins or spiced nuts for a variety that keeps everyone coming back for more.
Creative Ways to Present
One year, I arranged these whoopie pies on a tiered cake stand decorated with mini pumpkins and cobwebs—it made for a festive and fun display. You could also wrap individual pies in cellophane with a Halloween ribbon for party favors or school treats. Another fun idea is to pipe the frosting in fun shapes or colors and add spooky faces with edible markers.
Make Ahead and Storage
Storing Leftovers
Once assembled, I keep leftover whoopie pies in an airtight container in the fridge. They stay fresh and delicious for about 3 to 4 days. Leaving them chilled actually improves the texture of the frosting and keeps everything nicely firm.
Freezing
If you want to make these ahead of time, freeze the baked cookies separately on a baking sheet until solid, then transfer them to a freezer bag. Freeze the buttercream in an airtight container as well. When you’re ready, thaw everything overnight in the fridge and assemble—the results will still feel fresh and homemade.
Reheating
Since these are best served chilled, I don’t usually reheat them. However, if you want your cookies slightly warm, pop the cookie halves (without frosting) in the microwave for 10-15 seconds before assembling. Keep the frosting cool for the best texture and flavor.
FAQs
-
Can I make the Halloween Whoopie Pies Recipe gluten-free?
Absolutely! You can substitute the all-purpose flour with a gluten-free flour blend that measures cup-for-cup. Just make sure your blend contains xanthan gum or add a small amount to help with texture. The piping and baking times remain the same, but be sure to check the cookies earlier as gluten-free baked goods sometimes brown faster.
-
How do I prevent the frosting from melting?
The key is assembling the whoopie pies after the cookies are completely cool, then chilling them immediately. Using chilled ingredients when making your buttercream also helps keep it firm longer. If you’re in a warm kitchen, try chilling the assembled pies for at least an hour before serving.
-
Can I use a different flavor of frosting?
Definitely! This Halloween Whoopie Pies Recipe is a versatile base, so you can swap the vanilla buttercream for cream cheese frosting, peanut butter frosting, or even a flavored whipped cream. Just keep in mind frosting consistency, as it affects how well your whoopie pies hold together.
-
How long do Halloween Whoopie Pies last?
When stored properly in an airtight container in the fridge, the assembled whoopie pies last up to 4 days. The cookies alone (unfrosted) can last a week stored in an airtight container at room temperature.
Final Thoughts
Honestly, this Halloween Whoopie Pies Recipe has become one of my absolute favorites for the spooky season. It’s a showstopper that’s surprisingly easy to pull off, and the smiles you’ll get from sharing these with friends, family, or neighbors are priceless. Whether you’re a seasoned baker or trying whoopie pies for the first time, I promise you’ll enjoy every part of making and eating them. Go ahead and bake these for your next Halloween party—you won’t regret it!
Print
Halloween Whoopie Pies Recipe
- Prep Time: 20 minutes
- Cook Time: 10 minutes
- Total Time: 30 minutes
- Yield: 18 whoopie pies
- Category: Dessert
- Method: Baking
- Cuisine: American
Description
Halloween Whoopie Pies are delightful chocolate sandwich cookies filled with creamy buttercream frosting and decorated with festive sprinkles. These soft and fluffy treats are perfect for Halloween parties or a spooky seasonal dessert that everyone will love.
Ingredients
For the Chocolate Whoopie Pies
- 1/2 cup vegetable oil
- 1/2 cup brown sugar (packed)
- 1/2 cup granulated white sugar
- 1 egg
- 1 tsp vanilla extract
- 1/2 cup whole milk
- 2 1/4 cups all purpose flour (spooned and leveled)
- 1/2 cup cocoa powder
- 1 tsp baking soda
- 1 tsp baking powder
- 1/2 tsp salt
- 1/4 cup hot water (the hottest water from the sink is okay)
For the Buttercream
- 1 1/2 cups unsalted butter
- 5-6 cups powdered sugar
- 3 TBS heavy cream
- 1 1/2 tsp vanilla extract
- 1 dash salt
- 1 cup Halloween sprinkles
Instructions
- Preheat Oven and Prepare Baking Sheet: Preheat the oven to 350 Fahrenheit. Line a baking sheet with parchment paper or a silicone liner, and set aside.
- Mix Wet Ingredients: Combine the vegetable oil, brown sugar, and white sugar in a large bowl and stir until combined. Add in the egg, vanilla extract, and milk, stirring until just mixed.
- Combine Dry Ingredients: In another bowl, whisk together the all-purpose flour, cocoa powder, baking powder, baking soda, and salt.
- Combine Wet and Dry Mixtures: Slowly add the dry ingredients into the wet ingredients while stirring until just combined. Then add the hot water and stir until fully incorporated.
- Portion Batter: Carefully scoop the batter by 1 1/2 tablespoonfuls onto the prepared baking sheet, spacing them about 2 inches apart to allow for spreading.
- Bake Cookies: Bake in the preheated oven for 9 to 11 minutes until the tops are set and a toothpick inserted comes out clean.
- Cool Cookies: Let the whoopie pies cool on the baking pan for 5 to 10 minutes before transferring to a wire rack to cool completely.
- Prepare Buttercream Frosting: Cream the unsalted butter and powdered sugar at slow speed until well blended. Add the heavy cream, vanilla extract, and salt; beat on medium speed until combined. Continue beating for 3 to 4 minutes until light and fluffy. Add 1 to 2 drops of orange (or yellow and red) food coloring and fold it gently into the frosting.
- Fill and Assemble Whoopie Pies: Spoon the buttercream frosting into a piping bag, snip off the corner. Flip one cookie over and pipe a generous amount of frosting onto the flat side. Place a matching cookie on top, domed side up, to form a sandwich.
- Add Sprinkles: Pour the Halloween sprinkles into a shallow plate or bowl. Roll the edges of the frosting-covered cookies into the sprinkles.
- Chill and Serve: Place the frosted sandwiches on a cookie sheet. Enjoy immediately or chill in the refrigerator for 1 hour to help the frosting set for a firmer texture.
Notes
- Use fresh hot water for best batter texture when adding hot water.
- Spacing cookies properly is essential as they will spread during baking.
- Adjust powdered sugar quantity in frosting to achieve preferred consistency.
- For more vibrant frosting color, adjust food coloring drops as needed.
- Chilling improves frosting firmness but is optional for immediate serving.
Nutrition
- Serving Size: 1 whoopie pie
- Calories: 320
- Sugar: 28g
- Sodium: 180mg
- Fat: 15g
- Saturated Fat: 9g
- Unsaturated Fat: 5g
- Trans Fat: 0g
- Carbohydrates: 40g
- Fiber: 3g
- Protein: 3g
- Cholesterol: 35mg


