

Hey friends, if you’re on the lookout for a super fun and easy snack that will have everyone grinning ear to ear, this Pizza Mummies Recipe is exactly what you need. I absolutely love how these little mummified pizzas come together with just a few simple ingredients, and they’re perfect for Halloween parties, kid-friendly lunches, or anytime you want to add a bit of spooky charm without any fuss. Stick around—I’m going to share all my tips and tricks so your pizza mummies come out perfect every single time!
Why You’ll Love This Recipe
- Super Simple & Quick: You’ll be munching on these spooky bites in under 15 minutes—no complicated steps here!
- Kid-Approved Fun: My family goes crazy for how cute these look—and they’re perfect for little hands.
- Customizable: You can switch up toppings easily to suit your taste or dietary needs.
- Totally Crowd-Pleasing: Whether it’s a snack, appetizer, or simple meal, these mummies vanish fast!

Ingredients You’ll Need
These ingredients work so well together because they’re easy to find and each brings an essential element to the pizza mummy’s flavor and fun appearance. Plus, you probably have most of them at home already.
- English muffin halves: I love using English muffins because their nooks and crannies soak up the sauce without getting soggy.
- Pizza or marinara sauce: Feel free to use your favorite brand or homemade sauce; just make sure it’s nice and thick so it doesn’t make the muffins soggy.
- Mozzarella cheese sticks: Peeling these into strings is what gives you that “mummy wrap” look—string cheese is the secret weapon here!
- Green olives with pimentos: These make perfect “eyes” for your mummy faces—slice them thin and pop them on top.
Variations
One of my favorite things about this Pizza Mummies Recipe is how easy it is to make it your own. Over the years, I’ve played with toppings and tweaks, and you can too! Don’t be shy—let your creativity run wild.
- Meat lovers twist: Adding mini pepperoni slices or cooked sausage bits under the cheese makes these mummies extra hearty—my husband swears by this version!
- Vegetarian options: Swap olives for sliced black olives or add small strips of bell peppers as “mouths” to keep things bright and colorful.
- Cheese swaps: I’ve tried shredded mozzarella instead of string cheese when in a pinch—the look changes slightly but the taste is just as delightful.
- Spicy kick: A tiny sprinkle of chili flakes on top before baking adds a fun burst of heat for those who like it zesty.
How to Make Pizza Mummies Recipe
Step 1: Toast the English Muffins for a Crispy Base
Start by preheating your oven to 400℉. Then, place the English muffin halves on a baking sheet and bake them for about 5 minutes. This toasting step is so important—it ensures your pizza mummies won’t be soggy and gives that perfect crispy base that holds up beautifully to sauce and cheese.
Step 2: Spread That Saucy Goodness
Once toasted, pull out the muffins and quickly spread about a tablespoon of pizza or marinara sauce onto each half. I find that spreading the sauce generously but not overly thick helps keep balance—you want enough flavor, but not too much to weigh down the base.
Step 3: Wrap Your Mummies with Cheese Strings
Now for the fun part! Peel mozzarella sticks into thin strings and drape them creatively over each muffin half to mimic mummy bandages. This is where your pizza mummies start to take shape. Don’t worry about perfection—crooked “bandages” add to the charm. Arrange those mozzarella strings so the muffin’s surface is mostly covered but with some gaps to stay mummy-like.
Step 4: Add the Spooky Eyes
Slice green olives into thin rings about 1/4 inch thick, then place two olive slices on each pizza mummy to form eyes. This finishing touch really brings your mummies to life! If you want, you can even use small pieces of pepperoni or bell pepper for different eye effects.
Step 5: Bake Until Melty Magic Happens
Pop your assembled pizza mummies into the oven for about 3-5 minutes, just until the mozzarella melts into gooey, melty perfection. Keep a close eye so you don’t overbake—the cheese should be melty but not browned. That gorgeous gooeyness is what makes these mummies irresistible.
Pro Tips for Making Pizza Mummies Recipe
- String Cheese Peeling: I discovered that peeling mozzarella sticks slowly with your fingers creates perfect thin strings without breaking—just take your time, and it’s like magic!
- Olives Placement: Positioning the olive “eyes” just before baking helps them stay in place but won’t dry them out—adding them too early can make them shriveled.
- Oven Watch: Since ovens vary, check your pizza mummies early to avoid burning the crust or cheese; I usually peek around the 3-minute mark.
- Muffin Prep: Toasting the English muffins first changed the game for me—no more soggy bottoms, just perfectly crispy little pizza canvases.
How to Serve Pizza Mummies Recipe
Garnishes
For garnish, I love sprinkling a little dried oregano or Italian seasoning right after they come out of the oven—it amps up the flavor and brings that classic pizza aroma. Sometimes I add a small swirl of ranch or spicy sriracha mayo for dipping on the side. The kids? They usually prefer plain with extra eyes—go figure!
Side Dishes
These pizza mummies pair wonderfully with easy sides like carrot sticks, cucumber slices, or a refreshing green salad. For parties, I usually whip up a simple garlic butter popcorn or some seasoned kettle chips to round out the snack table. The mix of crispy crunch and cheesy goodness is a real crowd-pleaser.
Creative Ways to Present
For Halloween, I’ve set them up on a platter around fake spider webs with little plastic spiders—an instant spooky centerpiece! Another fun touch is decorating the baking sheet itself with edible “blood” drizzles made from ketchup or sriracha. Hosting a kids’ party? Let them assemble their own pizza mummies—it’s as much fun making as eating!
Make Ahead and Storage
Storing Leftovers
If you do have leftovers (though honestly, it rarely happens!), I wrap them tightly in plastic wrap or place them in an airtight container and refrigerate. The English muffin base stays relatively soft overnight, but reheating helps bring back some crispiness.
Freezing
Freezing pizza mummies works if you’re prepping ahead for a party. After assembling but before baking, pop them in a single layer on a tray and freeze until firm, then transfer to a freezer-safe bag. When you’re ready, bake from frozen adding a few extra minutes. I like this method because it preserves freshness without sacrificing the yummy melty cheese.
Reheating
For reheating, I find the oven or toaster oven works best—set it to 350℉ and bake for about 5-7 minutes. This brings the cheese back to melty and crisps the base nicely. Microwaving is quicker but tends to make the muffin a bit soggy, so I only do that in a pinch.
FAQs
-
Can I use other breads instead of English muffins for the Pizza Mummies Recipe?
Absolutely! While English muffins give a perfect texture, you can use mini bagels, sliced baguette, or even pita bread. Just make sure to toast or lightly bake the bread first so it holds up well under the sauce and cheese.
-
Can I prepare pizza mummies ahead of time?
You sure can! After adding the sauce and cheese strings but before baking, cover the assembled mummies loosely with foil and refrigerate for a few hours. When ready, just bake as usual. This is a great option for busy days or parties.
-
What if my kids don’t like olives for eyes?
No worries! You can swap olives for sliced pepperoni, cherry tomato halves, or even small bits of bell pepper. You can get creative with what you have on hand to keep the fun eye detail.
-
Can I make these gluten-free?
Definitely! Simply use gluten-free English muffins or small gluten-free flatbreads. The rest of the ingredients are naturally gluten-free, making it an easy modification.
Final Thoughts
Honestly, the Pizza Mummies Recipe is one of those gems I wish I’d found sooner. It’s playful, quick, and just plain delicious—everything you want when feeding hungry kids (or adults who are kids at heart). I love sharing these in my kitchen because not only do they taste amazing, but they bring everyone together around the table with smiles and a little spooky spirit. Give them a try and watch your family go crazy for these adorable, melty, cheesy little mummies!
Print
Pizza Mummies Recipe
- Prep Time: 5 minutes
- Cook Time: 8 minutes
- Total Time: 13 minutes
- Yield: 4 servings
- Category: Snack
- Method: Baking
- Cuisine: American
Description
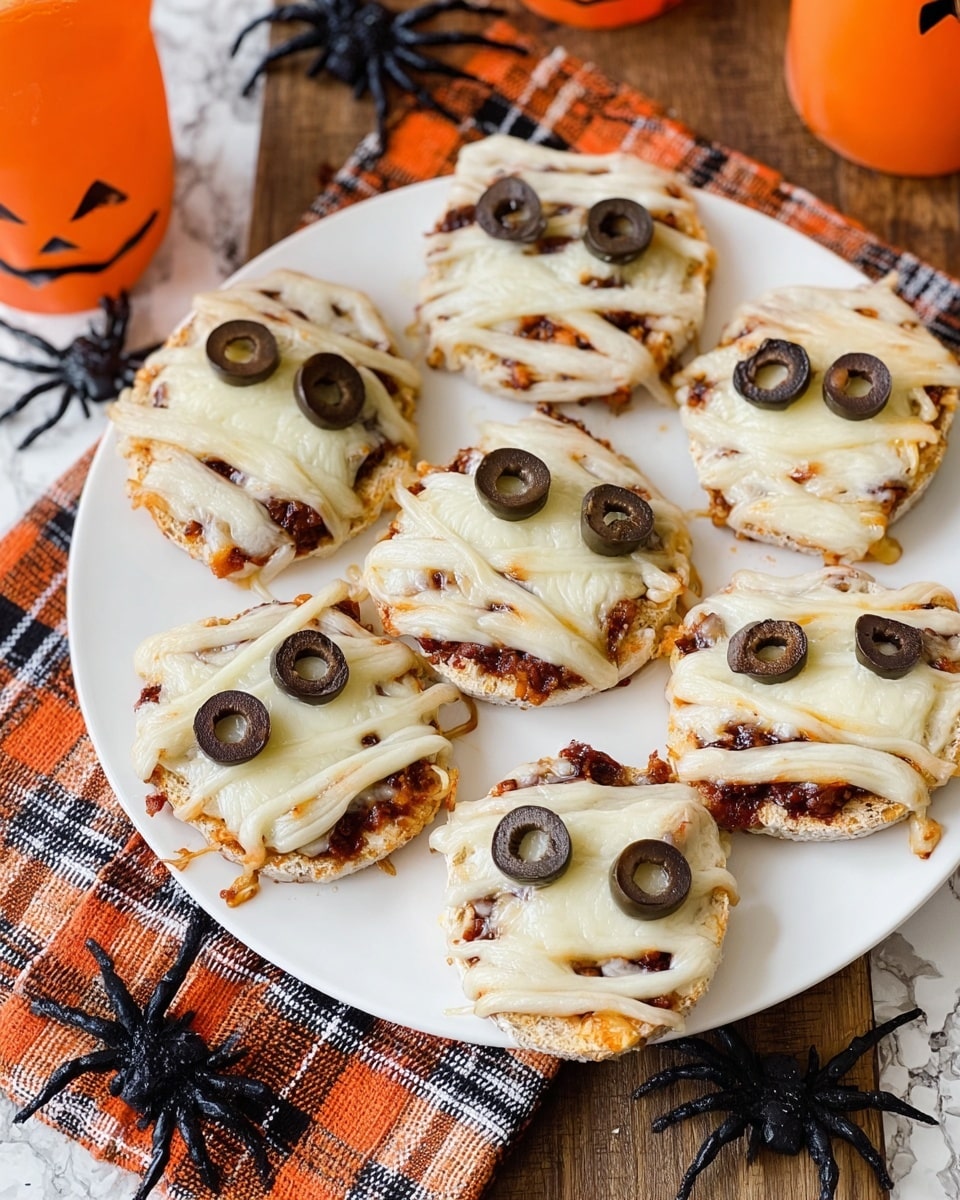
Pizza Mummies are a fun and spooky snack perfect for Halloween or any festive occasion. These bite-sized treats feature English muffins topped with pizza sauce, stringy mozzarella cheese arranged like mummy bandages, and olive slices for eyes. They’re easy to make, baked to golden perfection, and sure to delight kids and adults alike.
Ingredients
Main Ingredients
- 2 English muffins, cut in half
- 1/4 cup pizza or marinara sauce
- 2 mozzarella cheese sticks
- 3 green olives with pimentos
Instructions
- Preheat Oven: Preheat your oven to 400℉ to prepare for baking the pizza mums.
- Bake Muffins: Place the English muffin halves on a baking sheet and bake in the oven for 5 minutes to lightly toast them.
- Spread Sauce: Remove the toasted muffins from the oven and evenly spread about 1 tablespoon of pizza sauce on each muffin half.
- Add Cheese and Eyes: Peel the mozzarella sticks into thin strings to create the mummy bandage effect on top of the sauce. Slice the green olives into 1/4 inch thick rings and place two olive slices on each muffin half as eyes.
- Final Bake: Return the assembled muffins to the oven and bake for an additional 3-5 minutes, until the mozzarella cheese melts and becomes gooey.
Notes
- Prep Ahead: If making mummies earlier, after assembling (step 4), place muffins on a plate, cover loosely with foil, and refrigerate. Bake just before serving.
- Get Creative with Toppings: Try pepperoni eyes, bell pepper smiles, or sprinkle parmesan cheese for a personalized touch.
- Cheese Variety: Shredded mozzarella or other mild melting cheeses can be used in place of mozzarella sticks. Full fat cheeses melt better than low fat versions.
Nutrition
- Serving Size: 1 muffin half
- Calories: 150
- Sugar: 2g
- Sodium: 250mg
- Fat: 6g
- Saturated Fat: 3.5g
- Unsaturated Fat: 2g
- Trans Fat: 0g
- Carbohydrates: 18g
- Fiber: 2g
- Protein: 8g
- Cholesterol: 20mg

