

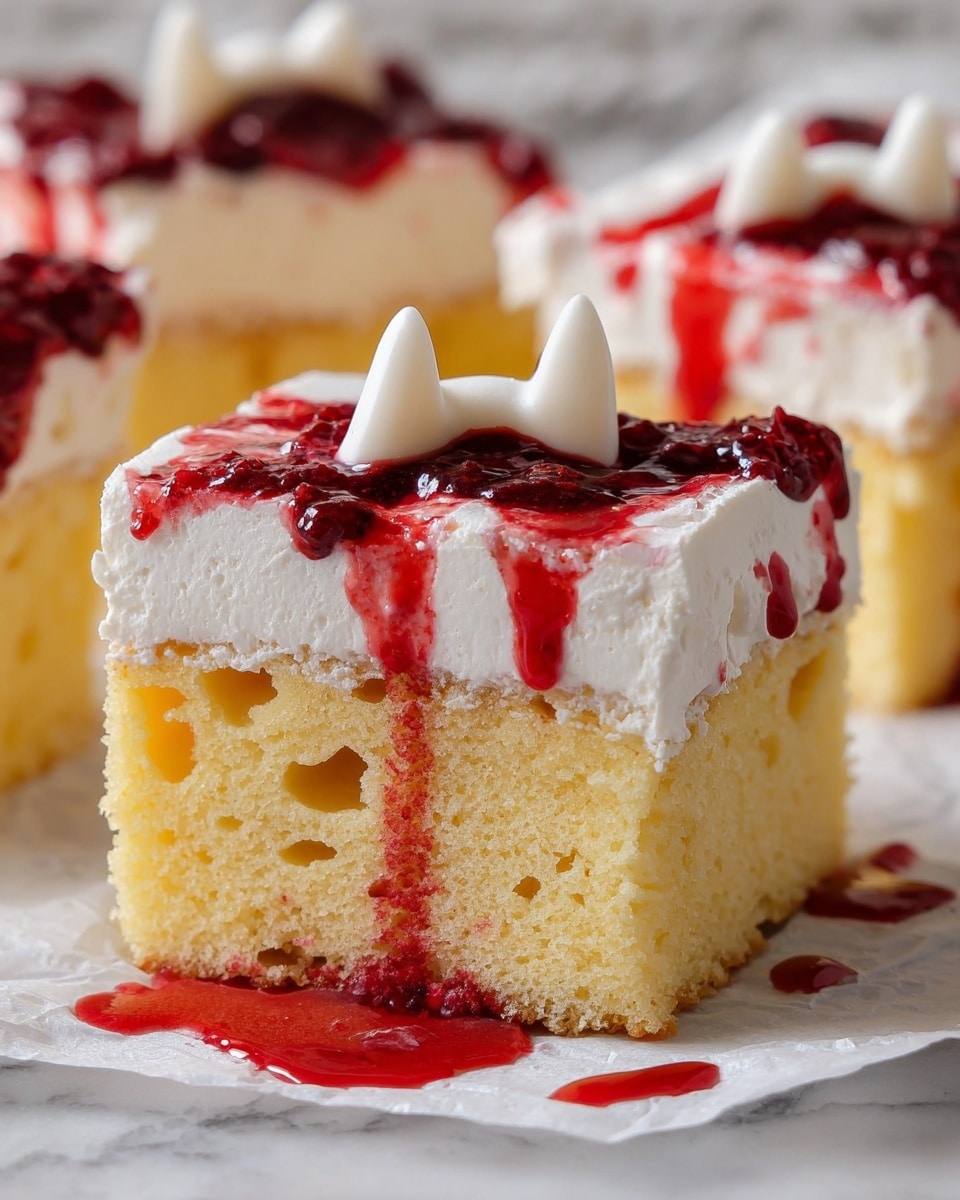
If you’re craving something spooky, yet irresistibly delicious, you’re going to love this Vampire Poke Cake Recipe. It’s a fun twist on the classic poke cake, featuring a luscious cherry sauce that oozes through the cake’s little holes like fresh vampire bites. I absolutely love how it’s both festive and surprisingly easy to make, perfect for Halloween or anytime you want a dessert with a little flair. Stick around—I’ll walk you through every step so your cake turns out perfectly juicy and insanely tasty.
Why You’ll Love This Recipe
- Juicy Cherry Sauce: It seeps into the cake for burst-after-burst of cherry flavor in every bite.
- Simple Yet Impressive: Makes you look like a pro baker with minimal effort and fuss.
- Perfect for Gatherings: Whether it’s a party or family dessert, it always disappears fast.
- Make-Ahead Friendly: The cherry sauce and assembled cake can be prepared the day before, saving you stress.

Ingredients You’ll Need
The harmony between tart cherries, tender almond-flavored cake, and airy whipped cream creates layers of flavor and texture that are just delightful. I usually pick fresh cherries when in season, but frozen work just as well and make this dessert easy year-round.
- Fresh or frozen cherries: Pitting them yourself gives the best texture, but frozen pre-pitted cherries save time.
- Granulated sugar: Balances the tartness of the cherries and sweetens the cake.
- Water: Just enough to help the cherries break down into a sauce.
- Cornstarch: Thickens the cherry sauce to the perfect consistency that won’t run everywhere.
- Kosher salt: Enhances all the flavors—never skip it!
- All-purpose flour: The backbone of the cake’s tender crumb.
- Baking powder & baking soda: These leaveners make sure the cake rises perfectly fluffy.
- Unsalted butter: Softened butter adds rich flavor and moistness.
- Large eggs: Bring structure and richness to the cake.
- Almond extract: Gives the cake a lovely nutty aroma, making this poke cake unique and memorable.
- Buttermilk: Helps keep the cake moist and tender with a slight tang.
- Heavy cream: For whipping up that fluffy topping that mimics clouds of whipped cream.
- Powdered sugar: Sweetens and stabilizes the whipped cream topping.
Variations
I love to switch things up and make this Vampire Poke Cake Recipe my own depending on the season or who I’m serving it to. Don’t be shy about adding your personal twist—it’s a very forgiving recipe!
- Cherry-Chocolate Combo: When I want something extra indulgent, I swirl melted semi-sweet chocolate in the batter before baking.
- Dairy-Free Version: I’ve swapped buttermilk with almond milk plus a splash of white vinegar, and used coconut cream whipped topping for dairy-free guests.
- Spicy Cherry Sauce: Adding a pinch of cinnamon and a dash of cayenne to the cherry sauce gives it a subtle, unexpected kick.
- Mini Cakes: Making individual cupcakes instead of one big cake is so fun for parties—just adjust baking time.
How to Make Vampire Poke Cake Recipe
Step 1: Make the Cherry Sauce Magic
Start by combining the cherries, sugar, water, cornstarch, and a pinch of salt in a small pot. Bring it to a boil over medium-high heat, then reduce it to low and gently mash the cherries as the mixture thickens—this takes about 2 minutes. I like to let it simmer just long enough to get a thick sauce but still keep some texture before pureeing. Once it’s cool, puree it smooth using an immersion blender or regular blender. Pro tip: Making this sauce a day ahead lets the flavors deepen and saves kitchen time the next day.
Step 2: Whip Up the Cake Batter
Preheat your oven to 350°F and get your 13-by-9-inch pan ready with cooking spray and parchment paper—this lining helps the cake come out cleanly. In a large bowl, whisk together flour, baking powder, baking soda, and salt. Then, beat the sugar and softened butter until light and fluffy. This step is key to a tender cake, so don’t rush it. Add eggs one at a time, mixing well after each, then stir in almond extract. The batter might look a bit curdled here, but that’s totally normal.
Now alternate adding the dry ingredients and buttermilk, starting and ending with the dry mix. I like to fold the last bit by hand with a spatula to avoid overmixing, which could make the cake tough. Pour that beautiful batter into your prepared pan and spread it evenly.
Step 3: Bake and Create the Poke Holes
Bake for about 25 to 35 minutes, until the cake is risen and springs back when you gently press the center. As soon as it’s out of the oven and still warm, grab a wooden spoon handle and poke holes about an inch apart, making a grid pattern. This is the fun part where the cherry sauce gets to work, sinking deep into the cake to infuse flavor into every bite.
Step 4: Fill the Holes with Cherry Sauce
Reserve a little bit of cherry sauce for serving, but use the rest to fill the holes in your cake. I use a small spoon or a piping bag for this—either works great. Here’s what I learned: the sauce soaks in quickly, so keep topping up the holes as much as the cake will take. Once you’re satisfied, let the cake cool completely before covering and refrigerating overnight. This resting time lets everything meld together beautifully.
Step 5: Whip and Top Off the Cake
The final flourish is whipping heavy cream with powdered sugar until medium peaks form—light, fluffy, and dreamy. Remove the cake from the pan using the parchment overhang for easy handling, then spread the whipped cream evenly on top. For the vampire effects, poke holes in the whipped cream with a wooden spoon to create fang shapes, and fill those with the reserved cherry sauce. You can splatter some extra sauce here and there for a dramatic, gory vibe that looks amazing and tastes incredible.
Pro Tips for Making Vampire Poke Cake Recipe
- Use Room Temperature Ingredients: I’ve found that butter, eggs, and buttermilk at room temp mix better, giving a smoother batter and fuller rise.
- Don’t Overmix: Once you combine wet and dry ingredients, fold gently to keep the cake light and airy.
- Poke Soon After Baking: Poking while the cake is warm prevents cracking and absorbs the cherry sauce wonderfully.
- Chill Overnight: This resting period deepens flavor and makes slicing easier without messy sauce leaks.
How to Serve Vampire Poke Cake Recipe
Garnishes
I’m a big fan of keeping it simple here: fresh cherries (if in season) and a sprinkle of shaved dark chocolate add a little elegance. Sometimes, I toss on a few mint leaves for contrast—it’s a small touch but really lifts the plate.
Side Dishes
Since this cake shines all on its own, I like pairing it with a light scoop of vanilla ice cream or even a tangy lemon sorbet to balance the sweetness. Hot coffee or a sharp black tea works wonders alongside, especially if you’re serving this after dinner or at a party.
Creative Ways to Present
For Halloween, I’ve laid out this cake on a black slate platter, surrounded by fake cobwebs and plastic spiders for maximum spooky effect. If you want to get fancy, piping red gel to drip from the “fang holes” creates a dramatic, blood-drip look that’s totally Pinterest-worthy.
Make Ahead and Storage
Storing Leftovers
I always cover the cake tightly with plastic wrap or place it in an airtight container and store it in the fridge. It keeps well for 3-4 days, which is great because it rarely lasts that long in my house! The flavors actually seem to intensify overnight, making leftovers even better.
Freezing
If you want to freeze this cake, it’s best to freeze it unassembled—bake the cake and make the cherry sauce, then wrap the cooled cake tightly in plastic wrap and foil. When you’re ready to eat it, thaw completely, then poke holes and fill with cherry sauce and whipped topping. I’ve found that freezing with the whipped cream topping isn’t ideal; it tends to separate upon thawing.
Reheating
Since this is a chilled dessert, I usually just serve it cold, but if you prefer it warmer, I gently microwave a slice for 10-15 seconds to take the chill off—just be careful not to melt the whipped cream. Alternatively, let it sit at room temperature for 10-15 minutes before serving to bring out the flavors.
FAQs
-
Can I use canned cherries instead of fresh or frozen?
You can, but fresh or frozen cherries give you much better flavor and texture. Canned cherries tend to be overly sweet and watery, which can thin out your cherry sauce. If you only have canned, reduce the added sugar in the recipe to compensate.
-
What’s the best way to pit cherries quickly?
I’ve found using a chopstick or the end of a wooden spoon works wonders to push out the pit quickly and easily without damaging the cherry much. Some folks swear by cherry pitters, which can be handy if you’re prepping a large batch.
-
Can I skip the almond extract?
Yes, though the almond extract gives this cake a signature flavor that sets it apart. If you don’t have it or prefer not to use it, vanilla extract will work fine—just expect a slightly more traditional taste.
-
How do I make sure the cherry sauce doesn’t soak through and make the cake soggy?
Poking the holes while the cake is still warm helps the sauce absorb without breaking the crumb down too much. Also, letting the cake set overnight in the fridge helps the sauce settle into the cake properly. Resist adding too much sauce at once—top off the holes gradually instead.
-
Can I make this cake gluten-free?
Absolutely! Substitute the all-purpose flour with a gluten-free flour blend that measures cup-for-cup, and ensure your baking powder doesn’t contain gluten. The texture might be slightly different, but it’s still delicious and perfect for those avoiding gluten.
Final Thoughts
This Vampire Poke Cake Recipe is one of those desserts that brings a smile to everyone’s face—whether it’s the juicy cherry sauce that oozes out or the fun “fang” details in the whipped cream. I love how it’s festive and approachable, making it my go-to for spooky celebrations or just a special weekend treat. Give it a try, have fun with it, and I promise this will become a favorite you’ll return to again and again. Happy baking!
Print
Vampire Poke Cake Recipe
- Prep Time: 10 mins
- Cook Time: 30 mins
- Total Time: 1 hr 30 mins
- Yield: 15 – 18 servings
- Category: Dessert
- Method: Baking
- Cuisine: American
Description
This Vampire Poke Cake is a moist, tender treat featuring a luscious cherry sauce that seeps into poke holes made in the warm cake, creating pockets of vibrant cherry flavor throughout. Topped with fluffy whipped cream and more cherry sauce for a spooky, festive presentation, this cake is perfect for Halloween or any cherry lover’s dessert craving.
Ingredients
Cherry Sauce
- 1 lb. fresh or frozen cherries, pitted
- 1/2 cup (100 g) granulated sugar
- 1/2 cup water
- 2 Tbsp. cornstarch
- 1/4 tsp kosher salt
Cake
- Cooking spray
- 3 cups (360 g) all-purpose flour
- 2 tsp baking powder
- 1/2 tsp baking soda
- 1/2 tsp kosher salt
- 1 cup (200 g) granulated sugar
- 3/4 cup (1 1/2 sticks) unsalted butter, softened
- 3 large eggs, room temperature
- 2 tsp almond extract
- 1 3/4 cups buttermilk, room temperature, divided
Topping
- 1 1/2 cups heavy cream
- 3 Tbsp powdered sugar
- 1 tsp vanilla extract
Instructions
- Make Cherry Sauce: In a small pot, combine cherries, granulated sugar, water, cornstarch, and kosher salt. Bring the mixture to a boil over medium-high heat, then reduce heat to low and cook while mashing occasionally until the cherries break down and the sauce thickens, about 2 minutes. Remove from heat and let cool. Use an immersion blender or standard blender to puree the sauce until smooth. The cherry sauce can be made up to 1 day ahead; refrigerate in an airtight container after cooling and bring to room temperature before use.
- Prepare Cake Pan: Preheat oven to 350°F (175°C). Spray a 13×9-inch pan with cooking spray and line it with parchment paper, leaving an overhang on two long sides for easy removal.
- Mix Dry Ingredients: In a large bowl, whisk together the all-purpose flour, baking powder, baking soda, and kosher salt. Set aside.
- Cream Butter and Sugar: In the large bowl of a stand mixer fitted with the paddle attachment, or using an electric mixer, beat the granulated sugar and softened butter on medium-high speed until pale and fluffy, about 4 to 5 minutes. Add eggs one at a time, beating well after each addition. Then add almond extract and beat until combined (the mixture may look curdled).
- Combine Batter: Add one-third of the dry ingredients and half of the buttermilk to the egg mixture. Mix on low speed just until combined. Repeat with another one-third of dry ingredients and the remaining buttermilk. Finally, fold in the remaining dry ingredients using a rubber spatula. Pour the batter into the prepared pan and smooth the surface.
- Bake the Cake: Bake for 25 to 35 minutes, or until the cake is risen and firm to the touch. While the cake is still warm, use the handle of a wooden spoon to poke holes all over the surface, spacing them about 1 inch apart, forming a grid approximately 12 by 8 holes.
- Fill Poke Holes: Set aside 1/4 cup of the cherry sauce for serving. Using a small spoon or a piping bag, fill the poke holes in the warm cake with the remaining cherry sauce. The sauce will soak into the cake after a few minutes, so continue topping up the holes to maximize the cherry flavor.
- Chill the Cake: Let the cake cool completely, then cover and refrigerate overnight to allow the flavors to meld and the cake to set.
- Prepare Whipped Cream Topping: In a large bowl, whip heavy cream, powdered sugar, and vanilla extract on high speed until medium peaks form.
- Assemble the Cake: Remove the chilled cake from the pan using the parchment overhang. Spread the whipped cream evenly over the cake. To create a spooky vampire effect, use a wooden spoon to poke fang-shaped holes in the whipped cream, then fill these with the reserved cherry sauce. Splatter any remaining cherry sauce over the top as desired for a dramatic effect.
Notes
- You can prepare the cherry sauce up to one day in advance for convenience.
- Ensure the buttermilk and eggs are at room temperature for better mixing and cake texture.
- Use fresh or frozen cherries; if using frozen, allow them to thaw and drain excess water before making the sauce.
- The poke holes can be refilled with cherry sauce multiple times to ensure maximum flavor infusion.
- This cake is best served the day after it’s made to allow full flavor melding.
- For an almond flavor boost, ensure your almond extract is pure and fresh.
- To make the cake easier to remove from the pan, properly line and overhang the parchment paper.
Nutrition
- Serving Size: 1 slice (approx. 1/16 of cake)
- Calories: 350
- Sugar: 30g
- Sodium: 180mg
- Fat: 18g
- Saturated Fat: 10g
- Unsaturated Fat: 6g
- Trans Fat: 0.2g
- Carbohydrates: 40g
- Fiber: 1g
- Protein: 4g
- Cholesterol: 70mg


