

If you’re looking for a show-stopping, crowd-pleasing treat that’s as festive as it is delicious, you’ve got to try this Red, White & Blue Fudge Recipe. It’s one of those desserts that instantly brightens any gathering, from summer BBQs to patriotic holidays. I absolutely love how creamy and rich this fudge turns out, with those vibrant layers that you can either keep smooth or swirl together for a stunning marbled effect. Plus, it’s surprisingly simple to make, even if fudge might seem intimidating at first. Stick with me, and I’ll walk you through every step so it’s foolproof and fun!
Why You’ll Love This Recipe
- Vibrant & Festive: Perfectly captures patriotic colors that make any occasion extra special.
- Simple Ingredients: Uses everyday pantry staples, making it easy to whip up anytime.
- Creamy Texture: The marshmallow creme and white chocolate blend create a smooth, melt-in-your-mouth bite.
- Customizable: Add your favorite sprinkles or swirl the colors for a unique, personal touch.

Ingredients You’ll Need
Each ingredient brings something special to this Red, White & Blue Fudge Recipe; from the sweet, creamy base to the bold pops of color. Here’s what you should gather before you get started, plus a few tips to make shopping easier.
- Sugar: Granulated sugar gives the fudge its classic sweet base and helps create that firm texture you want.
- Butter: Use unsalted for better control, and make sure it’s at room temperature to melt evenly.
- Marshmallow Creme: This is the secret to that luscious fudge texture; don’t swap it for regular marshmallows.
- Evaporated Milk: Adds richness and helps with the smooth consistency; avoid sweetened condensed milk here.
- White Chocolate Chips: High-quality chips melt beautifully and add a creamy, decadent flavor.
- Red & Blue Food Coloring: Gel or liquid works fine, but gel gives you those vibrant, deep colors without thinning the fudge.
- Red, White, & Blue Sprinkles (optional): For a festive finishing touch, but feel free to skip or swap for your favorite toppings.
Variations
I love making this fudge as is, but I encourage you to get creative! This Red, White & Blue Fudge Recipe can be adjusted based on your personal taste or what you have on hand. Here are some tweaks I’ve tried (and loved) over time.
- Chocolate Lover’s Twist: I swapped half the white chocolate chips for milk chocolate chips once, and the rich chocolate flavor was a hit with my family who loved it even more!
- Nutty Addition: Adding chopped pecans or walnuts can give a lovely crunch—just mix them in before setting the fudge.
- Dye-Free Fudge: If you prefer to skip artificial colors, use natural alternatives like beet powder or spirulina for red and blue hues.
- Marbled or Layered: Some days I prefer distinct layers; other times, I use a butter knife to create swirls, which always gets compliments on that stunning look.
How to Make Red, White & Blue Fudge Recipe
Step 1: Prep Your Pan and Bowls
Start by lining a 9×9 baking dish with parchment paper, then spray lightly with non-stick cooking spray—this makes cleanup a breeze and ensures your fudge pops out easily. Next, set out three medium-sized bowls; you’ll divide your fudge mixture between them for coloring later. This little prep step makes the whole process smooth and stress-free.
Step 2: Cook Your Fudge Base
In a large saucepan over medium heat, combine the sugar, butter, and evaporated milk. Stir occasionally until the mixture reaches a boil. Once boiling, continue to cook it lightly boiling for exactly 5 minutes, stirring constantly to prevent scorching. This is where patience really pays off—the right timing here means perfectly set fudge later on.
Step 3: Mix In Marshmallow Creme and White Chocolate
Remove the pan from the heat, then immediately stir in your marshmallow creme and white chocolate chips. Keep stirring until everything is melted and silky smooth—no lumps! If you do see lumps, just keep stirring and the residual heat will help smooth them out. Getting this step right will give you a wonderful creamy texture in the finished fudge.
Step 4: Color Your Fudge
Divide the fudge evenly into your three bowls. Add red food coloring to one, blue to the other, and leave the last bowl plain white. I usually start with a few drops, then add more until I get those bright, festive colors. If you’re using gel colors, it’s easier to get deeper hues without watering down the fudge.
Step 5: Layer or Swirl the Fudge
Pour the blue fudge into the prepared baking dish first and spread it evenly. Next, carefully add the white layer, then finish with the red fudge on top. If you want a striking marbled effect, take a butter knife and gently swirl through all the layers—this creates a beautiful pattern. Otherwise, keep them layered for a neat, classic look. Don’t forget sprinkles if you want that extra pop of fun!
Step 6: Chill and Slice
Let your fudge cool at room temperature for about 20–30 minutes. Then transfer it to the fridge for at least an hour to really set. Once chilled, use a sharp knife to cut it into squares. I find running the knife under hot water between cuts helps make each piece perfectly clean and pretty.
Pro Tips for Making Red, White & Blue Fudge Recipe
- Don’t Rush the Boil: I learned the hard way that undercooking the sugar mixture makes fudge too soft; use a timer for precision.
- Use Gel Food Coloring: It adds vivid color without thinning out your fudge, which keeps the texture perfect.
- Stir Like a Pro: When mixing marshmallow creme and white chocolate, keep stirring until silky smooth to avoid lumps.
- Clean Knife Technique: Running your knife blade under hot water before slicing keeps edges sharp and fudge looking flawless.
How to Serve Red, White & Blue Fudge Recipe

Garnishes
I usually keep it simple with a scattering of red, white, and blue sprinkles or edible glitter right after swirling the fudge. It adds just the right festive touch without overpowering the rich flavors. Sometimes, I’ll lightly dust with powdered sugar for a soft snowy look—especially fun for winter holidays.
Side Dishes
This fudge pairs beautifully with light, fruity accompaniments—think fresh berries or a tangy lemon sorbet. It also balances well alongside classic summer picnic fare like grilled chicken or even a handful of salty nuts to contrast the sweet.
Creative Ways to Present
For holidays, I like arranging the fudge pieces on a tiered platter with mini American flags for a showstopping centerpiece. Another fun approach is cutting fudge into star shapes with cookie cutters—kids love that! Wrapping individual squares in cellophane tied with red or blue ribbons also makes perfect homemade gifts or party favors.
Make Ahead and Storage
Storing Leftovers
I store leftover fudge in an airtight container in the fridge, and it stays fresh for up to 2 weeks. I’ve found layering parchment sheets between pieces prevents sticking without drying out the fudge. The texture holds up beautifully and still tastes just as creamy.
Freezing
This fudge freezes wonderfully! I wrap airtight containers tightly with plastic wrap first, then place them in freezer bags. When I want to enjoy some later, I thaw it overnight in the fridge for the best texture. Just know that freezing might slightly dull the vibrant colors.
Reheating
Since fudge is best enjoyed chilled, I don’t recommend reheating. But, if you want it softer, I’ll gently let it sit at room temperature for 10–15 minutes before serving—that way, it’s not hard but still holds shape.
FAQs
-
Can I substitute marshmallow creme with regular marshmallows?
While you can technically try, marshmallow creme melts more smoothly and helps give the fudge its creamy consistency. Regular marshmallows don’t melt as uniformly and can result in a grainier texture. For best results with this Red, White & Blue Fudge Recipe, stick with marshmallow creme.
-
What’s the best way to get vibrant red and blue colors?
I recommend using gel food coloring because it produces the most vivid colors without affecting the fudge’s texture. Add the coloring a few drops at a time until you reach the shade you want. Liquid food coloring can work but might thin out the fudge mixture slightly.
-
Can I make this fudge without food coloring?
Absolutely! If you prefer a more natural approach, omit the food coloring entirely and enjoy a classic white fudge. Alternatively, try natural colorants like beet powder for red or spirulina for blue to keep the patriotic theme with less artificial dye.
-
How long does this fudge keep?
Stored properly in an airtight container in the fridge, your fudge will stay fresh up to two weeks. For longer storage, freezing is a great option—just thaw in the fridge overnight before enjoying.
-
Can I make this fudge ahead for a party?
Definitely! I often make my Red, White & Blue Fudge Recipe a day or two ahead of time. Just keep it chilled until serving, and it holds its beautiful layers and creamy texture perfectly.
Final Thoughts
I can’t tell you how many times this Red, White & Blue Fudge Recipe has saved me for spontaneous celebrations or family get-togethers. It’s one of those recipes that’s both nostalgic and fresh, reliably crowd-pleasing but still impressive. I promise, once you try making it yourself, you’ll enjoy sharing it just as much as eating it. So go ahead, whip up this sweet patriotic treat and watch your friends and family go crazy for every bite!
Print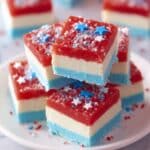
Red, White & Blue Fudge Recipe
- Prep Time: 15 minutes
- Cook Time: 10 minutes
- Total Time: 1 hour 25 minutes
- Yield: 20 servings
- Category: Dessert
- Method: Stovetop
- Cuisine: American
Description
This festive Red, White & Blue Fudge recipe is a creamy, colorful treat perfect for patriotic celebrations or any special occasion. Layers of rich white chocolate fudge tinted with vibrant red and blue food coloring create a marbled effect that is both visually stunning and delicious. Easy to prepare on the stovetop, this fudge combines sugar, butter, marshmallow creme, evaporated milk, and white chocolate for a smooth, melt-in-your-mouth texture.
Ingredients
Fudge Ingredients
- 2 ½ cups sugar
- ½ cup butter
- 5 oz can evaporated milk
- 7 ounces marshmallow creme
- 8 oz white chocolate chips
- a few drops of red food coloring
- a few drops of blue food coloring
- red, white, and blue sprinkles (optional)
Instructions
- Prepare Baking Dish: Line a 9×9 inch baking dish with parchment paper and lightly spray it with non-stick cooking spray. Set aside. Also, set out three medium-sized bowls for dividing the fudge mixture.
- Cook Sugar Mixture: In a large saucepan over medium heat, combine sugar, butter, and evaporated milk. Stir occasionally and bring the mixture to a boil.
- Boil and Stir: Once boiling, continue to boil lightly for 5 minutes, stirring constantly to prevent burning and ensure even cooking. Remove from heat immediately after the time is complete.
- Add Marshmallow and Chocolate: Quickly stir in marshmallow creme and white chocolate chips until fully combined and the mixture is smooth.
- Divide and Color: Evenly divide the warm fudge mixture into the three prepared bowls. Add red food coloring to one bowl and mix thoroughly, add blue food coloring to another and mix well. Leave the third bowl white.
- Layer the Fudge: Pour the blue fudge evenly into the prepared baking dish and spread smoothly. Next, add the white fudge layer on top and spread evenly, followed by the red fudge layer on top. Optionally, use a butter knife to swirl the colors together creating a marbled effect.
- Add Sprinkles (Optional): Immediately sprinkle red, white, and blue sprinkles on top if desired.
- Cool and Chill: Allow the fudge to cool at room temperature for 20-30 minutes. Then transfer the dish to the refrigerator and chill for at least 1 hour to set before slicing into 20 pieces.
Notes
- Use high-quality white chocolate chips for best flavor.
- Do not skip constant stirring during the boiling step to prevent burning or grainy texture.
- The fudge layers can be left separate or gently swirled for a marbled look.
- Store leftover fudge in an airtight container in the refrigerator for up to one week.
- Allow fudge to come to room temperature for a few minutes before serving for optimal softness.
Nutrition
- Serving Size: 1 piece (approx. 1.5 inch square)
- Calories: 190 kcal
- Sugar: 27 g
- Sodium: 60 mg
- Fat: 7 g
- Saturated Fat: 4.5 g
- Unsaturated Fat: 2 g
- Trans Fat: 0 g
- Carbohydrates: 33 g
- Fiber: 0.2 g
- Protein: 1.5 g
- Cholesterol: 15 mg


