

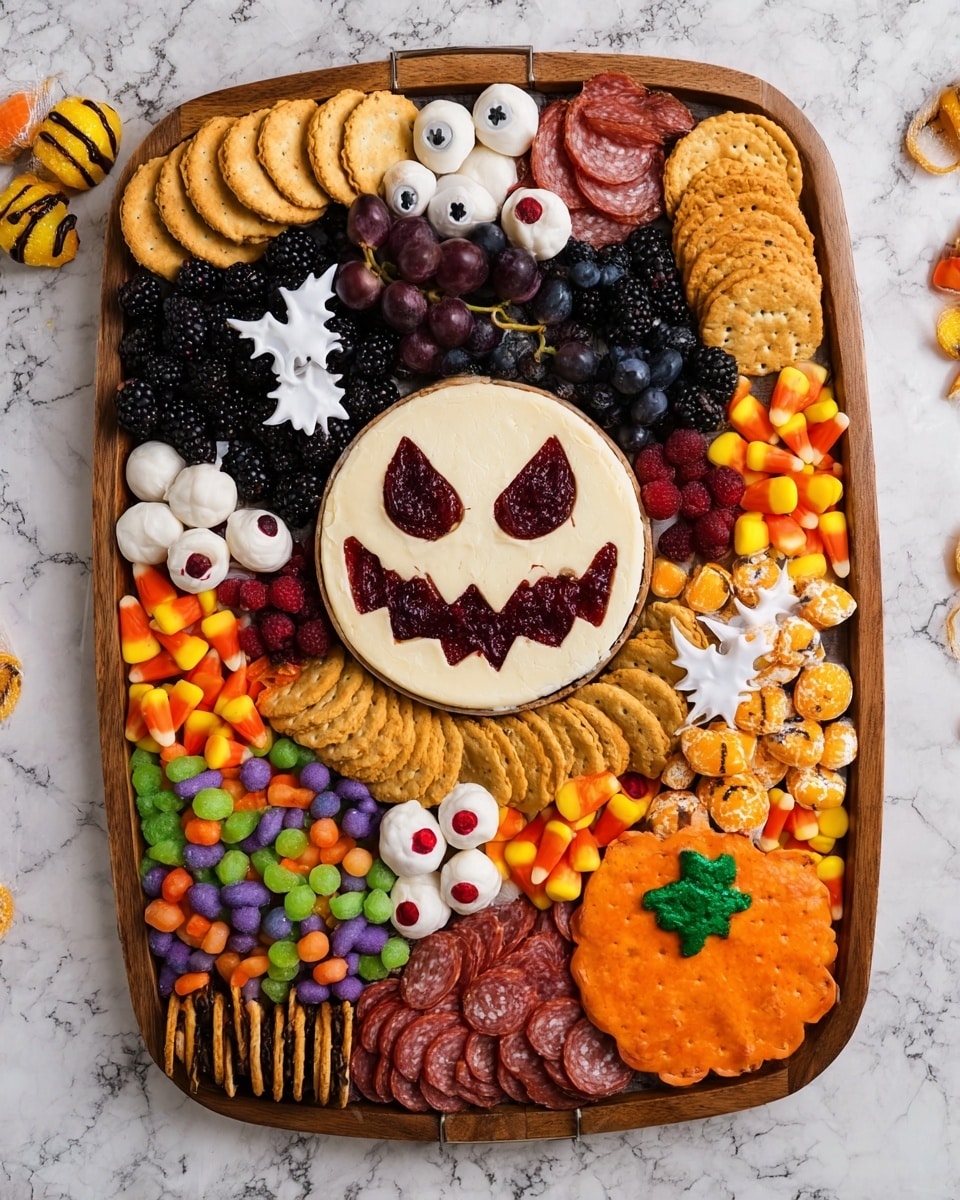
If you’re looking for a show-stopping party centerpiece that’s equal parts spooky and delicious, you’re going to love this Halloween Charcuterie Board Recipe. It’s the kind of festive spread that not only looks amazing but brings everyone together with all the sweet, savory, and creepy-cute bites. When I first tried this, it quickly became my go-to for Halloween get-togethers—I swear, my family goes crazy for it every single time. Trust me, once you see how easy it is to throw together and how much fun it adds to the party vibe, you’ll want to make this an annual tradition!
Why You’ll Love This Recipe
- Fun & Festive: It’s a unique way to celebrate Halloween that tastes as good as it looks.
- Easy to Assemble: No fancy cooking skills needed—just some thoughtful arranging and creativity.
- Crowd-Pleaser: Sweet, savory, and everything in-between, so everyone at your party will find something they love.
- Customizable: You can swap ingredients to suit dietary preferences or seasonal finds.

Ingredients You’ll Need
The magic behind this Halloween Charcuterie Board Recipe is in the balance of flavors and colors. The mix of creamy Brie, juicy dark berries, sharp cheeses, and savory meats creates a board that’s as fun to explore as it is to eat. When shopping, pick bright, fresh fruit and high-quality cheeses for the best results.
- Brie wheel: This creamy centerpiece adds a perfect mild but rich flavor and doubles as your canvas for the Jack Skellington face.
- Dark-colored jam (blackberry, blueberry, or purple grape): Use this to fill in details on the Brie; it adds a tart sweetness that contrasts beautifully.
- Blueberries and blackberries: Fresh, juicy berries add color and a refreshing burst to cut through the richness of cheese and meat.
- Purple grapes: These bring a juicy pop of sweetness and are perfect finger foods for guests.
- Black olives: Their deep color is perfect for creating “eyes” when paired with candy eyeballs.
- Cubed cheese: Choose a firm cheese like cheddar or gouda for variety in texture and flavor.
- Sliced white cheese: Great for cutting into festive shapes using Halloween cookie cutters.
- Mozzarella pearls: These little balls are great for sticking on candy eyeballs to look like mini eyeballs.
- Sliced salami: A savory, slightly spicy cured meat that adds good protein and flavor contrast.
- Assorted crackers: Variety here keeps the board interesting — think buttery, seeded, and gluten-free options.
- Candy eyeballs: These are the key to making your board delightfully spooky.
- Pretzels (chocolate-covered and regular): The salty and sweet combo offers great crunch and visual texture.
- Halloween cookies and candy: These complete the theme and add sweet treats for guests to nibble on.
- Serving tray or large wood cutting board: A spacious base to arrange everything creatively.
- Halloween cookie cutters: Essential for shaping the white cheese into fun, festive designs.
Variations
I love how this Halloween Charcuterie Board Recipe lends itself to personalization. Whether you want to keep things classic or mix in your favorite flavors, you really can’t go wrong. I always encourage you to make it your own and try out different combos each year.
- Meat-free board: Swap out salami for more nuts, roasted chickpeas, or marinated artichokes—I’ve done this for family friends who don’t eat meat, and no one even noticed!
- Spicy twist: Add spicy cheeses like pepper jack or include pickled jalapeños for a punch. I discovered this trick when trying to add more excitement to my boards.
- Seasonal fruit swap: Depending on the time of year, you can swap out berries for pomegranate seeds or figs for an elegant touch.
- Gluten-free crackers: If you’re serving guests with gluten sensitivities, I always recommend stocking up on gluten-free crackers or using sliced veggies like cucumber and bell pepper for dipping instead.
How to Make Halloween Charcuterie Board Recipe
Step 1: Create Your Spooky Brie Centerpiece
Place the whole Brie wheel in the center of your serving board. Using the edge of a knife or a toothpick, carefully outline Jack Skellington’s face. The outline doesn’t need to be perfect—imperfect is charming here! Then scoop out the cheese from the areas you outlined, creating “holes” for the face. This step might feel a bit tricky at first, but I find using a small serrated knife or even a melon baller works like a charm. Don’t worry if the holes are not perfectly smooth; this just adds character.
Step 2: Fill in with Dark Jam
Spoon your dark-colored jam—blackberry or blueberry works best—into the holes of the carved Brie face. This adds a rich contrast in color and a sweet-tart flavor that pairs amazingly with the creamy cheese. If your jam is too thick, warm it slightly to make it easier to spread. I’ve learned this little trick makes filling those small spaces way easier without messing up the design.
Step 3: Arrange Berries and Cheese Shapes
Next, surround your Brie with a generous handful of fresh blueberries and blackberries for a burst of color and flavor. Then take your white cheese slices and use your Halloween cookie cutters to make fun shapes like pumpkins, bats, or ghosts. It’s a simple way to add that festive vibe! Place these cheese shapes on top of the berries or arrange them artistically around the board.
Step 4: Add “Eyeballs” and Savory Elements
Stick candy eyeballs onto black olives and mozzarella pearls, then place them strategically around the board to give that eerie, playful look—guests get such a kick out of this! Layer on your sliced salami, cubed cheese, and scatter in crackers and pretzels, both chocolate-covered and plain, to add a variety of textures. This combination hits all the right savory and crunchy notes.
Step 5: Fill in with Halloween Candy and Cookies
Finally, fill any empty spaces with Halloween-themed cookies and candy. This not only keeps the festive momentum going but gives a sweet finishing touch to your board. I always find that this step makes the whole thing look inviting and complete. The kids especially love helping pick out their favorite candies to add!
Pro Tips for Making Halloween Charcuterie Board Recipe
- Use a warmed knife for carving Brie: Lightly warming your knife under hot water (then drying it) helps you carve cleaner lines without sticking.
- Pick jam with deep color: This makes your Jack Skellington face details pop visually and balances the Brie perfectly.
- Layer textures thoughtfully: Combine crunchy pretzels and crackers with soft cheese and juicy fruit to keep every bite exciting.
- Avoid overcrowding the board: Give each element room to shine; too much can get messy and overwhelming.
How to Serve Halloween Charcuterie Board Recipe
Garnishes
I like to finish the board with fresh rosemary sprigs and edible flowers if I can find them. They add a pretty, aromatic touch that elevates the whole experience. Plus, a few stray candy eyeballs tucked here and there keep the spooky fun alive throughout the display.
Side Dishes
Pair this board with a big fall punch or sparkling cider for a festive sipper. I also often serve some warm pumpkin soup or a hearty autumn salad on the side to round out the party menu without overshadowing the board.
Creative Ways to Present
I’ve had great fun using rustic wood slices or vintage trays instead of regular boards for a natural autumn vibe. For extra flair, add mini pumpkins or fake spider webs around the edges (just make sure they don’t touch the food). A black tablecloth or Halloween-themed napkins helps tie it all together perfectly.
Make Ahead and Storage
Storing Leftovers
I usually wrap any leftover cheeses tightly in parchment paper and keep them in an airtight container in the fridge. Berries and grapes don’t last as long, so I try to serve those fresh or pick at them early. Crackers and pretzels should be stored separately in sealed bags to maintain crunch.
Freezing
Freezing this kind of charcuterie board is tricky because fresh fruit and crackers don’t freeze well. However, you can freeze the jam and sliced salami separately if you want to prep early. I’ve found freezing cheese changes its texture, so fresh is best here.
Reheating
This board is meant to be enjoyed cold or at room temperature, so reheating isn’t necessary. If you want to soften leftover Brie, let it come to room temp for about 30 minutes before serving again—this brings back that creamy goodness.
FAQs
-
Can I make the Halloween Charcuterie Board Recipe ahead of time?
Absolutely! You can prepare most of the components a day ahead—slice the cheeses, wash the berries, and prepare the jam-filled Brie face. Assemble the board shortly before serving to keep everything fresh and visually appealing.
-
What can I use instead of candy eyeballs?
If you can’t find candy eyeballs, small olives stuffed with pimento or halved grapes can serve as spooky eye-like elements, or even small dollops of cream cheese with an olive slice on top.
-
Is this Halloween Charcuterie Board Recipe kid-friendly?
Yes! Kids love the fun shapes and candy accents. Just make sure to keep some less spicy or strong-flavored ingredients for younger taste buds.
-
What types of cheese work best for this board?
Soft cheeses like Brie are great for the centerpiece, while firmer cheeses such as cheddar or gouda provide nice texture balance. Mozzarella pearls add a fresh, mild component perfect for sticking on candy eyeballs.
Final Thoughts
I absolutely love how this Halloween Charcuterie Board Recipe brings a festive, fun spirit to any gathering without any stress. Whether you’re hosting friends, family, or neighbors, it’s an interactive, eye-catching spread everyone can enjoy nibbling on. I remember the first time I made this—my friends kept coming back for more and asking how I made such a cool, spooky centerpiece. Give it a try—you’ll find it’s not only delicious but a fantastic conversation starter. Trust me, once you get started, you’ll want to make this your Halloween tradition too!
Print
Halloween Charcuterie Board Recipe
- Prep Time: 20 minutes
- Cook Time: 0 minutes
- Total Time: 20 minutes
- Yield: 8 servings
- Category: Appetizer
- Method: No-Cook
- Cuisine: American
Description
This festive Halloween Charcuterie Board features a spooky Jack Skellington-themed Brie centerpiece surrounded by a variety of cheeses, fruits, crackers, meats, and Halloween-themed candies. Perfect for parties, it combines savory and sweet elements with creative decorations to delight guests of all ages.
Ingredients
Cheeses
- 16 ounce (454g) Brie wheel
- Cubed cheese (assorted varieties)
- Sliced white cheese
- Mozzarella pearls
Fruits & Vegetables
- Blueberries
- Blackberries
- Purple grapes
- Black olives
Meats
- Sliced salami
Spreads & Condiments
- Dark-colored jam such as blackberry, blueberry, or purple grape
Crackers & Snacks
- Assorted crackers
- Pretzels (chocolate-covered and regular)
Halloween Decorations & Sweets
- Candy eyeballs
- Halloween cookies and candy
Tools
- Serving tray or large wood cutting board
- Halloween cookie cutters
Instructions
- Prepare the Brie: Place the brie wheel in the center of a serving board. Using the edge of a knife or toothpick, carefully outline the Jack Skellington face on the brie.
- Carve the Design: Scoop out the cheese from the carved areas using a small serrated knife or spoon to create space for filling.
- Fill with Jam: Fill the carved holes with a dark-colored jam such as blackberry or blueberry to create contrasting facial features.
- Arrange Berries: Surround the brie wheel with fresh blueberries, blackberries, and purple grapes on the board.
- Cut and Place Cheese Shapes: Use small Halloween cookie cutters to cut shapes from the white cheese slices, then place these shaped cheeses atop the berries as decoration.
- Add Candy Eyes: Stick candy eyeballs onto black olives and mozzarella pearls to create spooky eyes, then add them to the board.
- Arrange Meats and Crackers: Place sliced salami, cubed cheeses, assorted crackers, and pretzels (both chocolate-covered and regular) artistically around the board.
- Fill Remaining Space: Fill all the nooks and crannies on the board with Halloween cookies and various candies to complete the festive presentation.
Notes
- Using a small serrated knife helps carve the brie neatly without breaking it.
- Choose dark jams for contrast against the pale brie for best visual effect.
- Ensure candy eyeballs are edible and suitable for all guests.
- For a gluten-free version, use gluten-free crackers and pretzels.
- This board is best enjoyed fresh on the day of assembly to preserve ingredient texture.
Nutrition
- Serving Size: 1/8 of board
- Calories: 280
- Sugar: 8g
- Sodium: 350mg
- Fat: 20g
- Saturated Fat: 12g
- Unsaturated Fat: 7g
- Trans Fat: 0g
- Carbohydrates: 15g
- Fiber: 3g
- Protein: 8g
- Cholesterol: 40mg

