

If you’re hunting for a spooky, fun, and totally irresistibly tasty treat this Halloween, look no further—my Witch Finger Cookies Recipe is just what you need. I absolutely love how these creepy yet charming cookies turn out with their perfect balance of buttery, nutty goodness and a sweet burst of jam, plus that eerie fingernail detail that’s just so much fun to make. Stick with me, and I’ll walk you through everything so you can wow your family or guests with these delightfully creepy witch fingers without any stress.
Why You’ll Love This Recipe
- Fun and Festive: These cookies look just like witch fingers, making them perfect for Halloween or spooky-themed parties.
- Perfect Texture: The combination of buttery dough and crunchy nuts creates a melt-in-your-mouth experience with a satisfying bite.
- Easy to Customize: I’ll share simple variations so you can make these your own, whether you want them nut-free or flavored differently.
- Great Make-Ahead Option: You can prep the dough days in advance, making entertaining less stressful.

Ingredients You’ll Need
These ingredients come together beautifully to create that signature flavor and look of the witch finger cookies—think sweet, nutty, and a touch fruity from the jam. I always recommend using good-quality butter and fresh nuts for maximum yum.
- Confectioners’ Sugar: Gives the dough a silky texture and gentle sweetness—be sure to sift it to avoid lumps.
- Unsalted Butter: Using softened butter helps achieve that rich, tender cookie base. I always leave mine out for about 30 minutes before mixing.
- Large Egg: Binds everything together and adds moisture—room temperature works best here.
- Almond Extract: I love how it adds a subtle nutty aroma, perfect for this cookie’s vibe.
- Vanilla Extract: A cozy flavor booster that really rounds out the taste.
- Green Food Coloring: Just a few drops to give that spooky eerie tint without being overpowering.
- All-Purpose Flour: The backbone of the dough—make sure to measure carefully to avoid dry or dense cookies.
- Kosher Salt: Enhances the sweet and nutty flavors; don’t skip it!
- Finely Chopped Pistachios: These add a fantastic texture and look like knobby warts on the witch fingers.
- Sliced Almonds: These become the ‘fingernails’—fresh and crisp is best.
- Cherry, Strawberry, or Raspberry Jam: Provides that creepy, oozing blood effect—plus a burst of fruity sweetness.
Variations
Don’t be shy about making this recipe your own—I’ve tried a few twists and found they really keep things interesting. Whether you want to cater to allergies or just switch up flavors, a little tweak goes a long way.
- Nut-Free Version: I swapped pistachios and almonds for crushed pretzels or graham cracker pieces once, and it was surprisingly delicious with a bit of salty crunch.
- Spiced Witch Fingers: Adding a pinch of cinnamon and nutmeg to the dough gave a warm fall twist that my family couldn’t get enough of.
- Chocolate ‘Fingernails’: Instead of almonds, I used small pieces of dark chocolate which melted slightly and looked extra gruesome.
How to Make Witch Finger Cookies Recipe
Step 1: Whip Up the Soft, Fluffy Base
Start by beating the confectioners’ sugar and softened butter together until they’re pale and fluffy—about 2 minutes on medium speed. This step is where you build that tender, buttery foundation. Then, add the egg and keep beating until the mixture is light and combined, another minute or so. Finally, stir in the almond extract, vanilla, and green food coloring until everything’s beautifully blended. Pro tip: Beat it well but don’t overdo it or the dough can get greasy.
Step 2: Mix in the Dry Ingredients and Nuts
In a small bowl, whisk together the flour and salt. Then, add this dry mix to your wet mixture on low speed, just until you see the dough coming together. Overmixing here will make the cookies tough, which you don’t want. Fold in those finely chopped pistachios by hand for that perfect texture and those “wart-like” details. Cover the dough with plastic wrap, and let it chill in the fridge for at least 30 minutes—this rest helps the dough firm up and makes shaping a breeze.
Step 3: Shape Your Witch Fingers
This part is the fun and slightly creepy bit. Line two baking sheets with parchment. Take a quarter of your chilled dough and divide it into tablespoon-sized balls. Roll each one between your palms, aiming for a finger shape about 3 inches long and half an inch thick—think pinky finger size but a little thinner. Press a sliced almond into the tip of each for the fingernail. Then, pinch the dough below the almond and halfway down the finger to form knuckles, carving horizontal little slits with a sharp knife for extra detail. Don’t forget to press in some pistachio pieces randomly on fingers to look like warts. Once shaped, pop your trays in the freezer for 30 minutes; this really helps the cookies hold their shape when baking.
Step 4: Bake Until Spooky & Perfect
Preheat your oven to 375°F (190°C). Bake the cookies for 7 to 9 minutes, rotating the trays halfway for even cooking. You’ll know they’re done when the edges are firm and the tops feel dry to the touch. Be careful not to overbake—these cookies are best soft with a crisp outside, not hard. Let them cool slightly before moving onto their bloody finishing touch.
Step 5: Add the Creepy Jam ‘Blood’
Now, gently lift the almond fingernail off each cookie, and place a tiny dab of your chosen jam on the tip of the finger. Replace the almond nail, pressing down so the jam oozes out like fresh blood. Spread a little extra jam along the base of each finger for that extra gory effect. Let the cookies cool completely to let the jam set—it’s so satisfying to see the jam bleed just right!
Pro Tips for Making Witch Finger Cookies Recipe
- Chill Time is Key: I discovered this trick when shaping the fingers was tricky—freezing the dough logs makes clean carving and placing almonds much easier.
- Almond Pressing: Press your almond nails gently but firmly to avoid breakage—if they crack, just use a smaller piece and it still looks great.
- Consistent Sizing: Use a tablespoon measure for dough balls—that way your fingers bake evenly and look uniform on the tray.
- Watch Your Baking Time: I used to overbake these, leaving them too dry, but keeping a close eye means they come out with the perfect tender yet firm bite.
How to Serve Witch Finger Cookies Recipe
Garnishes
I like to dust my finished witch finger cookies lightly with some extra confectioners’ sugar—it adds a bit of ghostly frostiness. Sometimes, I arrange a few edible sugar spiders or use fresh mint leaves around the platter for a whimsical spooky vibe. If you’re taking them to a party, plastic spider rings nestled around the plate can add to the fun!
Side Dishes
These cookies really shine as a standalone treat, but if you’re throwing a Halloween bash, I love pairing them with a rich hot cocoa or a spiced cider. The warm drinks balance the sweetness and make for a cozy combo. For kids’ parties, a simple glass of milk always works wonders too.
Creative Ways to Present
For Halloween gatherings, I’ve had great success arranging these witch fingers sticking out of a “cauldron” (a deep bowl filled with gummy worms or dry ice smoke effect). Another time, I presented them in a wooden box lined with parchment paper and scattered some sugar webs on top—guests loved the extra creepy factor! I find small details like this turn a simple cookie into a conversation starter.
Make Ahead and Storage
Storing Leftovers
These cookies stay tasty stored in an airtight container at room temperature for up to 4 days. I put parchment or wax paper between layers to keep them from sticking, especially because of the jam. My family rarely has leftovers though—these fingers disappear fast!
Freezing
I freeze the shaped but unbaked dough logs before baking—this way I can slice and bake them fresh whenever I want. Freezing baked cookies is okay too, but I think the texture stays better when frozen before baking. Just thaw overnight in the fridge and bake as usual. It’s a lifesaver for last-minute spooky treats!
Reheating
If you want to warm up leftovers and bring back that just-baked aroma, pop the cookies in a 300°F oven for about 5 minutes. Avoid microwaving as it can make the nuts soggy and jam too sticky. Warm cookies are magical—like freshly conjured!
FAQs
-
Can I make the Witch Finger Cookies Recipe without nuts?
Absolutely! If you have nut allergies or prefer nut-free, you can simply omit the pistachios and almonds. Try substituting the pistachios with crushed pretzels or graham crackers for similar texture, and use mini chocolate chips or small candy pieces as “fingernails” instead of almonds.
-
How long can I store these cookies?
When stored in an airtight container at room temperature, the cookies stay fresh for about 3 to 4 days. The jam will keep them moist but be sure to layer them separated by parchment paper to prevent sticking.
-
What’s the best jam to use for the ‘blood’ effect?
I usually go with raspberry jam because its deep red color looks the most eerie, but cherry or strawberry jams work just as well. Choose a thicker jam to prevent it from running off the cookies unevenly.
-
Can I prepare the dough ahead of time?
Yes, you can refrigerate the dough for up to 2 days before shaping and baking. This makes it super convenient if you want to prep early and bake fresh closer to serving time.
-
Any tips for shaping perfect witch fingers?
Chilling the dough before shaping is crucial. Also, using the almond slices as nails helps guide your finger lengths and shapes. Don’t rush the knuckle pinching and carving – that’s what really brings these cookies to life!
Final Thoughts
Making these witch finger cookies has become one of my favorite Halloween traditions—each batch reminds me of cozy nights with family, laughter, and that little thrill of spooky fun. I hope you enjoy preparing (and devouring) them as much as I do. Go ahead and give this Witch Finger Cookies Recipe a try—you’ll impress everyone with your creepy, delicious skills, and trust me, these will vanish before you know it!
Print
Witch Finger Cookies Recipe
- Prep Time: 15 mins
- Cook Time: 9 mins
- Total Time: 1 hr 50 mins
- Yield: 50 cookies
- Category: Dessert
- Method: Baking
- Cuisine: American
Description
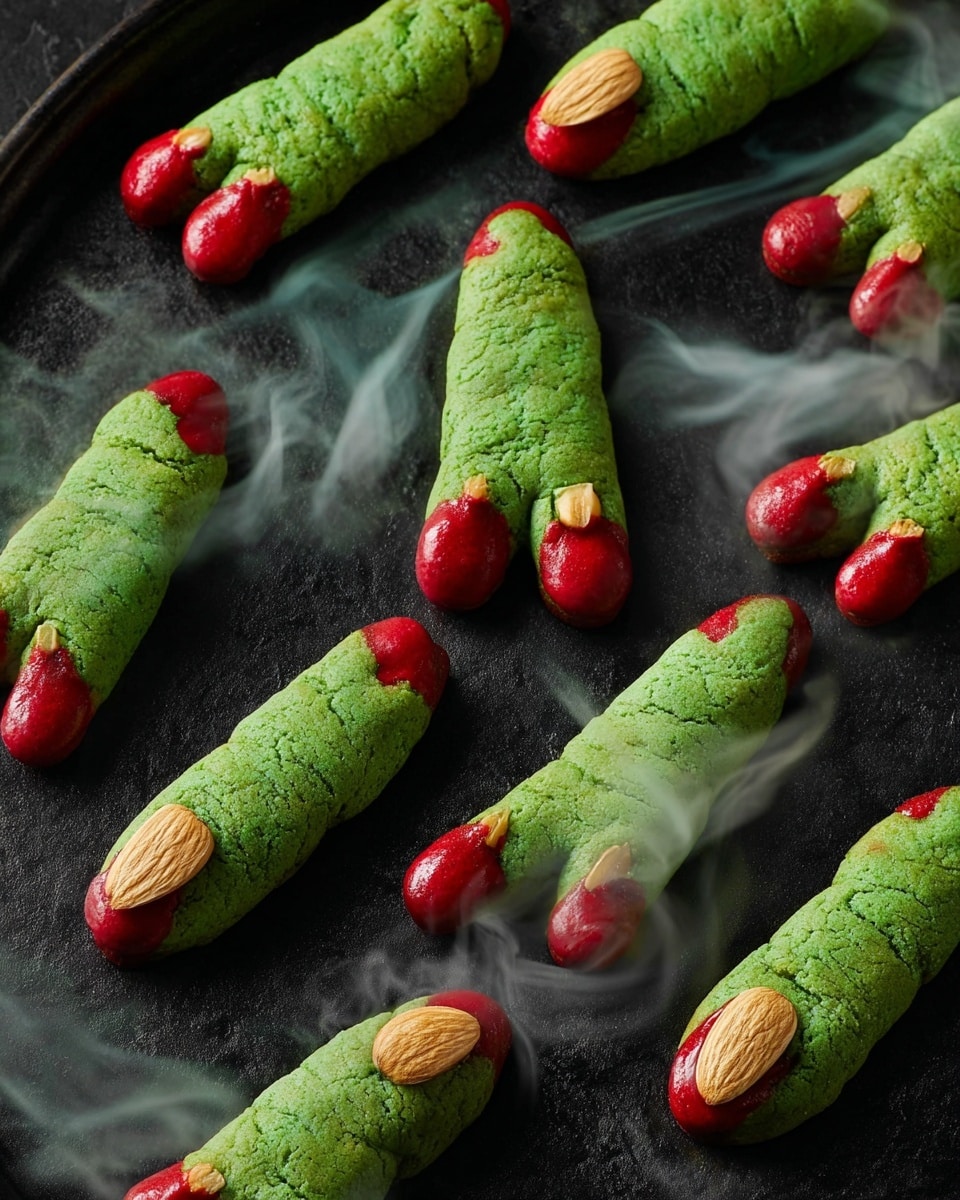
Witch Finger Cookies are a spooky and fun treat perfect for Halloween. These buttery, almond-scented cookies are shaped like eerie fingers, adorned with almond slice fingernails and decorated with pistachios as warts. The finishing touch is a delicious dab of fruity jam that oozes from beneath the almond nails for a creepy, blood-like effect. They are baked to a perfect crisp and make a festive addition to any holiday dessert table.
Ingredients
Cookie Dough
- 1 1/4 cups (145 g) confectioners’ sugar
- 1 cup (2 sticks) unsalted butter, softened
- 1 large egg
- 1 tsp almond extract
- 1 tsp pure vanilla extract
- 5 to 6 drops green food coloring
- 2 3/4 cups (330 g) all-purpose flour
- 1 tsp kosher salt
- 1/2 cup finely chopped pistachios (about 70 g), plus more for decorating
Decorations and Filling
- 3/4 cup sliced almonds (about 85 g)
- 1/2 cup (135 g) cherry, strawberry, or raspberry jam
Instructions
- Prepare the dough: In the large bowl of a stand mixer fitted with the whisk attachment or using a handheld mixer, beat confectioners’ sugar and softened butter on medium speed until pale and fluffy, about 2 minutes. Add the egg and continue to beat until fully incorporated and fluffy, about 1 minute more. Mix in almond extract, vanilla extract, and green food coloring until well combined.
- Incorporate dry ingredients and chill: Whisk together the all-purpose flour and kosher salt in a small bowl. Add this to the butter mixture and beat on low speed until just combined. Fold in the finely chopped pistachios. Cover the dough with plastic wrap and refrigerate for at least 30 minutes or up to 2 days to firm up.
- Shape the fingers: Preheat the oven later before baking. When ready, line two rimmed baking sheets with parchment paper. Remove one-quarter of the chilled dough and divide it into 12 to 13 tablespoon-sized balls. Roll each between your palms into a finger shape approximately 3 inches long and 1/2 inch thick. Arrange the shaped logs on the prepared baking sheets. Press one almond slice onto each finger’s tip as a fingernail. Pinch the dough just below the almond and halfway down to create knuckles. Use a sharp knife to carve horizontal lines into the knuckle area to mimic finger joints. Press 1 or 2 pistachio pieces into the finger to represent warts. Repeat with the remaining dough and freeze for 30 minutes to help retain shape during baking.
- Bake the cookies: Preheat your oven to 375°F (190°C). Bake the frozen fingers on the prepared baking sheets, rotating trays after halfway through baking, for 7 to 9 minutes until the edges are firm and tops appear dry. Remove from oven and let cookies cool slightly on the sheets.
- Add the finishing touch: Carefully lift off each almond fingernail. Dab a small amount of the cherry, strawberry, or raspberry jam onto the tip of each finger, then replace the almond nail, pressing down gently to let the jam ooze out around the nail, creating a blood-like effect. Spread a little jam onto the bottom of each finger for extra color. Let the cookies cool completely before serving or storing.
Notes
- Make sure to chill the dough well to make shaping the fingers easier and keep their form during baking.
- Use green food coloring sparingly to avoid overpowering the subtle almond flavor.
- The pistachios add texture and a spooky wart-like appearance, but you can substitute with other nuts if preferred.
- Use a sharp paring knife to carve knuckle lines cleanly without tearing the dough.
- If you prefer less sweetness, reduce the confectioners’ sugar slightly or substitute jam varieties that are less sugary.
- Store finished cookies in an airtight container at room temperature for up to 5 days.
Nutrition
- Serving Size: 1 cookie
- Calories: 110
- Sugar: 8g
- Sodium: 70mg
- Fat: 7g
- Saturated Fat: 3g
- Unsaturated Fat: 3g
- Trans Fat: 0g
- Carbohydrates: 11g
- Fiber: 1g
- Protein: 2g
- Cholesterol: 15mg


