

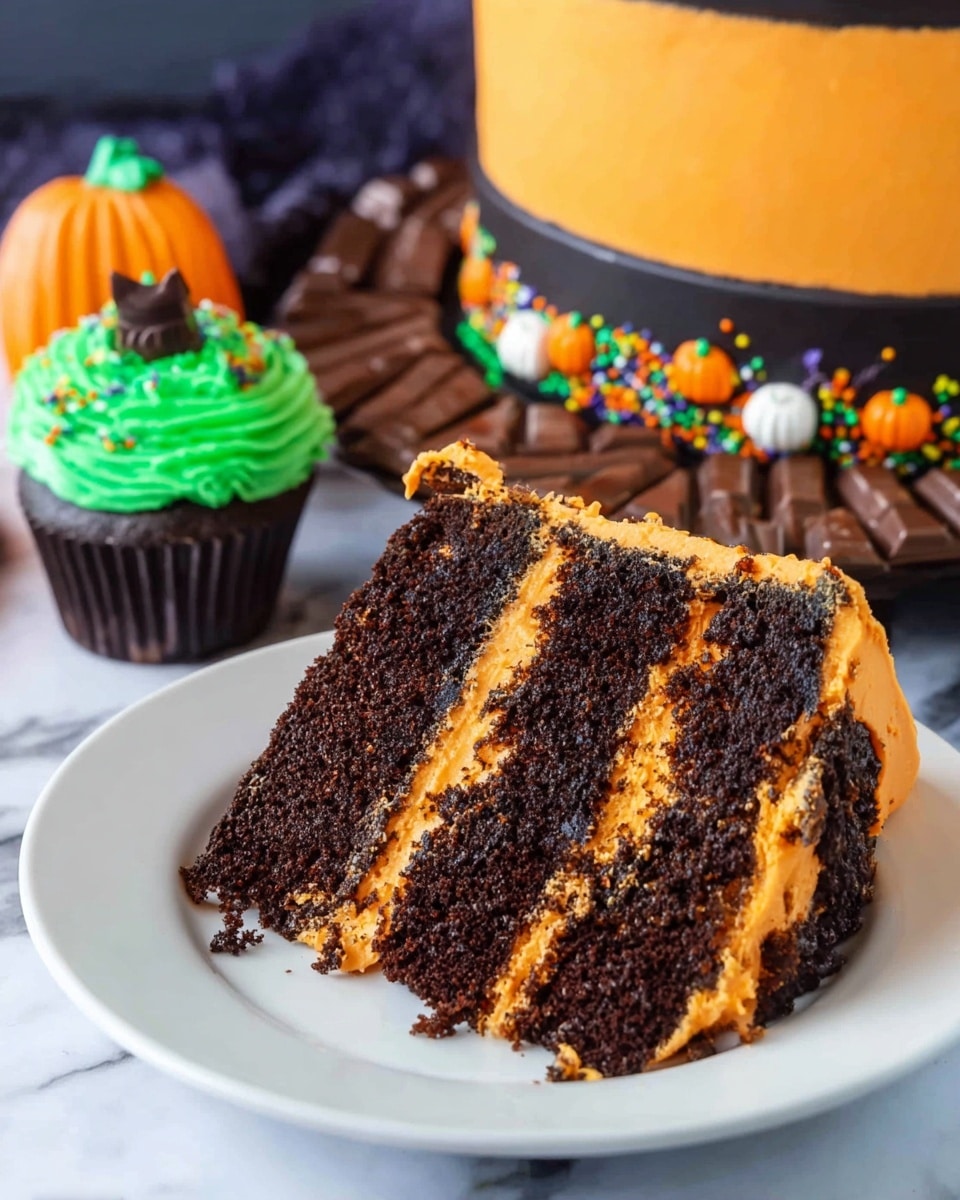
If you’re looking for a show-stopping Halloween dessert that’s as fun to make as it is to eat, you’re in for a treat with this Graveyard Halloween Cake Recipe. It’s loaded with layers of rich chocolate cake and colorful buttercream frostings, decorated to look like a spooky graveyard that will absolutely wow your guests. I absolutely love how this turns out every time — the contrast between the dark cocoa and vibrant orange and green buttercream is just magical. Stick with me, and I’ll guide you through every step to nail this festive masterpiece with ease and have fun doing it!
Why You’ll Love This Recipe
- Perfect Halloween Vibes: The spooky graveyard theme brings festive charm that kids and adults both love.
- Moist & Rich Chocolate Layers: The chocolate cake is deeply flavored with espresso and cocoa, making every bite decadent.
- Vibrant Colored Frostings: The orange, black, and green buttercreams add visual pop and plenty of creamy texture.
- Step-by-Step Friendly: I share detailed tips and tricks so you can confidently tackle this festive cake—even if you’re not a pro baker.

Ingredients You’ll Need
Each component in this Graveyard Halloween Cake Recipe plays a special role—from the cocoa-laced chocolate cake to the luscious buttercream frostings that give you those perfect Halloween shades. Here’s what you’ll bring home for the best results.
- Unsalted Butter: Provides richness and a velvety crumb in both cake and frostings, plus it whips beautifully for the buttercream.
- Powdered Sugar: The key to smooth, sweet buttercream frostings that hold their shape well.
- Instant Espresso Powder: Adds depth and intensifies the chocolate flavor in the cake and black buttercream.
- Dark Cocoa Powder: Using a dark variety like Hershey’s Special Dark yields a rich, almost fudgy chocolate base.
- Buttermilk: Keeps the cake tender and moist while balancing the cocoa’s bitterness.
- Eggs and Extra Yolk: Provide structure and tenderness; the extra yolk enhances richness.
- Vanilla Extract: Elevates flavors and adds a subtle sweet warmth.
- Heavy Cream: Adds silkiness and helps achieve the perfect frosting consistency.
- Food Gel Coloring: For vivid orange, black, and green frostings that scream Halloween.
- Cake Flour: Provides a lighter texture than all-purpose flour, which is essential for tender cake layers.
- Additional Decor Items: Crushed Oreos, Halloween-shaped chocolates like ghosts and pumpkins, Kit Kats, and sprinkles—these bring your graveyard to life.
Variations
I love to keep things classic with this Graveyard Halloween Cake Recipe, but sometimes I like to switch it up a bit. Don’t be afraid to make it your own—holiday baking should be creative and joyful!
- Dairy-Free Variation: Substitute butter with vegan margarine and use a plant-based heavy cream alternative; just watch your cake’s texture as it may vary slightly.
- Spice It Up: Add a teaspoon of pumpkin pie spice or cinnamon to the chocolate batter for an autumn twist that pairs wonderfully with the orange frosting.
- Mini Graveyard Cupcakes: Use the same components but scale down to cupcakes for a fun party option—I’ve had great success with this at school Halloween bashes.
- Gluten-Free Version: Try a 1:1 gluten-free baking flour blend to accommodate dietary needs without losing the cake’s tender crumb.
How to Make Graveyard Halloween Cake Recipe
Step 1: Baking the Moist Chocolate Cake Layers
Preheat your oven to 350°F and prepare three 6-inch round cake pans by greasing and dusting them with flour. I like to use a floured baking spray like Baker’s Joy—it saves a lot of time and cleanup.
Start by creaming the butter and sugar in your stand mixer on medium speed until it’s light and fluffy, which takes about 5 minutes—don’t rush this part, it makes a big difference in texture.
While that’s happening, microwave your water for 30 seconds and stir in the espresso powder until fully dissolved. This step is essential for enhancing the chocolate flavor.
Next, whisk cocoa powder, buttermilk, and vanilla into the espresso mixture—this combination keeps the cake moist and intensely chocolaty.
In a separate bowl, sift together the cake flour, baking soda, and salt to avoid any lumps and ensure even baking.
Once the butter and sugar mixture is pale and fluffy, add eggs and the extra yolk one at a time, mixing well after each addition. Then pour in the vegetable oil and beat on medium-high speed for about a minute—it should be airy and light.
Fold in half of the dry flour mixture, followed by half of the wet cocoa-buttermilk mixture, alternating gently to preserve airiness. Repeat with the remaining portions.
Divide the batter evenly into the 3 pans and bake for 20-25 minutes, or until a toothpick inserted in the center comes out clean. Baking all pans simultaneously on the same rack helps with even cooking.
Once baked, let layers cool completely. If they domed on top, carefully level them with a serrated knife—flat layers stack better and look more polished. Wrap individual layers in plastic wrap and freeze at least an hour or overnight—freezing firms them up and makes frosting easier.
Step 2: Whipping Up the Colorful Buttercreams
You’ll make three different buttercreams here: orange, black, and green. Each one starts similarly but varies with add-ins and colors. Here’s how I approach them:
- Orange Buttercream: Whip softened butter until fluffy. Add vanilla and a pinch of salt. Then alternate adding powdered sugar and heavy cream (1 cup sugar, 2 tbsp cream at a time), mixing well between additions. Finish by mixing in orange gel coloring on medium-low speed until vibrant and smooth.
- Black Buttercream: Beat butter with espresso powder, dark cocoa powder, vanilla, and salt until combined. Add powdered sugar and cream in alternating batches as before. The frosting will initially look grayish—after mixing in the black gel coloring on medium-low speed, it deepens to the perfect spooky black.
- Green Buttercream (Half batch): Whip butter with vanilla and salt. Alternate powdered sugar and cream additions, then blend in green gel coloring until you get a lively grass green shade.
Using gel coloring is key here—it won’t thin your frosting like liquid dyes, so the consistency stays perfect for piping and spreading.
Step 3: Assembling & Decorating Your Graveyard Cake
Start by crushing Oreos; I use a food processor, but smushing them in a ziplock bag with a rolling pin works just as well—these will replicate dirt and add crunch.
Secure your 8-inch cake board to a turntable with tape, then tape a 6-inch cake board to the center. Place a dollop of orange buttercream on the smaller board to stick the first cake layer in place.
Layer your cakes: cake, orange buttercream, cake, buttercream, and final cake layer. Spread a thin crumb coat of orange buttercream all around and chill for 10-15 minutes to set.
While it chills, decorate your Halloween chocolate ghosts and pumpkins by gently halving them to make them thinner, then add facial details with the writing tip; I find adding little eyes and mouths brings them to life.
Once chilled, pipe or spread a generous band of black buttercream around the cake’s center. Press Halloween sprinkles into this black frosting to mimic creepy soil and add some ghosts and pumpkins into this layer—using toothpicks helps secure them. Chill again for 10 minutes.
Then, frost the areas above and below the black band with more orange buttercream, using a piping bag with the tip cut off for even coverage. Use a bench scraper to gently smooth the sides, being careful to keep clear lines between orange and black—a sharp visual edge makes the graveyard effect pop.
Top the cake with mounds of crushed Oreos, place halved KitKats around the bottom edge for a fence effect, and pipe tufts of green grass buttercream at the base and around headstones using a grass piping tip.
Pop the cake in the fridge to set for 10 minutes before serving or displaying your spooky masterpiece.
Pro Tips for Making Graveyard Halloween Cake Recipe
- Freeze Cake Layers Before Frosting: I discovered this trick to keep layers firm which makes spreading buttercream so much easier and prevents crumbs from mixing in.
- Alternate Sugar and Cream in Buttercream: Adding powdered sugar and cream in small alternating batches gives you better control over frosting texture than dumping everything at once.
- Use Dark Cocoa for Deeper Chocolate Flavor: Regular cocoa just doesn’t deliver that rich, almost bittersweet flavor I love in this cake.
- Don’t Overmix Batter After Adding Flour: Folding gently preserves the cake’s tender crumb and keeps it from becoming tough.
How to Serve Graveyard Halloween Cake Recipe
Garnishes
I love topping this cake with crushed Oreos for a crushed ‘dirt’ effect and halved KitKats to resemble wooden picket fences. The Halloween-themed chocolates like ghosts and pumpkins add instant character and make the presentation feel both spooky and whimsical. Don’t skip piping that green grass buttercream—it really ties it all together and brings the graveyard to life.
Side Dishes
This cake pairs fabulously with a simple cup of hot apple cider or a rich pumpkin spice latte. If you want to turn your Halloween menu up a notch, serve it alongside caramel popcorn or spiced roasted nuts to add some contrasting textures and flavors.
Creative Ways to Present
For an extra spooky party centerpiece, I’ve set this cake on a slab of slate or rustic wooden platter surrounded by candy ‘bones’ and edible ‘spiders’ made from chocolate chips and pretzels. Another fun twist—serve mini versions as individual graveyard cupcakes, arranging them on a tiered platter to look like a haunted cemetery.
Make Ahead and Storage
Storing Leftovers
Once decorated, I recommend storing the cake in the refrigerator covered loosely with a cake dome or plastic wrap. It will keep beautifully for up to 3 days. Just pull it out about 30 minutes before serving to let it come to room temperature—this lets those luscious buttercreams soften beautifully.
Freezing
I always freeze the cake layers before assembly, which really simplifies frosting day. You can also freeze the whole assembled cake for short periods (up to 1 week) by wrapping tightly with plastic and foil. Thaw in the fridge overnight before serving to keep decorations intact.
Reheating
This cake is best served chilled or at room temperature, so reheating isn’t usually necessary. If you prefer slightly warmer cake, leave slices out for 30 minutes before eating rather than microwaving—this preserves the frosting’s texture and taste.
FAQs
-
Can I make the cake gluten-free?
Absolutely! Swap the cake flour for a 1:1 gluten-free baking flour blend and ensure your cocoa powder and other ingredients are gluten-free certified. The cake’s texture might be a bit different but will still be delicious and festive.
-
How do I get the black buttercream really black?
The key is using a combination of dark cocoa powder, espresso powder, and black gel food coloring. Initially, the frosting looks grayish, but as you mix in the gel color, it darkens beautifully. Patience here really pays off!
-
Can I make this cake ahead of time?
Yes! Bake and freeze your cake layers a day or two before assembling. You can also prepare the buttercreams in advance. Assembly and decorating day will be more relaxed, and the cake will taste even better as flavors meld.
-
What if I don’t have a cake turntable?
No worries! You can frost the cake on a flat surface or plate. Use a steady hand and an offset spatula to smooth the frosting, rotating the plate gently as you go for even coverage.
-
Can I use all-purpose flour instead of cake flour?
For best results, I recommend cake flour as it produces a lighter crumb. But if you only have all-purpose flour, use a tablespoon less per cup and sift well to mimic cake flour’s texture as closely as possible.
Final Thoughts
This Graveyard Halloween Cake Recipe has become one of my absolute favorites for the spooky season—it brings a perfect blend of fun, flavor, and festive flair to any Halloween party. I love how it invites creativity and lets you get playful with decorations while also rewarding you with a wonderfully rich and moist chocolate cake that everyone raves about. If you want to impress your family and friends with a dessert that’s both hauntingly beautiful and downright delicious, this is the recipe to try. Trust me, your Halloween celebrations will be so much sweeter with this cake center stage!
Print
Graveyard Halloween Cake Recipe
- Prep Time: 3 hours
- Cook Time: 25 minutes
- Total Time: 4 hours 25 minutes
- Yield: 15 slices
- Category: Baking
- Method: Baking
- Cuisine: American
Description
This Graveyard Halloween Cake is a spooky and delicious layered chocolate cake decorated with vibrant orange, black, and green buttercream frostings. The cake features a rich chocolate base combined with creamy, colorful frostings made with butter, powdered sugar, and heavy cream, perfect for a festive Halloween celebration. Detailed decorating tips make it as visually striking as it is tasty, with crushed Oreos, Halloween-themed toppings, and creative piping to create a graveyard scene on your cake.
Ingredients
Orange Buttercream Frosting
- 1 cup butter, softened to room temperature
- 5-7 cups powdered sugar
- 1 tablespoon vanilla extract
- ¾ cup heavy cream
- Pinch salt
- Orange food gel coloring
Black Buttercream Frosting
- 1 cup butter, softened to room temperature
- ½ teaspoon espresso powder
- ½ cup dark cocoa powder (Hershey’s Special Dark recommended)
- 1 teaspoon vanilla extract
- 5-7 cups powdered sugar
- ¾ cup heavy cream
- Pinch of salt
- Black food gel coloring
Green Buttercream Frosting (half batch)
- ½ cup butter, softened to room temperature
- 3-5 cups powdered sugar
- ½ tablespoon vanilla extract
- 6 tablespoons heavy cream
- Pinch of salt
- Green food gel coloring
Chocolate Cake
- 1 ¼ cups sugar
- ½ cup unsalted butter
- ½ teaspoon instant espresso powder
- ⅓ cup boiling water
- ⅓ cup dark cocoa powder
- ½ cup buttermilk
- 1 teaspoon vanilla extract
- 1 ⅓ cups cake flour
- ¾ teaspoon baking soda
- ½ teaspoon salt
- 2 extra-large eggs
- 1 extra-large egg yolk
- ¼ cup vegetable oil
Additional Decorating Items
- Crushed Oreos
- Halloween Ghosts, Pumpkins, Tombstones decorations
- Kit Kats, halved
- Halloween Sprinkles
Instructions
- Prepare the Chocolate Cake: Preheat the oven to 350°F and grease three 6-inch round cake pans with butter and flour or baking spray. In a stand mixer, cream 1 ¼ cups sugar and ½ cup unsalted butter until fluffy, about 5 minutes. Microwave ⅓ cup water for 30 seconds and dissolve ½ teaspoon instant espresso powder into it. Whisk ⅓ cup dark cocoa powder, ½ cup buttermilk, and 1 teaspoon vanilla extract into the espresso mixture. Sift 1 ⅓ cups cake flour, ¾ teaspoon baking soda, and ½ teaspoon salt together in a separate bowl. Add 2 extra-large eggs and 1 extra-large egg yolk to the butter-sugar mixture one at a time, mixing fully each time. Mix in ¼ cup vegetable oil and beat on medium-high speed for 1 minute until light and fluffy. Fold in half the flour, then half the buttermilk mixture, then the remaining flour and buttermilk alternately. Divide batter evenly into prepared pans and bake for 20-25 minutes until a toothpick comes out clean. Cool completely, level if needed, wrap in plastic wrap, and freeze for at least an hour or overnight.
- Make the Orange Buttercream Frosting: Whip 1 cup butter in a mixer until fluffy. Add 1 tablespoon vanilla extract and a pinch of salt, and mix until combined. Alternately add 5-7 cups powdered sugar and ¾ cup heavy cream in increments (about 1 cup sugar followed by 2 tablespoons cream), mixing well each time. After incorporating all ingredients, beat on high for 20-30 seconds. Add orange food gel coloring and mix on medium-low speed until fully incorporated.
- Make the Black Buttercream Frosting: Whip 1 cup butter until fluffy. Add ½ teaspoon espresso powder, ½ cup dark cocoa powder, 1 teaspoon vanilla, and a pinch of salt, mixing until well combined. Alternate adding 5-7 cups powdered sugar and ¾ cup heavy cream in increments, combining thoroughly. Beat on high speed for 20-30 seconds once all added. Add black food gel coloring and mix on medium-low until fully incorporated; the frosting will darken with time.
- Make the Green Buttercream Frosting: Whip ½ cup butter until fluffy. Add ½ tablespoon vanilla extract and a pinch of salt, mixing until combined. Alternately add 3-5 cups powdered sugar and 6 tablespoons heavy cream in increments, mixing well each time. Beat on high for 20-30 seconds after all ingredients are added. Mix in green food gel coloring on medium-low speed until fully incorporated.
- Decorate the Graveyard Cake: Crush Oreos using a food processor or placing them in a zip-lock bag and smashing lightly. Secure an 8-inch cake board to a turntable with tape, then tape a 6-inch cake board to the center of the larger board. Place a dollop of frosting onto the smaller board and position the first cake layer on top. Spread an even layer of orange buttercream, then stack the second and third layers with more frosting in between. Apply a thin crumb coat of orange buttercream over the entire cake and refrigerate for 10-15 minutes. While chilling, decorate Halloween ghost and pumpkin decorations by piping facial details using a writing tip. After chilling, apply a thick band of black buttercream around the cake’s center and press sprinkles, then arrange ghosts and pumpkins on this black layer, halving them for thickness. Chill again for 10 minutes. Frost the areas above and below the black band and the cake top with the final orange coat, using a piping bag with the tip cut off for even coverage. Smooth the sides carefully with a bench scraper to maintain the black-orange boundary and tidy the edges with an offset spatula. Create several Oreo mounds on top and place halved KitKats around the base, then chill for 10 minutes. Insert toothpicks into the ghosts and pumpkins and place them and the tombstones on top. Use green buttercream and a grass piping tip to pipe grass around the headstones and KitKats for finishing touches.
Notes
- Make the cake at least a day before serving and freeze it to simplify frosting application; otherwise, freeze for at least 1-2 hours before frosting.
- Apply sprinkles to the black buttercream fault line before adding the ghost and pumpkin decorations.
- Slice the backs off the ghosts and pumpkins used for the fault line to make them thinner and avoid protruding too far.
- Trim the bottoms of the ghosts used in the fault line to fit the space properly, especially for smaller cakes.
- Leftover frosting is perfect for decorating Halloween cupcakes or cookies.
Nutrition
- Serving Size: 1 slice (1/15th of cake)
- Calories: 460
- Sugar: 38g
- Sodium: 170mg
- Fat: 28g
- Saturated Fat: 16g
- Unsaturated Fat: 10g
- Trans Fat: 0.5g
- Carbohydrates: 49g
- Fiber: 2g
- Protein: 4g
- Cholesterol: 90mg


