

If you’re looking for a fun, festive treat that not only tastes amazing but also adds a little Halloween magic to your kitchen, you’ve got to try this Witch Hat Cookies Recipe. I absolutely love how these cookies come together with that perfect peanut butter base, a melty chocolate brim, and a burst of colorful frosting crowned by a chocolate kiss. Trust me, once you’ve made these, your family and friends will be begging you to share the secret!
Why You’ll Love This Recipe
- Perfect Halloween Vibes: These cookies look adorably spooky but are delightfully tasty for all ages.
- Easy to Make: The steps are straightforward, even if you’re not super experienced in baking.
- Versatile Frosting: Customize your frosting colors for your own twist every time.
- Crowd-Pleaser: My family goes crazy for these at parties or just as a fun weekday treat.

Ingredients You’ll Need
This Witch Hat Cookies Recipe brings together classic baking ingredients with a peanut butter twist for rich flavor and the perfect texture. You’ll want to grab some quality peanut butter and chocolate wafers to get that signature hat look just right!
- All-purpose flour: The base of the cookie dough, making them tender yet sturdy enough.
- Baking soda: Helps your cookies rise just enough for a soft bite.
- Salt: Balances the sweetness and enhances overall flavor.
- Granulated sugar: Adds crispness and sweetness; also used for rolling the dough.
- Light brown sugar: Gives these cookies a subtle caramel depth that’s irresistible.
- Creamy no-stir peanut butter: I suggest using Skippy Natural for smooth, consistent texture.
- Unsalted butter: Room temperature butter ensures smooth mixing and creaminess.
- Large egg: Adds structure and moisture.
- Pure vanilla extract: For that warm, inviting aroma in every bite.
- Chocolate melting wafers: The perfect brim size for the witch hats; melts beautifully when pressed onto the warm cookies.
- Confectioners’ sugar: For the creamy frosting that helps decorate and hold the hats together.
- Heavy cream or whole milk: Adjusts frosting consistency for perfect piping.
- Gel food coloring: Pick your favorite Halloween colors—orange, purple, green all work fabulously.
- Chocolate kisses: Unwrapped, they sit atop the hats as the iconic pointy tip.
- Sprinkles: Optional, but I love sprinkling tiny Halloween-themed ones to make them pop!
Variations
One of my favorite things about this Witch Hat Cookies Recipe is how easy it is to make it your own. Whether you’re tweaking the frosting colors or swapping out peanut butter for a nut-free option, you learn a lot just playing around.
- Nut-Free Variation: I once swapped the peanut butter for sunflower seed butter for a allergy-friendly batch, and it worked wonderfully without sacrificing texture.
- Different Frosting Colors: Each year, I switch up my frosting colors—last time it was a neon green and purple combo that the kids loved.
- Chocolate Alternatives: If you can’t find melting wafers, I’ve used chopped chocolate bars melted and spooned onto cookies; just let it set up fully before adding the kiss.
How to Make Witch Hat Cookies Recipe
Step 1: Prep and Mix Your Cookie Dough
Start by preheating your oven to 375º F and lining your baking sheets with parchment paper—you’ll thank yourself when cleanup is a breeze. Next, whisk together your flour, baking soda, and salt in a bowl. In your stand mixer, blend the granulated sugar, brown sugar, butter, and creamy peanut butter until fluffy (about 2 minutes). Don’t forget to scrape down the bowl occasionally—it makes sure everything blends evenly! Add your egg and vanilla, mixing for another 30 seconds.
Step 2: Form and Bake the Cookies
Slowly add in your flour mixture on low speed and mix until just combined. Scoop full tablespoons of dough and roll them into 1-inch balls, then roll those balls in extra granulated sugar to give a little crunch and sparkle. Place your dough balls on the baking sheet about 1 ½ inches apart, gently pressing down so they get a bit flat.
Bake for 10 minutes until you see a light golden brown around the edges—here’s where the magic starts. Immediately after pulling them out of the oven, press a chocolate melting wafer on top of each cookie. The warmth melts them just enough; use the back of a spoon to spread the chocolate around a bit, forming the brim wider than your eventual chocolate kiss.
Step 3: Whip Up the Frosting and Assemble
While those cookies are cooling on a wire rack, it’s time to make the frosting. Cream your softened butter until it’s light and fluffy, then gradually add the sifted confectioners’ sugar on low speed. Once fully incorporated, add the vanilla, a tablespoon of cream, and a pinch of salt. Test the consistency—add more cream for a thinner frosting perfect for piping, or sift in extra sugar if you want it stiffer.
Divide the frosting into separate bowls and add 1-2 drops of gel food coloring to each—you want those vibrant Halloween shades to really stand out. Load each colored frosting into piping bags with round tips.
Now comes the fun part: pipe frosting on the bottom of every chocolate kiss and gently press it onto the solidified chocolate wafer brim. You should see some frosting squish out the sides, giving that witch hat “point” some dimension. Add sprinkles right away if you like, and voila—your Witch Hat Cookies are ready to impress!
Pro Tips for Making Witch Hat Cookies Recipe
- Use No-Stir Peanut Butter: I found using no-stir creamy peanut butter helps the dough maintain its consistency without extra oils separating.
- Press Wafers Immediately: Be sure to add chocolate wafers right away when the cookies come out of the oven so they melt perfectly.
- Adjust Frosting Thickness: If your frosting gets too thick, add milk or cream one teaspoon at a time—too thin, add more sugar slowly.
- Avoid Overbaking: Pull cookies out when edges just start golden to keep them soft-centered and chewy under that crispy outer layer.
How to Serve Witch Hat Cookies Recipe
Garnishes
I like to add a mix of colorful Halloween-themed sprinkles right after piping frosting. It adds a playful pop with every bite and looks fantastic stacked on a cookie platter.
Side Dishes
These Witch Hat Cookies go wonderfully with a warm mug of spiced cider or hot chocolate—perfect for cozy fall nights. They’re also a fun addition to any Halloween dessert spread alongside caramel popcorn and pumpkin cupcakes.
Creative Ways to Present
For a special occasion, I like arranging these cookies on a black or orange platter with little pumpkin gourds around them to enhance the spooky vibe. Another fun idea is to stack them like a witch’s hat tower and tie with a ribbon for a festive gift presentation.
Make Ahead and Storage
Storing Leftovers
I store leftover Witch Hat Cookies in an airtight container at room temperature, and they stay fresh for up to one week. If any frosting gets a bit soft, just pop them in the fridge for a bit to firm up before enjoying again.
Freezing
If you want to save dough for later, just freeze it for up to three months—defrost it overnight in the fridge before scooping. Alternatively, baked cookies freeze well too, retaining their softness when thawed gently at room temperature.
Reheating
To refresh your cookies, I pop them in a warm oven for a few minutes or zap in the microwave for 10 seconds to bring back that fresh-baked softness—just watch closely so the frosting stays intact!
FAQs
-
Can I use crunchy peanut butter for the Witch Hat Cookies Recipe?
I recommend using creamy, no-stir peanut butter because crunchy varieties can affect the texture and make the dough a bit uneven. That said, if you prefer the crunch, you can try it—but the finished cookie might be less smooth overall.
-
What if I can’t find chocolate melting wafers?
No worries! You can melt regular chocolate chips or bars and spoon a small circle onto the warm cookies for the hat brims. Just let the chocolate set fully before adding the kiss on top to avoid slipping.
-
Can I make the frosting ahead of time?
Absolutely! You can make the frosting a day in advance—just keep it covered tightly and stored in the fridge. Before using, whip it a bit to get it fluffy again and add a splash of cream if needed for piping.
-
How long do Witch Hat Cookies stay fresh?
Stored in an airtight container at room temperature, these cookies stay fresh for about a week. For longer storage, freeze either the dough or baked cookies for up to three months.
Final Thoughts
When I first tried this Witch Hat Cookies Recipe, I wasn’t sure if my decorating skills would do it justice—but the result totally surprised me. They not only tasted incredible but brought so much joy and color to our Halloween celebrations. If you want a show-stopping treat that’s fun to make and a blast to eat, you’re going to love making these. Give them a try and see how they become your new fall favorite—I promise the compliments will keep rolling in!
Print
Witch Hat Cookies Recipe
- Prep Time: 15 minutes
- Cook Time: 10 minutes
- Total Time: 55 minutes
- Yield: 30 cookies
- Category: Dessert
- Method: Baking
- Cuisine: American
Description
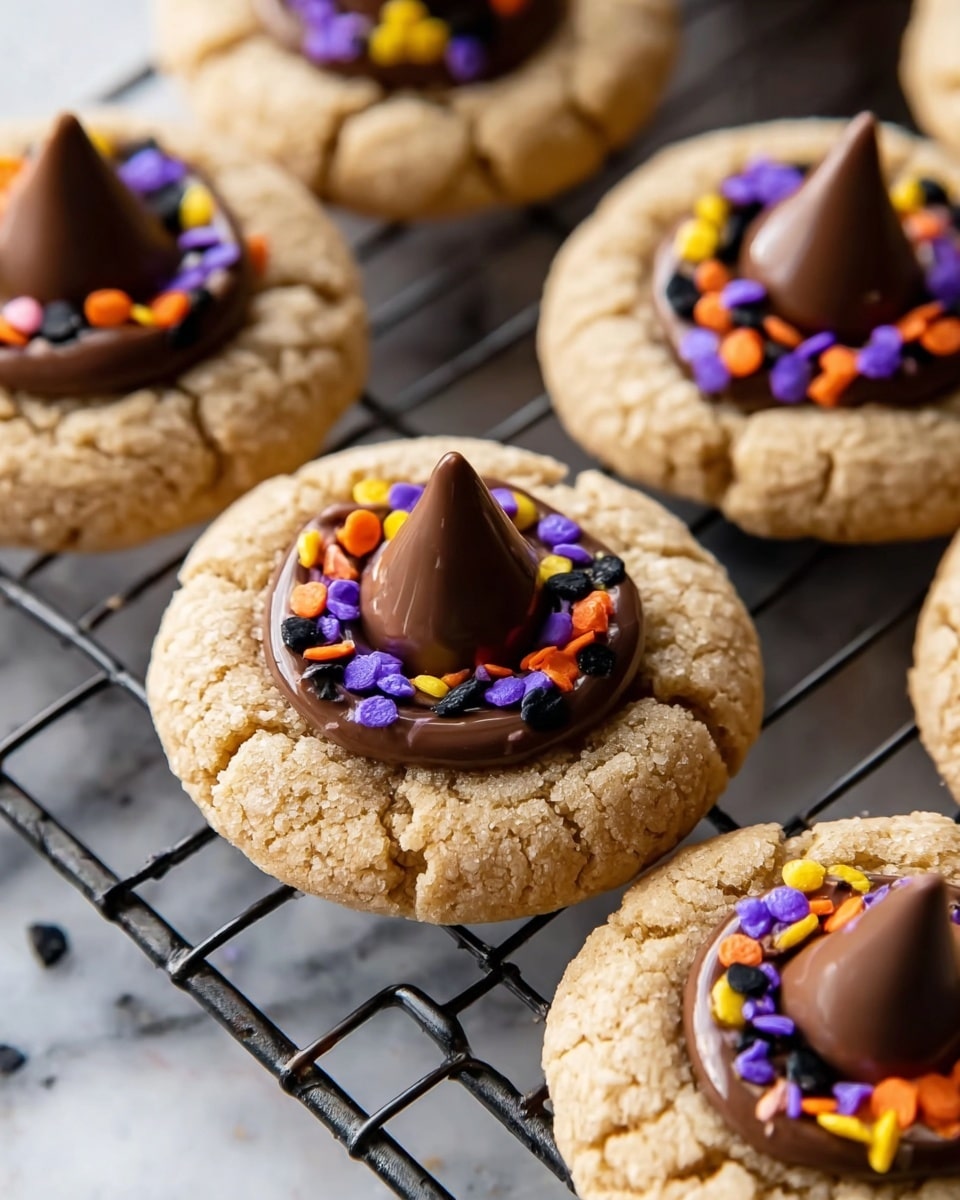
These Witch Hat Cookies are a festive Halloween treat combining a soft peanut butter cookie base with a melted chocolate wafer brim and a chocolate kiss topper decorated with colorful frosting and sprinkles. Perfectly spiced and easy to make, they offer a delightful mix of textures and flavors that bring fun and whimsy to your dessert table.
Ingredients
Cookies
- 1 ¾ cup (218 g) all-purpose flour
- 1 teaspoon baking soda
- ¼ teaspoon salt
- ½ cup (100 g) granulated sugar, plus more for rolling cookies in
- ½ cup (100 g) light brown sugar
- ½ cup (128 g) no-stir creamy peanut butter
- ½ cup (113 g or 1 stick) unsalted butter, room temperature
- 1 large egg, room temperature
- 1 teaspoon pure vanilla extract
- 30 chocolate melting wafers
Frosting
- ½ cup (113 g or 1 stick) unsalted butter, room temperature
- 1 ¼ cups (150 g) confectioners’ sugar, sifted
- 1 teaspoon pure vanilla extract
- Pinch salt
- 1-2 Tablespoons heavy cream or whole milk, room temperature
- Gel food coloring (orange, purple, green)
Decoration
- 30 chocolate kisses, unwrapped
- Sprinkles
Instructions
- Prepare Dry Ingredients: In a medium bowl, whisk together the all-purpose flour, baking soda, and salt. Set aside.
- Cream Sugars and Fats: In a stand mixer bowl or large bowl with a hand mixer, combine granulated sugar, light brown sugar, room temperature butter, and no-stir creamy peanut butter. Beat on medium speed until fluffy, about 2 minutes, scraping down the sides as needed.
- Add Egg and Vanilla: Beat in the egg and vanilla extract until fully incorporated, about 30 seconds.
- Combine Dough: With mixer on low, slowly add the flour mixture and beat just until combined; avoid overmixing.
- Shape Cookies: Using a tablespoon, scoop dough and roll into 1-inch balls. Roll each ball in extra granulated sugar and place on a parchment-lined baking sheet, spacing them 1 ½ inches apart. Press balls down slightly.
- Bake Cookies: Preheat oven to 375°F (190°C). Bake cookies for 10 minutes or until lightly golden. Immediately remove from oven and press one chocolate melting wafer on top of each cookie to melt from residual heat. Use the back of a spoon to spread melted chocolate slightly wider than the base of a chocolate kiss.
- Cool Cookies: Transfer cookies to a wire rack to cool completely and allow the chocolate wafers to harden.
- Make Frosting: Beat butter in a mixing bowl until creamy (about 2 minutes). Gradually add sifted confectioners’ sugar on low speed until fully incorporated.
- Add Flavor and Texture: Increase mixer speed to medium, add vanilla extract, 1 tablespoon of heavy cream, and a pinch of salt. Mix until smooth. Adjust consistency by adding more cream for thinner or sugar for thicker frosting.
- Color Frosting: Divide the frosting into three bowls and tint each with gel food coloring (orange, purple, green) to desired color intensity.
- Assemble Hats: Transfer colored frosting to piping bags fitted with round tips. Frost the bottom of each chocolate kiss and press it on top of the hardened chocolate wafer on each cookie, allowing some frosting to peek out.
- Decorate: Add sprinkles on the frosting around the kisses for a festive touch.
- Serve and Store: Serve the cookies once assembled. Store in an airtight container at room temperature for up to one week.
Notes
- Use no-stir creamy peanut butter for best texture and flavor. Skippy Natural is recommended.
- Chocolate wafers create the perfect brim size; if unavailable, melt chocolate and spoon onto cooled cookies.
- There may be leftover frosting; it’s excellent for decorating Halloween cupcakes.
- Freeze cookie dough for up to 3 months; thaw in refrigerator before scooping and baking.
- Baked cookies can also be frozen for up to 3 months.
- Store finished cookies in an airtight container at room temperature for up to 1 week.
Nutrition
- Serving Size: 1 cookie
- Calories: 202
- Sugar: 17g
- Sodium: 87mg
- Fat: 11g
- Saturated Fat: 6g
- Unsaturated Fat: 4g
- Trans Fat: 0.2g
- Carbohydrates: 24g
- Fiber: 1g
- Protein: 3g
- Cholesterol: 25mg

