

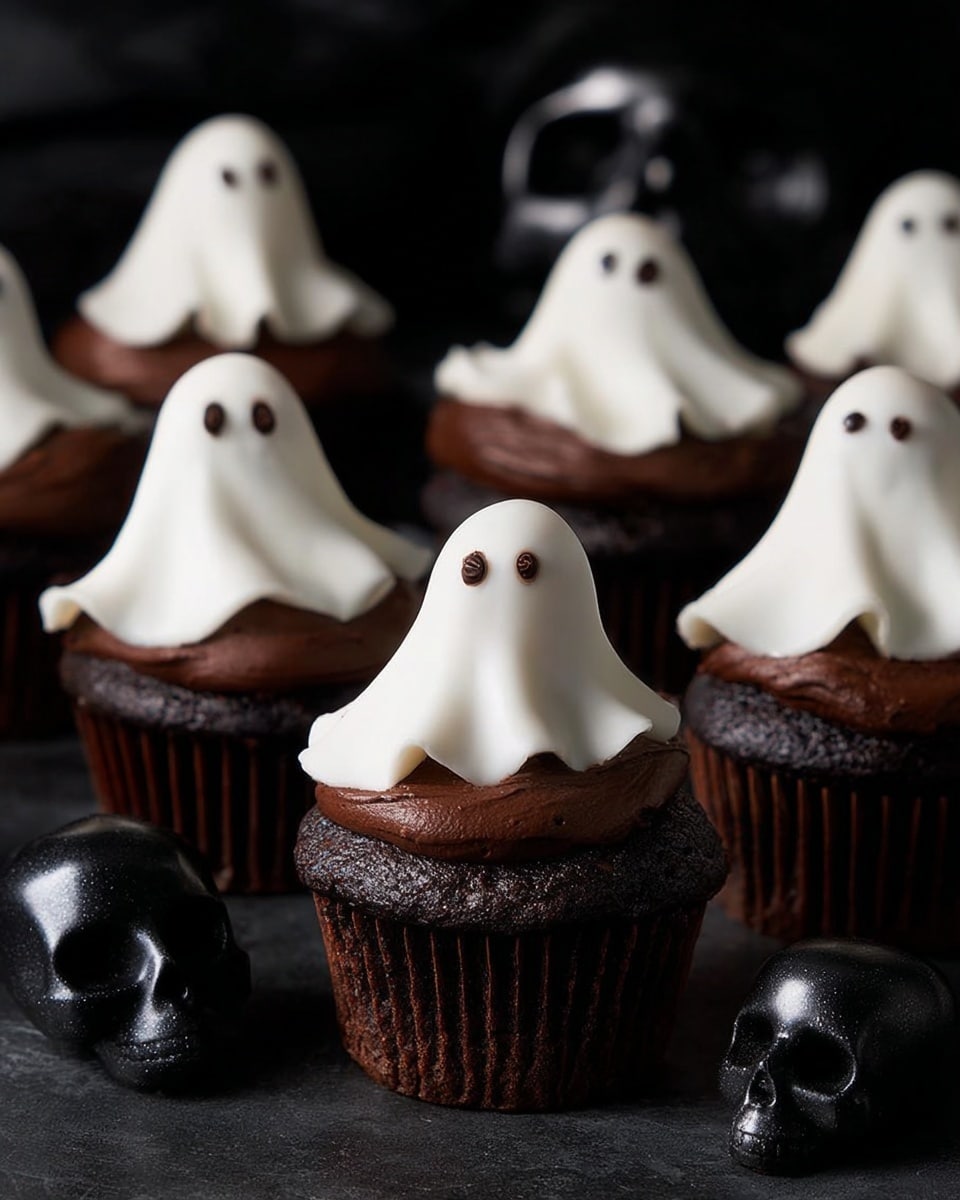
If you’re looking for a fun, spooky, and surprisingly easy treat to make this season, you’re going to adore this Ghost Cupcakes Recipe. I absolutely love how these cupcakes turn out — they’re perfect for Halloween parties, classroom celebrations, or anytime you want to put a playful twist on dessert. Plus, they come together quickly and look utterly adorable. Stick with me, and I’ll show you exactly how to make these ghostly delights your new go-to festive favorite!
Why You’ll Love This Recipe
- Super Simple: You don’t need fancy baking skills or unusual ingredients to pull these off.
- Fun for All Ages: Kids love helping shape the ghosts, making it a great family activity.
- Customizable: You can swap out flavors or decorations to suit your taste or theme.
- Perfect Presentation: These cupcakes look stunning on any party table, guaranteed to wow your guests.

Ingredients You’ll Need
For this Ghost Cupcakes Recipe, the ingredients are straightforward and easy to find, which I love because it takes the guesswork out of baking. Each component plays its part in creating those hauntingly cute ghosts that pop right off your cupcakes!
- White Buttercream Fondant: Choose a smooth, pliable fondant that’s easy to roll—this is what you’ll shape into ghost covers.
- Cornstarch: Use this to lightly dust your surface, preventing the fondant from sticking while rolling.
- Cupcakes with Chocolate Frosting: I like using chocolate because the ghosts really stand out against the dark background.
- Small Lollipops: DumDums work great for the ghost’s “body” structure inside the fondant.
- Black Decorating Gel: This makes it easy to pipe tiny ghost eyes with precision—don’t substitute unless you have similar gel icing.
Variations
I’ve played around a bit with this Ghost Cupcakes Recipe, and it’s fun to customize based on your vibe or dietary preferences—making it a recipe you can make your own with ease.
- Flavor Switch-Up: Try using vanilla or red velvet cupcakes instead of chocolate for a different look and flavor.
- Diet-Friendly: You can use gluten-free cupcakes and fondant made without gelatin for allergy-friendly options.
- Ghost Color: Dye the fondant pale gray or add shimmer for a spooky twist that doesn’t stick to just white ghosts.
- Eye Expression: Swap black gel for edible markers or tiny candy eyes to give each ghost its own personality.
How to Make Ghost Cupcakes Recipe
Step 1: Roll Out the Fondant
First off, dust your work surface and rolling pin lightly with cornstarch to keep things from sticking—this little trick makes fondant easier to manage. Then, take half of the white buttercream fondant and roll it out into a large circle about 1/16 inch thick, aiming for an even thickness so your ghosts look consistent. Grab a 4-inch round cookie cutter or carefully use a paring knife to cut out circles. Don’t worry if you have scraps; just gather them, re-roll gently, and cut again until you have 12 perfect circles. I learned that working in halves helps keep fondant fresh and manageable.
Step 2: Frost the Cupcakes
Spread a generous, smooth layer of frosting on each cupcake. I usually go with chocolate frosting because it creates a nice contrast with the white ghosts, but you can choose your favorite. The key is to have a flat, even surface so the ghost lollipops can stand up straight. This step is where you set the foundation for the whole look—take your time!
Step 3: Shape the Ghosts
Place each fondant circle over a lollipop and gently shape it into a ghostly figure. Press lightly around the lollipop to mold the fondant—it’s like giving your ghost a little drapey sheet look. The lollipop stick will serve as the ghost’s body and handle, making it easy to insert into the cupcake. I love how playful this step feels; it’s a nice break from pure baking into a bit of craft!
Step 4: Assemble Your Ghost Cupcakes
Now you’re ready to set your ghosts onto the cupcakes. Insert each ghost lollipop right into the center of the frosted cupcake, pushing it all the way down so it stands tall and proud. This part always feels so satisfying because the cupcakes suddenly come alive with this cute ghost shape standing on top.
Step 5: Add the Eyes
Use the black decorating gel to pipe two small dots on each ghost’s face for eyes. This quick finishing touch brings your ghosts to life. If you’re new to piping, don’t worry—just squeeze gently and take your time. I discovered that resting the tube on the table and gently squeezing works better than trying to pipe mid-air.
Pro Tips for Making Ghost Cupcakes Recipe
- Keep Fondant Covered: Fondant dries out quickly, so keep unused pieces wrapped tightly in plastic wrap while you work.
- Use Cornstarch, Not Flour: Flour can make the fondant sticky or tough; cornstarch is the delicate way to prevent sticking.
- Smooth Frosting for Stability: A flatter frosting surface helps ghosts stand upright without wobbling or falling over.
- Practice Piping on Paper: Before dotting the ghosts’ eyes, try out the black decorating gel on parchment paper to control the flow.
How to Serve Ghost Cupcakes Recipe
Garnishes
I like to keep it simple with these ghost cupcakes—sometimes just a little edible glitter dusted lightly over the fondant adds a magical shimmer. For extra charm, scatter some mini candy pumpkins or candy corn around the serving plate. The contrast adds color without competing with our little ghosts.
Side Dishes
These cupcakes are best enjoyed as the star of the show, but I do like pairing them with a lightly spiced warm apple cider or a pumpkin-flavored latte for that full cozy fall vibe. If it’s a party, cheese and cracker trays balance the sweet treat nicely too!
Creative Ways to Present
For parties, I’ve displayed these ghost cupcakes on a cake stand surrounded by dry ice for a smoky, eerie effect that guests love. You can also arrange them on a black slate board with mini LED lights underneath for that ghostly glow. Presentation is where you can get really creative, and believe me, your guests will talk about it!
Make Ahead and Storage
Storing Leftovers
If you have leftovers (which might be tough!), store the cupcakes in an airtight container at room temperature or in the fridge if your kitchen’s warm. I recommend placing a sheet of parchment between layers if stacking to keep those ghost toppers from sticking together.
Freezing
These cupcakes freeze well if wrapped tightly in plastic wrap and then boxed. When you’re ready to serve again, thaw them in the fridge overnight to preserve the fondant’s texture. I tested freezing once, and the ghosts held up surprisingly well without cracking.
Reheating
Since these cupcakes are best enjoyed fresh, reheating isn’t necessary, but if you want to take the chill off frozen ones, just bring them to room temperature before serving. Avoid microwaving as it can melt the fondant and ruin the look.
FAQs
-
Can I use colored fondant instead of white for this Ghost Cupcakes Recipe?
Absolutely! While white fondant gives a classic ghost look, you can experiment with pale grays or even glow-in-the-dark colors for a fun twist. Just keep in mind that lighter colors work best for that ghostly vibe.
-
What can I substitute if I don’t have black decorating gel?
If you don’t have black gel, you can use an edible black food marker or carefully dab melted dark chocolate with a toothpick for ghost eyes. Just be gentle to keep the fondant intact.
-
How do I prevent the fondant ghosts from cracking?
Keep unused fondant tightly wrapped in plastic to maintain moisture, and avoid rolling it too thin. Work quickly but gently when shaping the ghosts, and store finished cupcakes in a stable temperature environment.
-
Can these cupcakes be made gluten-free?
Yes! Use gluten-free cupcake mixes or homemade recipes along with gluten-free fondant to make the entire recipe safe for gluten-sensitive guests.
Final Thoughts
When I first tried this Ghost Cupcakes Recipe, I was amazed at how simple yet festive it was to create something that really captures the Halloween spirit. It’s fun, quick, and gets a ton of smiles from friends and family alike. I highly recommend giving these a go, especially if you want a charming but stress-free holiday treat. Next time you’re prepping for a gathering or just want to surprise your loved ones, whip up these ghostly cupcakes—you won’t regret it!
Print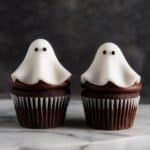
Ghost Cupcakes Recipe
- Prep Time: 15 Minutes
- Cook Time: 0 Minutes
- Total Time: 30 Minutes
- Yield: 12 cupcakes
- Category: Dessert
- Method: No-Cook
- Cuisine: American
Description
Delightfully spooky and fun Ghost Cupcakes featuring soft white buttercream fondant ghosts perched on chocolate frosted cupcakes, perfect for Halloween or any festive occasion. These easy-to-make treats combine creamy frosting, sweet fondant, and creative decorating with simple ingredients and no baking beyond the cupcakes themselves.
Ingredients
Fondant and Decoration
- 2 pounds white buttercream fondant (available at most craft stores)
- Cornstarch, for rolling the fondant
- 1 small tube black decorating gel
Cupcakes
- 12 cupcakes with chocolate frosting
- 12 small lollipops, such as DumDums
Instructions
- Roll out the fondant: Dust your work surface and rolling pin lightly with cornstarch to prevent sticking. Roll out half of the fondant into a large circle about 1/16 inch thick. Using a 4-inch round cookie cutter or paring knife, cut out circles. Gather scraps, re-roll, and cut again until you have 12 circles in total.
- Frost the cupcakes: Spread a generous, smooth layer of chocolate frosting on each cupcake creating a flat, even surface for the ghosts to sit on. This layer will help hold the fondant ghosts steadily in place.
- Form the ghosts: Place each fondant circle over a lollipop and gently shape it to resemble a ghost. Press lightly around the lollipop to mold the fondant, ensuring it drapes and holds the ghost shape.
- Assemble the cupcakes: Insert each ghost lollipop into the center of a frosted cupcake. Push the lollipop all the way down so it stands upright securely in the cupcake.
- Add the eyes: Use the black decorating gel to squeeze out small dots onto the fondant ghosts to create eyes, giving them a spooky yet charming look.
Notes
- Use cornstarch sparingly to avoid drying out the fondant.
- If fondant becomes too soft, refrigerate briefly before shaping.
- Substitute chocolate cupcakes with any favorite flavor as desired.
- Decorating gel can be replaced with edible black food coloring or icing pens.
- Store cupcakes in a cool area to prevent the fondant from melting or warping.
Nutrition
- Serving Size: 1 cupcake
- Calories: 320
- Sugar: 35g
- Sodium: 150mg
- Fat: 15g
- Saturated Fat: 8g
- Unsaturated Fat: 6g
- Trans Fat: 0g
- Carbohydrates: 45g
- Fiber: 1g
- Protein: 2g
- Cholesterol: 30mg

