

If you’re looking for a fall treat that’s playful, easy, and utterly delicious, you’ve got to try my Pumpkin Rice Krispie Treats with Tootsie Roll Stems Recipe. I absolutely love how these little pumpkins turn out — they’re perfect for parties, Halloween, or just a fun snack that brings a smile to everyone’s face. Plus, the Tootsie Roll stems give them that adorable finishing touch that makes it feel like you really went the extra mile. Stick around because I’m sharing all my tips so you can nail this recipe on your first try!
Why You’ll Love This Recipe
- Fun and Festive: These treats bring the joy of autumn right into your kitchen with their cute pumpkin shape and colorful Tootsie Roll stems.
- Simple Ingredients: You probably already have everything on hand, and the method is straightforward, making this a great last-minute dessert.
- Kid-Friendly: My kids love helping shape and decorate the pumpkins — it’s a fun activity plus a treat!
- Perfect Texture: Crispy, soft marshmallow goodness with just the right chewy stem finish — everyone always asks for seconds.

Ingredients You’ll Need
These ingredients are simple pantry staples that work beautifully together to create that classic Rice Krispie Treat texture, with a festive twist from the food coloring and the Tootsie Roll stems acting as charming pumpkin tops.
- Mini marshmallows: Using mini marshmallows helps them melt evenly and bind everything nicely.
- Salted butter: Adds richness and a little salty balance to the sweetness.
- Orange food coloring gel: A few drops give that perfect pumpkin hue without watering down your treats.
- Vanilla extract: Brings a warm, cozy flavor to the marshmallow mixture.
- Rice cereal (Rice Krispies): Classic crispy texture that everyone loves.
- Mini chocolate-flavored Tootsie Rolls: These make the perfect little pumpkin stems — easy to cut and shape.
- Mini green apple-flavored Tootsie Rolls: Flattened and shaped into cute leaves, they add a fun pop of contrasting color.
Variations
I love making this Pumpkin Rice Krispie Treats with Tootsie Roll Stems Recipe my own by switching up colors or flavors depending on the season or who’s coming over. Feel free to get creative — these treats are a fantastic blank canvas!
- Spiced Variation: I sometimes add a pinch of pumpkin pie spice to the marshmallow mix to deepen the fall flavor — it’s cozy and addictive.
- Gluten-Free Option: Use a certified gluten-free rice cereal if you want to keep this recipe safe for everyone.
- Different Candy Stems: Instead of Tootsie Rolls, try pretzel sticks dipped in chocolate for a salty-sweet stem alternative — I did this once and loved the crunch!
- Mini Pumpkin Muffins: Use the same Tootsie Roll stem idea to spruce up tiny pumpkin-shaped muffins or cupcakes for a multi-texture dessert spread.
How to Make Pumpkin Rice Krispie Treats with Tootsie Roll Stems Recipe
Step 1: Melt Marshmallows and Butter Gently
Start by combining your mini marshmallows and salted butter in a large pot or Dutch oven over low heat. Keep the heat low — I learned the hard way that high heat can scorch the marshmallows and make the mixture grainy. Stir often until everything’s melted and smooth, about 3-5 minutes. Remove from heat and quickly stir in the vanilla extract and several drops of orange food coloring gel until you get that perfect bright pumpkin color. Don’t overdo the coloring — a little goes a long way and ensures your treats look natural and inviting.
Step 2: Fold in the Rice Cereal
Add the Rice Krispies to the gooey marshmallow mixture and gently stir until they’re all evenly coated. I like to do this step off the heat so the cereal doesn’t get too soggy. Once combined, let the mixture rest for about 15 minutes or until it cools just enough so it’s safe to handle. This resting time helps the treats firm up a bit, making shaping easier. I sometimes sneak a taste here – it’s irresistible!
Step 3: Shape into Pumpkin Balls
Grease your hands with a little butter or non-stick spray (trust me, this saves so much cleanup!) and start shaping the mixture into pumpkin-like spheres. I often use an ice cream scoop for uniform sizes, which means they bake evenly and look professional. If you want to get a little fancy, use a skewer or small knife to gently press indentations into the sides of each ball. This creates the ribbed look of a pumpkin. Don’t worry if yours aren’t perfect — that rustic charm is part of the fun.
Step 4: Create and Attach the Tootsie Roll Stems and Leaves
Take your mini chocolate-flavored Tootsie Rolls and cut each in half to make pumpkin stems. For the leaves and curly vines, roll out the green apple-flavored Tootsie Rolls with a rolling pin until flattened, then cut into leaf shapes with a small knife. You can also roll some green Tootsie Rolls into thin ropes to mimic curly vines — it’s so fun to do and looks super cute on top of your pumpkins. Press the stems and leaves gently into the top of each pumpkin. If you want them to stick better, a dab of melted marshmallow works wonders as edible glue!
Step 5: Chill and Serve
Let your pumpkin treats sit at room temperature or pop them in the fridge for a bit until firm. They hold their shape nicely and are ready for devouring or packing up for a party. I find chilling makes cutting or stacking them much easier without squashing the marshmallow texture.
Pro Tips for Making Pumpkin Rice Krispie Treats with Tootsie Roll Stems Recipe
- Low and Slow Melting: I always melt the marshmallows on low heat to avoid burning, which keeps the final treat smooth and soft.
- Greasing Hands Is a Game-Changer: It stops the sticky marshmallow mixture from sticking to your hands, making shaping pumpkins a breeze.
- Use Gel Food Coloring: It gives you vibrant color without thinning the mixture like liquid colors can.
- Firm Up Before Decorating: Let the pumpkins cool a bit before adding the Tootsie Roll stems so they don’t slide off.
How to Serve Pumpkin Rice Krispie Treats with Tootsie Roll Stems Recipe
Garnishes
I like to keep garnishes simple so the pumpkins really stand out. Sometimes I sprinkle a tiny bit of cinnamon or edible glitter on top for a subtle sparkle. Crushed nuts or toffee bits around the serving plate add a nice touch and extra texture without overpowering the treat’s sweetness.
Side Dishes
These pumpkin treats go perfectly alongside a warm cup of spiced apple cider or hot cocoa with marshmallows. If you’re making a dessert table, pair them with pumpkin-flavored cookies or caramel apples for a complete fall-themed spread.
Creative Ways to Present
For Halloween parties, I like arranging them in a pumpkin patch style on a platter lined with green tissue paper or shredded coconut dyed green. You could also stick toothpicks into each treat for easy grab-and-go servings, especially for kids. Wrapping some individually in clear treat bags tied with orange ribbon makes a sweet favor, too!
Make Ahead and Storage
Storing Leftovers
I store these in an airtight container at room temperature for up to 3 days. They hold their texture really well and don’t get stale too quickly. Just keeping the container sealed is key — exposure to air makes them a bit tough.
Freezing
You can freeze the shaped pumpkin Rice Krispie treats wrapped individually in plastic wrap, then place them in a freezer bag for up to 2 months. When you’re ready to eat, just thaw at room temperature for a few hours and they’ll taste like fresh!
Reheating
I usually don’t reheat these treats since the marshmallow coating is best enjoyed fresh or at room temperature. If needed, a quick 10-second zap in the microwave can soften them slightly, but be careful not to overdo it or you’ll get a sticky mess.
FAQs
-
Can I use regular marshmallows instead of mini for this recipe?
Absolutely! Just be aware that regular marshmallows take a little longer to melt and you’ll want to stir gently to make sure they melt evenly without burning. Using mini marshmallows is just quicker and ensures a smoother melt.
-
How do I make the Tootsie Roll stems and leaves stay in place?
Pressing the Tootsie Rolls gently into the pumpkin while the treat is slightly warm helps with sticking. You can also use a dab of melted marshmallow as edible glue to secure the stems and leaves better. Just be careful not to squash the pumpkins!
-
Can I make these pumpkins ahead of time for a party?
Definitely! You can prepare the Rice Krispie pumpkins up to 2 days in advance. Store them in an airtight container at room temperature to keep them fresh and firm. If freezing, just thaw fully before serving.
-
What if I don’t have orange food coloring?
No worries! You can skip the color entirely or try mixing red and yellow food gel to create orange. Another trick I’ve used is adding a bit of pumpkin pie spice to enhance the autumn vibe even without vibrant color.
Final Thoughts
This Pumpkin Rice Krispie Treats with Tootsie Roll Stems Recipe has become a fall favorite in my house — I love how it brings everyone together, whether it’s little hands shaping treats or guests admiring the cute pumpkin details. The joy in baking these is just as sweet as eating them, and you’ll find that this recipe is both satisfying and simple. I can’t wait for you to make them and hear what you think — trust me, your family and friends will go crazy for these adorable autumn bites!
Print
Pumpkin Rice Krispie Treats with Tootsie Roll Stems Recipe
- Prep Time: 30 minutes
- Cook Time: 5 minutes
- Total Time: 35 minutes
- Yield: 14 pumpkins
- Category: Dessert
- Method: Stovetop
- Cuisine: American
Description
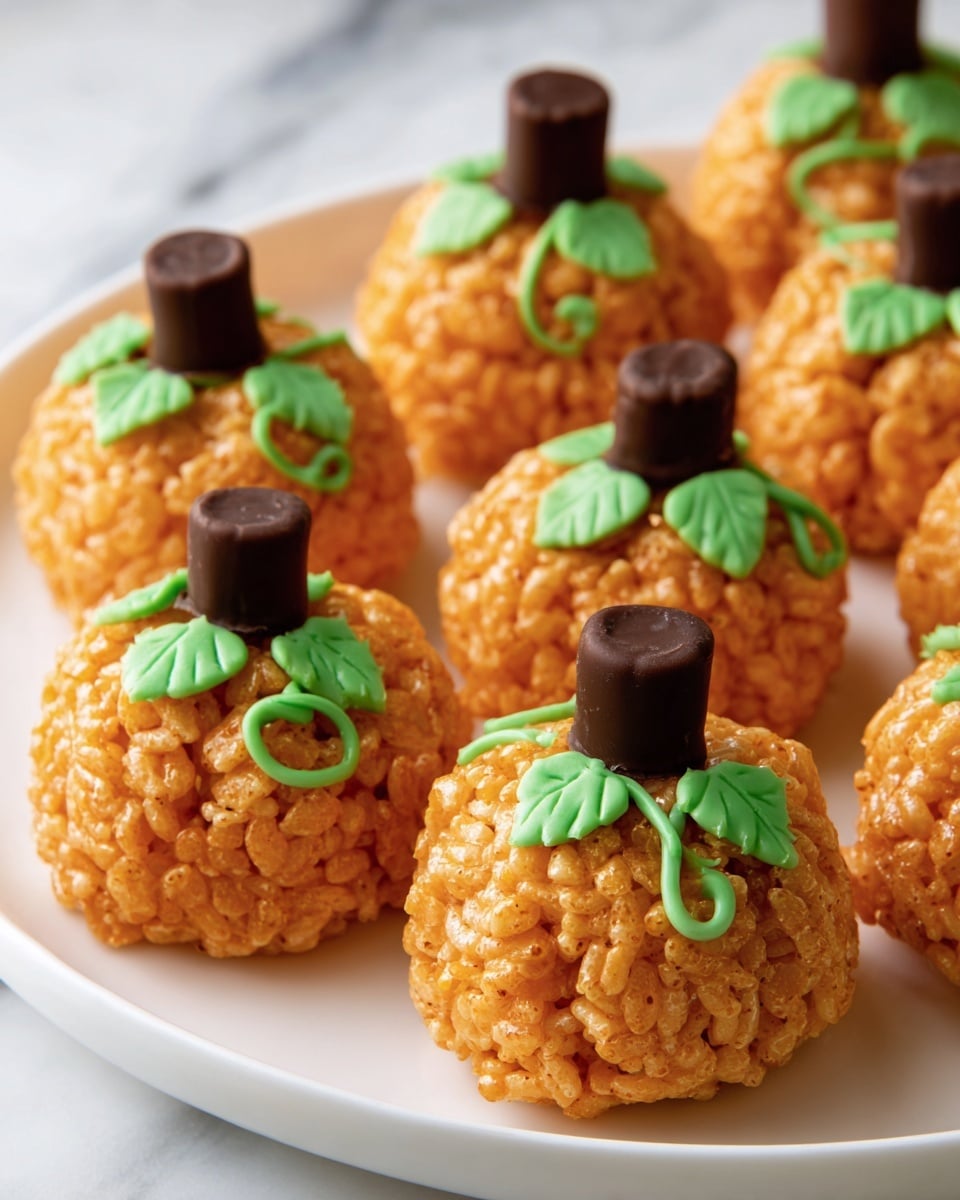
These festive Pumpkin Rice Krispie Treats with Tootsie Roll Stems are a fun and easy no-bake dessert perfect for fall celebrations. Sweet marshmallow-coated rice cereal is shaped into pumpkins and decorated with chocolate and green apple-flavored Tootsie Roll accents to resemble pumpkin stems and leaves, making them a delightful treat for kids and adults alike.
Ingredients
Main Ingredients
- 1 (10-ounce) package mini marshmallows
- ¼ cup salted butter
- Orange food coloring gel (a few drops)
- 1 teaspoon vanilla extract
- 5 cups Rice Krispies cereal
Decorations
- Mini chocolate-flavored Tootsie Rolls (for stems)
- Mini green apple-flavored Tootsie Rolls (for leaves and curly stems)
Instructions
- Melt Marshmallow Mixture: In a large pot or Dutch oven over low heat, combine the mini marshmallows and salted butter. Stir frequently until the mixture is completely melted and smooth. Remove from heat promptly to prevent burning.
- Add Color and Flavor: Stir in a few drops of orange food coloring gel and 1 teaspoon of vanilla extract until the color and flavor are well blended throughout the marshmallow mixture.
- Mix in Cereal: Add 5 cups of Rice Krispies cereal to the pot and stir thoroughly until all the cereal is evenly coated with the marshmallow mixture.
- Cool and Set Mixture: Let the coated cereal mixture stand for at least 15 minutes or until it is cool enough to handle comfortably for shaping.
- Shape Pumpkins: With greased hands (to prevent sticking), shape the mixture into pumpkin shapes. Using an ice cream scoop can help form uniform balls. To enhance the pumpkin look, use a skewer or paring knife to create small indentations around each ball to mimic the pumpkin’s ridges.
- Let Harden: Allow the shaped pumpkins to sit at room temperature or refrigerate until completely firm and set.
- Prepare Stems and Leaves: Cut each chocolate mini Tootsie Roll in half to serve as pumpkin stems. Roll out green apple-flavored Tootsie Rolls with a rolling pin and cut them into leaf shapes. Roll some green Tootsie Rolls into thin ropes to create curly stems for decoration.
- Decorate Pumpkins: Attach the chocolate stems, green leaves, and curly stems to the top of each pumpkin-shaped treat. Press gently so they stick to the marshmallow mixture.
- Storage: Store the completed pumpkin treats in an airtight container at room temperature until ready to serve to maintain their freshness.
Notes
- Greasing your hands or using cooking spray prevents the sticky mixture from adhering to your skin while shaping.
- If you prefer, use gloves when handling colored marshmallow mixture to avoid staining your hands.
- These treats can be stored at room temperature in an airtight container for up to 3 days.
- For a more intense pumpkin flavor, consider adding a small amount of pumpkin pie spice when melting the marshmallows.
- To make different sized pumpkins, simply adjust the size of the scoops or hand-formed shapes.
- The orange food coloring gel is highly concentrated; a few drops are sufficient to achieve a bright pumpkin color.
Nutrition
- Serving Size: 1 pumpkin-shaped treat
- Calories: 150 kcal
- Sugar: 15 g
- Sodium: 90 mg
- Fat: 3.5 g
- Saturated Fat: 2.3 g
- Unsaturated Fat: 1.2 g
- Trans Fat: 0 g
- Carbohydrates: 28 g
- Fiber: 0.5 g
- Protein: 1 g
- Cholesterol: 7 mg


