

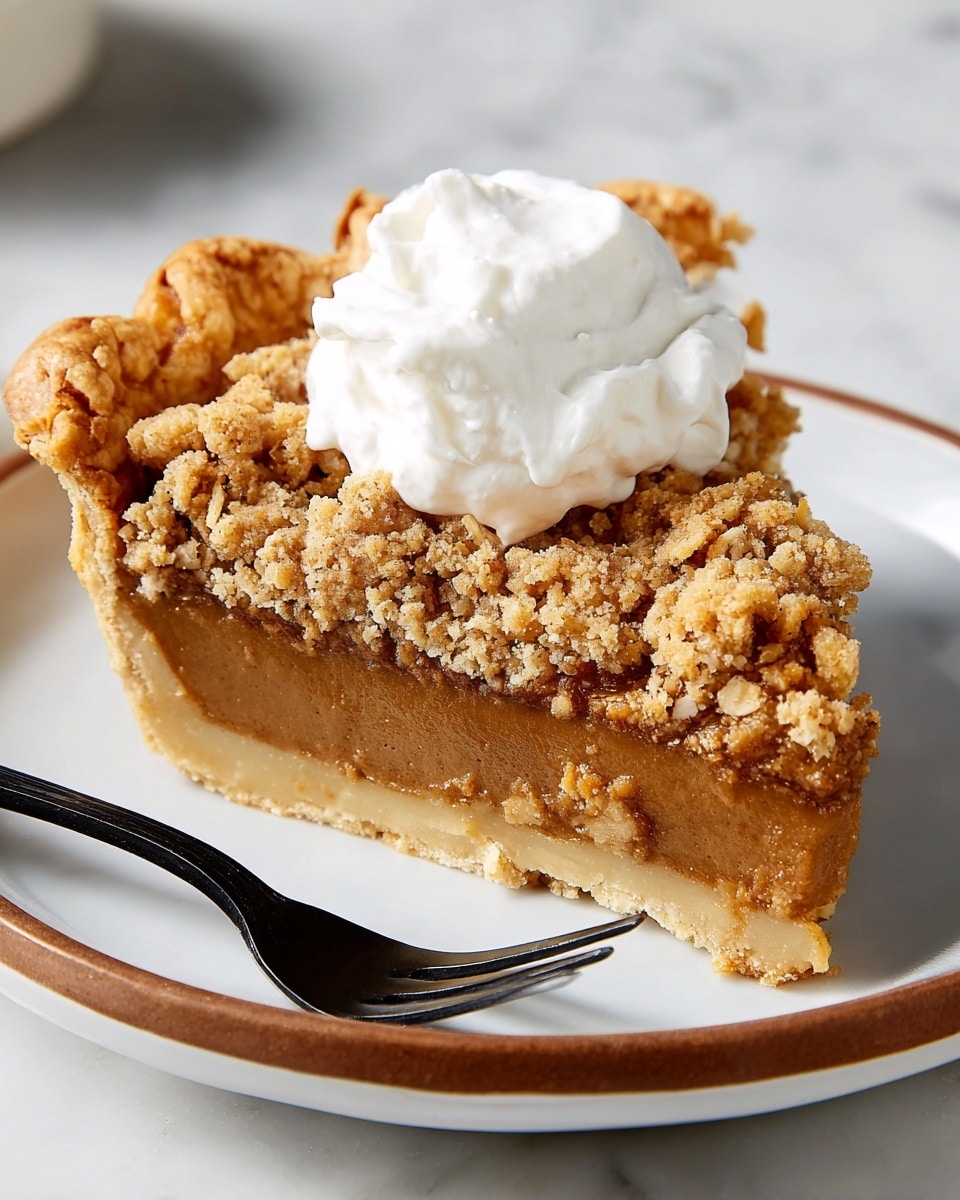
I absolutely love how this Apple Butter Pie with Oat Topping Recipe brings such a cozy, comforting vibe to any dessert table. The luscious apple butter filling is perfectly spiced and sweetened, and that crumbly oat topping adds the ideal touch of texture and warmth. It’s one of those desserts that makes you feel like fall has arrived in the best possible way, even if it’s still summer outside.
When I first tried this pie, I was amazed at how simple ingredients come together to create such a memorable flavor explosion. Whether you’re serving it for a holiday dinner or just want a crowd-pleasing dessert for the weekend, you’ll find that this Apple Butter Pie with Oat Topping Recipe is a winner every time. Plus, it’s great for those who want something a little different from your usual apple pie but no less delicious.
Why You’ll Love This Recipe
- Rich Apple Butter Flavor: The filling’s deep apple butter taste is spiced just right for a nostalgic autumn feel.
- Perfect Oat Topping: The crumbly oat mixture adds a delightful texture contrast that keeps every bite exciting.
- Easy to Make Ahead: You can prepare the crust days in advance or freeze it, making it wonderful for busy schedules.
- Family Favorite: My family goes crazy for this pie – it’s a delicious way to impress guests without stress.

Ingredients You’ll Need
Each ingredient in the Apple Butter Pie with Oat Topping Recipe is chosen to balance flavors and textures, from the flaky crust to the creamy filling and crumbly topping. Using fresh, quality ingredients will make a huge difference in the final taste, so try to find good apple butter and cold butter for that tender crust.
- All-purpose flour: The base for both crust and topping, choose good quality flour for a tender, flaky texture.
- Granulated sugar: Adds sweetness to the crust and topping without overpowering the apple flavors.
- Kosher salt: Enhances all the flavors – don’t skip it in the crust!
- Cold unsalted butter: Keep it chilled to ensure the crust stays flaky and the topping crumbly.
- Cold water: Helps bring the dough together without melting the butter – add gradually to avoid a sticky mess.
- Apple cider vinegar: A secret weapon for tender crust; it prevents gluten overdevelopment.
- Old-fashioned oats: For that classic oat topping crunch and rustic look.
- Light brown sugar: Adds a rich molasses flavor that pairs beautifully with cinnamon.
- Cinnamon, ground cloves, ground nutmeg: Warm spices that bring the filling alive and make every bite cozy.
- Apple butter: The star of the filling – choose a thick, flavorful variety for best results.
- Sweetened condensed milk: Adds creamy sweetness and helps the filling set perfectly.
- Eggs: Bind the filling so it’s custardy but firm enough to slice.
- Vanilla extract: Boosts all the warm flavors with its sweet, aromatic notes.
Variations
I love how adaptable this Apple Butter Pie with Oat Topping Recipe is—feel free to tweak it to suit your taste or dietary needs. Over the years, I’ve customized it with different nuts in the topping or swapped spices to create a slightly different mood each time.
- Add toasted pecans or walnuts to the oat topping: This adds a wonderful crunch and nutty flavor that my family adores during the holidays.
- Make it gluten-free: I’ve successfully substituted gluten-free flour blends in the crust and topping—just keep the ratios similar.
- Use pumpkin pie spice instead of separate cinnamon, nutmeg, and cloves: A quick shortcut that works perfectly when you’re short on time.
- Try a vegan version: I once experimented by using coconut oil instead of butter and a flax egg in the filling, with promising results for dairy-free friends.
How to Make Apple Butter Pie with Oat Topping Recipe
Step 1: Crafting the Flaky Crust
Start by whisking together the flour, sugar, and salt in a large bowl. Then, add the cold, cubed butter and use your fingertips to rub it into the flour until you notice the pieces shrink to about the size of walnut halves. Toss the mixture often to keep the butter coated—this is what creates those beautiful flaky layers. Next, mix in the apple cider vinegar and cold water one tablespoon at a time, gently tossing until the dough sticks together when squeezed, but isn’t wet or sticky. Form it into a flat disc, wrap it tightly, and pop it in the fridge for at least 2 hours to chill—this rest time is essential for dough that rolls out smoothly without shrinking during baking.
Step 2: Rolling and Blind Baking the Crust
When the dough is chilled, let it sit out for 5-10 minutes so it’s a bit more pliable. Roll it out on a lightly floured surface to about 12 inches in diameter—this gives you enough to cover a 9-inch pie plate with an overhang. Gently transfer the dough to the pie plate and press it into the edges without stretching it. Trim the edges to leave about a 1-inch overhang, then tuck that under and crimp for a neat border. Pop the crust back in the fridge for about 15 minutes to firm up. Now, preheat your oven to 400°F, line the crust with parchment or foil, and fill with pie weights or dried beans to keep it from puffing up. Bake until the crust is lightly golden, about 12 to 15 minutes. Remove the weights and parchment, then let it cool slightly—this keeps your crust from becoming soggy once filling is added.
Step 3: Preparing the Oat Topping
In a large bowl, stir together the oats, brown sugar, flour, granulated sugar, and cinnamon. Then toss in the cold butter cubes and use your fingers to rub it into the oat mixture until it looks crumbly with some pea-sized clumps. This crumbly texture is exactly what you want for a topping that bakes up golden and crisp.
Step 4: Mixing the Spiced Apple Butter Filling
Lower your oven temperature to 375°F. Whisk the apple butter, sweetened condensed milk, and eggs together until smooth in a large mixing bowl. Then stir in the cinnamon, vanilla, cloves, and nutmeg for that fragrant, warm spice profile. This silky filling will bake into a custardy, rich layer that balances the oats perfectly.
Step 5: Assembling and Baking the Pie
Pour the filling evenly into your pre-baked crust and smooth the top with a spatula. Crumble the oat topping evenly over the filling, making sure to cover as much surface as possible without pressing it down. Bake the pie for 35 to 45 minutes until the topping is golden brown and the filling jiggles slightly in the center when gently shaken—a sign it’s perfectly set. Let the pie cool completely to room temperature before refrigerating it for at least 2 hours or overnight. This chilling step helps it set and makes slicing a breeze.
Pro Tips for Making Apple Butter Pie with Oat Topping Recipe
- Keep Butter Cold: I always chill my butter cubes until the last minute—cold butter is the key to flaky crust and crumbly topping.
- Add Water Gradually: Adding water bit by bit lets you control dough consistency—too much water = tough crust.
- Use Pie Weights: Blind baking with pie weights prevents the crust from bubbling and keeps it even.
- Chill Before Baking: Letting both dough and assembled pie rest in the fridge helps avoid shrinking and keeps crumb topping intact.
How to Serve Apple Butter Pie with Oat Topping Recipe
Garnishes
I like to add a simple dusting of powdered sugar right before serving—it gives the pie a pretty, delicate finish without messing with that crunchy oat topping. A dollop of whipped cream or a scoop of vanilla ice cream is always a welcome companion. Sometimes, I sprinkle a bit of extra cinnamon on top of the whipped cream for just a hint of spice in every bite.
Side Dishes
Serving this pie alongside a warm spiced cider or even a cup of strong coffee makes for a cozy pairing. If it’s brunch, I enjoy it with mildly sweet breakfast sausages or a small cheese plate to balance the sweetness—trust me, it’s a delightful combo that my guests always comment on.
Creative Ways to Present
For special occasions, I like to cut the pie into small squares and serve them with mini whipped cream rosettes and a drizzle of caramel sauce. Another fun idea is layering slices on a dessert platter with fresh apple slices and toasted nuts for a rustic autumn dessert board that impresses visually and taste-wise.
Make Ahead and Storage
Storing Leftovers
I keep leftover Apple Butter Pie with Oat Topping wrapped tightly in plastic wrap or stored in an airtight container in the fridge. It stays fresh for 3 to 4 days, and I’ve noticed the flavors actually deepen after sitting overnight—bonus!
Freezing
This pie freezes well—wrap it thoroughly with plastic wrap and then aluminum foil to prevent freezer burn. When I freeze it, I usually thaw it overnight in the fridge and then reheat slightly in a low oven or enjoy it chilled.
Reheating
To reheat slices, I gently warm them in a 300°F oven for about 10 minutes to refresh the oat topping’s crunch without drying out the filling. If you want it warm with ice cream, this method is my go-to to get that cozy, freshly baked feel.
FAQs
-
Can I use regular apples instead of apple butter in this Apple Butter Pie with Oat Topping Recipe?
You could substitute fresh apples, but the texture and flavor profile will be quite different. Apple butter provides a smooth, intensely spiced apple flavor that blends beautifully with the custard-like filling. If you want to use fresh apples, you might need to adjust the filling’s liquid content and cook the apples beforehand to soften them. For the best results and classic taste, I recommend sticking to apple butter.
-
How do I prevent the oat topping from burning while baking?
Make sure to keep an eye on the pie during its last 10 minutes in the oven. If you notice the topping browning too quickly, loosely cover the pie with aluminum foil to shield it from direct heat. Also, evenly spreading the topping so it’s not too thick helps it bake evenly without burning.
-
Can I make the crust in advance for this Apple Butter Pie with Oat Topping Recipe?
Absolutely! The crust dough can be made up to three days ahead and stored in the fridge wrapped well in plastic, or you can freeze it for up to a month. This makes it easy to bake the crust fresh on pie day and assemble with minimal prep.
-
What makes this Apple Butter Pie with Oat Topping unique compared to regular apple pies?
Unlike typical apple pies with sliced fruit, this pie uses apple butter for a smooth, concentrated apple flavor combined with a creamy custard filling. The oat topping adds a rustic and crunchy contrast that sets it apart from traditional double-crust apple pies, making it a cozy, elevated twist on a classic dessert.
Final Thoughts
To me, this Apple Butter Pie with Oat Topping Recipe feels like a warm kitchen hug on a plate—rich, comforting, and filled with familiar cozy flavors. I can’t recommend it enough if you love apple desserts but want something a bit more special and texturally interesting than your average pie. Once you try it, you’ll see why my family keeps requesting it year after year. So, grab your butter, apple butter, and oats, and let’s make some magic happen in the kitchen together!
Print
Apple Butter Pie with Oat Topping Recipe
- Prep Time: 20 mins
- Cook Time: 1 hr
- Total Time: 5 hrs 30 mins
- Yield: 8 servings
- Category: Dessert
- Method: Baking
- Cuisine: American
Description
Apple Butter Pie is a delightful dessert featuring a flaky, buttery crust, a rich and spiced apple butter filling, and a crunchy oat-based topping. This pie perfectly balances sweet and warm autumn flavors, making it an ideal treat for fall gatherings or cozy nights.
Ingredients
Crust
- 1 1/2 cups (180 g) all-purpose flour, plus more for surface
- 1 Tbsp. granulated sugar
- 1/2 tsp. kosher salt
- 1/2 cup (1 stick) cold unsalted butter, cut into 1/2″ cubes
- 1/4 cup (or more) cold water
- 1 Tbsp. apple cider vinegar
Topping
- 1/2 cup (50 g) old-fashioned oats
- 1/3 cup (70 g) packed light brown sugar
- 1/3 cup (40 g) all-purpose flour
- 1/4 cup (50 g) granulated sugar
- 1/2 tsp. ground cinnamon
- 4 Tbsp. (1/2 stick) cold unsalted butter, cut into 1/2″ cubes
Filling
- 2 cups (480 g) apple butter
- 1 (14-oz.) can sweetened condensed milk
- 2 large eggs
- 1 tsp. pure vanilla extract
- 1 tsp. ground cinnamon
- 1/4 tsp. ground cloves
- 1/4 tsp. ground nutmeg
Instructions
- Prepare the Crust: In a large bowl, whisk together flour, granulated sugar, and salt. Add the cold, cubed butter and rub it into the dry ingredients using your hands until the butter pieces are about the size of walnut halves and well coated in flour. Sprinkle in water and apple cider vinegar, tossing to combine. Add more water one tablespoon at a time if needed, until the dough holds together when squeezed but is not sticky.
- Chill the Dough: Form the dough into a smooth disc, wrap in plastic wrap, and refrigerate for at least 2 hours or up to 3 days. You can freeze it for up to 1 month if desired.
- Roll and Shape the Crust: Let the dough sit at room temperature for 5 to 10 minutes. On a lightly floured surface, roll the dough into a 12-inch round. Carefully transfer it into a 9-inch pie plate, pressing it gently into the bottom and up the sides. Refrigerate the shaped crust for about 10 minutes until cold.
- Trim and Crimp Edges: Trim the excess dough, leaving a 1-inch overhang. Fold the edges underneath so they are flush with the pie plate edge, then crimp the edges decoratively. Return the crust to the refrigerator for 15 more minutes to firm up.
- Pre-bake the Crust: Preheat the oven to 400°F (204°C). Line the crust with parchment paper and fill with pie weights or dry beans to prevent bubbling. Place the pie plate on a baking sheet and bake for 12 to 15 minutes until lightly golden. Remove parchment and weights.
- Prepare the Topping: In a large bowl, mix the oats, brown sugar, flour, granulated sugar, and cinnamon. Add the cold cubed butter and rub it into the mixture with your hands until the topping holds together when squeezed and the butter pieces are pea-sized.
- Make the Filling: Lower the oven temperature to 375°F (190°C). In a large bowl, whisk together the apple butter, sweetened condensed milk, and eggs until smooth. Stir in the cinnamon, vanilla extract, ground cloves, and nutmeg until fully combined.
- Assemble and Bake the Pie: Pour the filling evenly into the pre-baked crust and smooth the top. Sprinkle the oat topping evenly over the filling. Bake for 35 to 45 minutes until the filling is slightly jiggly in the center and the topping is golden brown.
- Cool and Chill: Let the pie cool to room temperature, then refrigerate it for at least 2 hours or up to overnight to fully set before serving.
Notes
- For best results, use cold butter and cold water to keep the crust flaky.
- Pie weights or dry beans prevent the crust from puffing up during prebaking.
- Chilling the dough before rolling helps prevent shrinkage and cracking.
- Allowing the pie to chill overnight enhances flavor integration and texture.
- The pie can be served with whipped cream or vanilla ice cream for extra indulgence.
Nutrition
- Serving Size: 1 slice (1/8 of pie)
- Calories: 380 kcal
- Sugar: 35 g
- Sodium: 150 mg
- Fat: 18 g
- Saturated Fat: 10 g
- Unsaturated Fat: 6 g
- Trans Fat: 0 g
- Carbohydrates: 52 g
- Fiber: 3 g
- Protein: 5 g
- Cholesterol: 70 mg


