

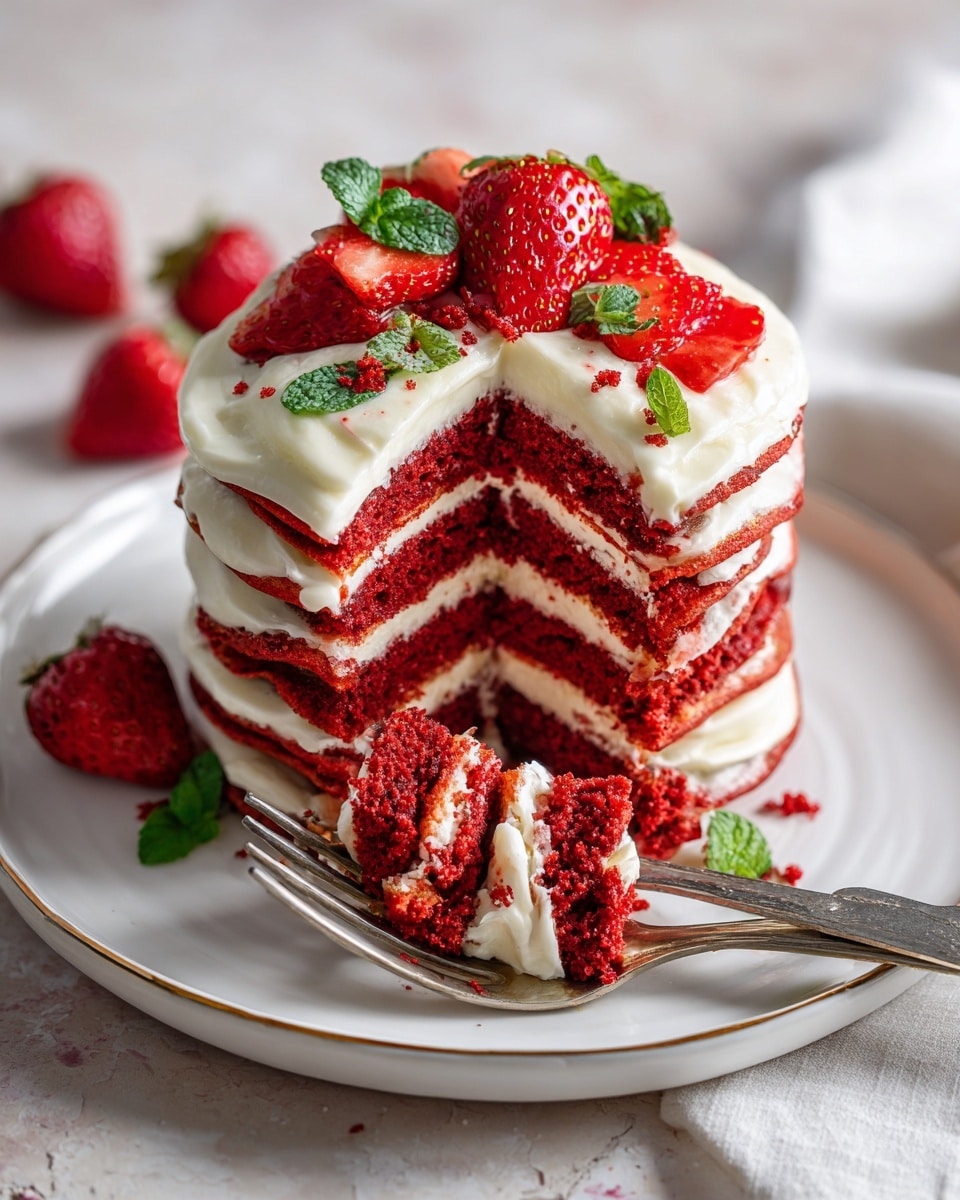
If you’re anything like me, you’ll absolutely fall in love with this Red Velvet Pancakes Recipe — it’s like breakfast meets dessert in the most delightful way. These pancakes are fluffy, lightly cocoa-flavored, and that hint of red food coloring just makes them look so festive and fun, perfect for special mornings or when you want to treat yourself without too much fuss.
I remember the first time I tried making red velvet pancakes; the batter was thick and creamy, and cooking them slowly brought out such a tender texture. You’ll find this recipe super approachable whether you’re whipping up a quick weekend brunch or impressing guests with something a little different. Plus, they pair beautifully with cream cheese frosting or a dollop of Greek yogurt if you want a lighter twist.
Why You’ll Love This Recipe
- Easy to Whip Up: You don’t need fancy ingredients or complicated steps – just simple pantry staples and a bit of love.
- Fluffy, Tender Texture: Thanks to the perfect balance of baking powder and soda, these pancakes come out light and soft every time.
- Vibrant and Festive Look: The red hue adds a fun, indulgent vibe without any artificial flavors overpowering the taste.
- Versatile Serving Options: Whether topped with cream cheese frosting, yogurt, or just syrup, these pancakes satisfy a range of cravings.

Ingredients You’ll Need
All the ingredients for this Red Velvet Pancakes Recipe are things you likely have on hand or can grab easily at the store. The key here is that they work together to build that classic red velvet flavor without being too heavy.
- All-purpose flour: Using sifted flour makes a lighter batter, which helps achieve those fluffy pancakes.
- Sugar: Just a touch to balance the cocoa’s slight bitterness and the tanginess from the buttermilk.
- Salt: Enhances all the flavors; never skip it even in sweet recipes.
- Baking soda: Reacts with the buttermilk for lift — this is part of the magic for fluffiness.
- Baking powder: Adds extra rise so the pancakes aren’t dense.
- Buttermilk: Gives that subtle tang and tender crumb; if you don’t have buttermilk, I’ll share a quick DIY trick below.
- Large eggs: Room temperature eggs mix better and help the batter hold together.
- Red food coloring: This gives the signature red velvet color; you can adjust the amount depending on how vibrant you want it.
- Cocoa powder: Unsweetened cocoa lends that classic hint of chocolate flavor that makes this recipe stand out.
Variations
I love playing around with this Red Velvet Pancakes Recipe depending on the season or mood. It’s easy to tweak and make it your own, so don’t hesitate to try something a little different.
- Gluten-Free Version: I tested swapping all-purpose flour for a gluten-free blend with xanthan gum and it turned out surprisingly close to the original.
- High-Protein Option: Try swapping the cream cheese frosting topping with Greek yogurt for a tangy, protein-rich alternative that still feels indulgent.
- Extra Chocolatey: Add a handful of mini chocolate chips to the batter just before cooking for an extra treat that my family loves.
- Dairy-Free Swap: You can use almond or oat milk with lemon juice as a buttermilk substitute if you prefer non-dairy options.
How to Make Red Velvet Pancakes Recipe
Step 1: Mix Your Dry Ingredients
Start by sifting together your flour, sugar, salt, baking soda, and baking powder in a large bowl. This not only breaks up any lumps but also distributes the leavening agents evenly, which is key for those fluffy pancakes. Make a small well in the center for the wet ingredients.
Step 2: Combine Your Wet Ingredients
In a separate bowl, whisk together the buttermilk and eggs until smooth, then stir in the vanilla and your red food coloring. I like to start with half the amount of food coloring and add more if I want a deeper shade. Pour this wet mixture into the well of your dry ingredients, then gently whisk everything together until you have a thick batter. Don’t overmix — a few lumps are okay and actually help keep the pancakes tender.
Step 3: Let the Batter Rest
Letting the batter sit for 2-3 minutes helps it thicken a bit, which makes it easier to handle in the pan and results in fluffier pancakes. This little resting step makes a noticeable difference, and I started doing it after a few tries where my pancakes were a bit flat.
Step 4: Cook Your Pancakes
Heat a non-stick pan over medium heat and add a bit of oil to grease the surface. When the pan is hot, drop about ¼ cup portions of batter onto the pan and immediately cover it with a lid. This covering traps steam and helps the pancakes cook evenly inside without drying out. Cook for about 2-3 minutes, then flip and cook the other side for another 2-3 minutes until cooked through and lightly browned.
Step 5: Repeat and Serve
Continue this process until all your batter is used up. Keep the pancakes warm in a low oven (around 200°F / 90°C) if you’re making a big batch. Serve them immediately or top with your favorite frosting, syrup, or fruits.
Pro Tips for Making Red Velvet Pancakes Recipe
- Use Room Temperature Eggs: It helps the batter blend more evenly and gives better texture to your pancakes.
- Don’t Overmix: I learned that overmixing kills fluffiness — stop whisking as soon as you see no dry flour.
- Cover Your Pan: This trick speeds up cooking and keeps pancakes moist, especially with thicker batters like this one.
- DIY Buttermilk: If you’re out, stir 1 tablespoon lemon juice or vinegar into 1 cup milk and let it sit to get that tangy punch.
How to Serve Red Velvet Pancakes Recipe
Garnishes
I’m a huge fan of topping these pancakes with cream cheese frosting — it’s such a classic pairing that brings out the red velvet vibe perfectly. If I want something lighter, I’ll dollop on a bit of Greek yogurt mixed with a touch of honey. Fresh berries or sliced bananas add a fresh contrast and pop of color that’s just gorgeous.
Side Dishes
My family loves having crispy bacon or breakfast sausage alongside these pancakes — the savory meats balance out the sweetness and make for a hearty breakfast. You can also add a small fruit salad or even a drizzle of maple syrup to keep it simple but scrumptious.
Creative Ways to Present
For birthdays or Valentine’s Day, I stack the pancakes with layers of cream cheese icing so it looks like a mini red velvet cake. Sometimes I sprinkle edible rose petals or crushed pistachios on top to make them extra fancy — it’s a huge crowd-pleaser and makes the morning feel special.
Make Ahead and Storage
Storing Leftovers
I keep leftover pancakes in a sealed container in the fridge, and they’re good for up to 3 days. Just make sure they’re cooled completely before sealing them to avoid sogginess.
Freezing
Freezing works wonderfully for this Red Velvet Pancakes Recipe. I freeze single pancakes stacked with parchment paper between them to prevent sticking and then pop them into a freezer-safe bag. They keep for up to 3 months, making busy mornings much easier.
Reheating
To reheat, I like using a toaster or a quick zap in the microwave. For the best texture, warming them on a skillet over low heat restores that lightly crispy exterior without drying them out.
FAQs
-
Can I make this Red Velvet Pancakes Recipe without buttermilk?
Absolutely! You can easily substitute buttermilk by adding 1 tablespoon of lemon juice or white vinegar to 1 cup of milk and letting it sit for 5 minutes. This homemade version adds the necessary acidity to react with the baking soda, resulting in fluffy pancakes.
-
How can I make these pancakes gluten-free?
Swap the all-purpose flour for a gluten-free all-purpose blend that contains xanthan gum for binding. I’ve had great results using Bob’s Red Mill gluten-free mix, but consistency may vary with other brands, so adjust if needed.
-
Why does the batter need to rest before cooking?
Resting the batter for a few minutes helps it thicken and allows the leavening agents to start working. This results in lighter, fluffier pancakes and prevents them from spreading too thin in the pan.
-
Can I add chocolate chips or nuts to the recipe?
Definitely! Adding mini chocolate chips or chopped nuts adds texture and extra flavor. Just fold them gently into the batter right before cooking to avoid overmixing.
Final Thoughts
Honestly, this Red Velvet Pancakes Recipe has quickly become a weekend favorite in my house — it’s comforting, festive, and not too complicated, which is a winning combo in my book. If you’re craving something a little different from your everyday pancakes but still want something easy and satisfying, I’d wholeheartedly recommend trying these out. I’m confident you’ll enjoy the vibrant color and tender texture as much as I do, and once you get the hang of it, you’ll find yourself making them again and again.
Print
Red Velvet Pancakes Recipe
- Prep Time: 5 minutes
- Cook Time: 5 minutes
- Total Time: 10 minutes
- Yield: 4 servings
- Category: Breakfast
- Method: Stovetop
- Cuisine: American
Description
Deliciously fluffy and visually striking, these Red Velvet Pancakes combine the classic flavors of red velvet cake with the comforting texture of traditional pancakes. Enhanced with cocoa powder and a touch of red food coloring, they offer a perfect breakfast or brunch treat, easily paired with cream cheese frosting or Greek yogurt for added richness.
Ingredients
Dry Ingredients
- 2 cups all purpose flour, sifted
- 1/4 cup sugar
- 1/2 teaspoon salt
- 1 teaspoon baking soda
- 2 teaspoons baking powder
- 2 tablespoons cocoa powder
Wet Ingredients
- 1 cup buttermilk
- 2 large eggs, room temperature
- 1/2 teaspoon red food coloring
Instructions
- Mix dry ingredients: In a large bowl, combine the sifted flour, sugar, baking soda, baking powder, salt, and cocoa powder. Stir them together well to ensure the leavening agents and cocoa powder are evenly distributed.
- Add wet ingredients: Make a well in the center of the dry mixture and add the buttermilk and eggs. Whisk the mixture until a thick and smooth batter forms. Stir in the red food coloring thoroughly to achieve the signature vibrant red hue.
- Rest the batter: Allow the batter to sit for 2-3 minutes to thicken slightly; this resting period helps improve the pancake texture.
- Preheat pan and add oil: Heat a non-stick pan over medium heat and lightly grease it with oil to prevent sticking.
- Cook the pancakes: Pour 1/4 cup portions of batter into the hot pan, covering the pan with a lid. Cook the pancakes for about 2-3 minutes, flipping halfway through until both sides are golden brown and the pancakes are cooked through.
- Repeat cooking: Continue cooking in batches until all the batter has been used, maintaining the medium heat.
Notes
- Layering: These pancakes are delicious on their own but can be enhanced with a simple cream cheese frosting or Greek yogurt for a protein boost.
- DIY buttermilk substitute: Combine 1 cup of milk with 1 tablespoon of lemon juice or vinegar to make a homemade buttermilk substitute.
- Storage: Leftover pancakes can be refrigerated, covered, for up to 3 days or frozen for up to 3 months for convenient future meals.
- Gluten-free option: Using gluten-free all-purpose flour with xanthan gum works well; Bob’s Red Mill brand is recommended.
Nutrition
- Serving Size: 1 serving (approximately 3 pancakes)
- Calories: 320
- Sugar: 8g
- Sodium: 320mg
- Fat: 9g
- Saturated Fat: 2g
- Unsaturated Fat: 6g
- Trans Fat: 0g
- Carbohydrates: 52g
- Fiber: 2g
- Protein: 8g
- Cholesterol: 65mg

