

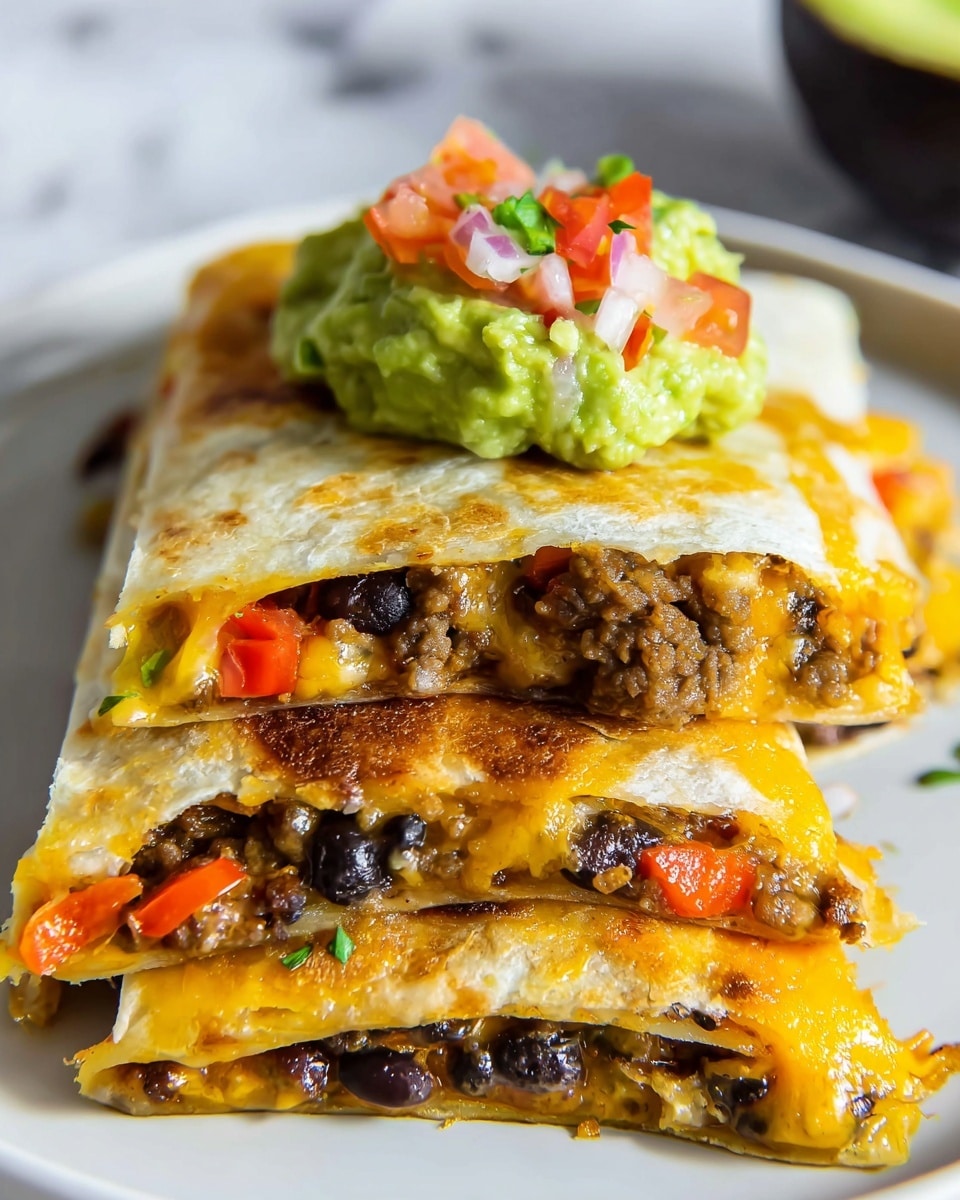
I absolutely love this Loaded Sheet Pan Quesadillas Recipe because it takes the classic quesadilla to a whole new level—perfectly melty, loaded with flavorful beef and veggies, and effortlessly baked in the oven without standing over a pan flipping every single one. When I first tried this sheet pan method, I couldn’t believe how easy it was to get crispy, cheesy quesadillas for a crowd without any fuss.
You’ll find that this recipe is such a game-changer for busy weeknights or casual get-togethers where you want something delicious and shareable without the stress. Plus, the combination of seasoned ground beef, black beans, peppers, and melty cheese all baked together makes for an irresistible meal that everyone will ask you to make again.
Why You’ll Love This Recipe
- Hands-Off Baking: No flipping quesadillas one by one—just assemble, bake, and enjoy.
- Loaded with Flavor: A perfect blend of seasoned ground beef, beans, peppers, and plenty of cheese.
- Crowd Pleaser: Makes 15 big pieces, ideal for feeding a hungry family or friends.
- Great for Meal Prep: Leftovers store and reheat beautifully without losing that crispy finish.

Ingredients You’ll Need
For this Loaded Sheet Pan Quesadillas Recipe, I like to use fresh, simple ingredients that pack a punch but are easy to find at any grocery store. The blend of spices and mix-ins come together to create a hearty filling that melds perfectly with melty cheese and crisp tortillas.
- Olive oil: Use a good quality one for browning the beef and sautéing vegetables for depth of flavor.
- Lean ground beef: Opt for 90% lean to keep it juicy but not greasy.
- Yellow onion: Adds sweetness and body to the filling—chop finely for even cooking.
- Red pepper: Provides a nice pop of color and subtle sweetness that balances the savory beef.
- Black beans: Rinsed and drained to cut excess sodium, they add fiber and texture.
- Mild green chiles: Bring gentle smoky heat without overpowering the dish.
- Taco seasoning: The magic blend that ties everything together — adjust according to your taste preferences.
- Kosher salt and black pepper: For seasoning the beef and vegetables perfectly.
- Water: Just enough to help the seasonings coat the filling evenly without drying it out.
- Cooking spray: Keeps the quesadilla from sticking to the pan and helps crisp the tortillas.
- Flour tortillas (10-inch): I recommend medium-sized to make folding easier and cooking even.
- Cheddar or Mexican blend cheese: Choose freshly grated cheese for the best melt and flavor.
- Salsa, sour cream, guacamole (for serving): Classic toppings that add freshness and creaminess to each bite.
Variations
I love to mix things up with this Loaded Sheet Pan Quesadillas Recipe depending on what my family’s craving or what’s in the fridge. The base recipe is super flexible, so feel free to get creative and make it your own.
- Vegetarian Version: I swapped ground beef for extra black beans and some sautéed mushrooms once, and it was just as satisfying and packed with flavor.
- Spicy Kick: Add diced jalapeños or use a spicier taco seasoning if you like things with more heat—I’ve done this for game day, and everyone loved it!
- Cheese Variations: Try pepper jack for a little smoky spice or even a blend with some crumbled queso fresco on top after baking for a fun twist.
- Seasonal Veggies: Throw in some corn or diced zucchini when they’re in season—it adds freshness and a sweet crunch I adore.
How to Make Loaded Sheet Pan Quesadillas Recipe
Step 1: Sauté the Filling to Flavor Perfection
Start by heating the olive oil in a large skillet over medium heat. Add the lean ground beef and break it up with a spoon, cooking until it’s just browned—about 4 to 5 minutes. Then toss in the chopped onions, red pepper, black beans, and mild green chiles. Cook that mixture for another 5 to 6 minutes until the veggies soften but don’t brown; this keeps the filling vibrant and fresh-tasting.
Next, sprinkle over the taco seasoning, salt, and pepper. Pour in the water and stir well, letting it simmer until the water evaporates and everything clings together—this usually takes 3 to 4 minutes. Give it a taste and tweak the seasoning if needed. I discovered this trick of adding a little water after seasoning helps distribute flavors evenly without drying the filling out.
Step 2: Assemble Your Sheet Pan Quesadilla
Spray your 9 x 13-inch sheet pan with cooking spray to prevent sticking. Lay down two tortillas in the center of the pan slightly overlapping, then arrange six tortillas around the edges overlapping and slightly hanged over the edge. This tortilla “base” creates the perfect canvas for your quesadilla filling.
Sprinkle about one-third of the grated cheese evenly over the bottom tortillas, then spread your prepared filling all the way to the edges of the pan. Top that with the remaining cheese, then place two more tortillas in the center. Fold the tortillas hanging off the edge over the top to cover the filling. Don’t worry if there are small holes — if you want a perfect seal, just cut up an extra tortilla and patch the holes.
Finally, lightly spray the top with cooking spray. Place a slightly smaller sheet pan or a rimmed baking dish with a piece of foil in between on top to weigh it down while baking. This step is key—it helps everything meld together and keeps the quesadilla flat for even baking.
Step 3: Bake Until Crispy and Gooey
Bake at 350˚F for 20 minutes with the top pan on. This gentle heat allows the cheese to melt and the flavors to marry without burning the bottom. Then take off the top pan and foil, crank up the oven to 400˚F, and bake for another 10 to 15 minutes until those tortillas are wonderfully crispy and golden brown.
Once it’s out of the oven, let your quesadilla rest for 10 minutes. This waiting game gives everything a chance to settle, making it way easier to slice without cheese oozing everywhere. I like to cut it into 3 x 5-inch rectangles, which yields about 15 hearty pieces—trust me, they disappear fast!
Pro Tips for Making Loaded Sheet Pan Quesadillas Recipe
- Don’t Skip the Weight: Using a second sheet pan with foil on top keeps your quesadilla flat and ensures even cooking without puffing up.
- Use Freshly Grated Cheese: Pre-shredded cheese has anti-caking agents that can affect meltiness, so fresh is best for gooey results.
- Let It Rest: Resting for 10 minutes before slicing helps keep your quesadilla slices neat and cheesy instead of a melty mess.
- Adjust Seasonings to Your Taste: I always taste the filling before assembling to add extra taco seasoning or salt as needed—don’t be shy with flavor!
How to Serve Loaded Sheet Pan Quesadillas Recipe
Garnishes
For garnishes, I’m a huge fan of the classics—cool dollops of sour cream, scoops of creamy guacamole, and a bright, chunky salsa really elevate these quesadillas. Sometimes, I’ll sprinkle chopped fresh cilantro or add a squeeze of lime juice for a fresh zing that balances all the richness. These toppings make each bite perfectly layered with creamy, tangy, and fresh flavors.
Side Dishes
I like pairing these Loaded Sheet Pan Quesadillas with a simple side salad tossed in a light vinaigrette to cut through the richness. Mexican street corn or a bowl of black bean soup also work beautifully if you want to amp up the meal. For casual nights, tortilla chips with salsa and guacamole alongside feel just right—no fuss, all flavor.
Creative Ways to Present
For parties or game days, I love serving the quesadilla pieces on a large wooden board with ramekins of salsa, sour cream, and guacamole surrounded by jalapeño slices and lime wedges. It makes for a fun, colorful presentation that invites everyone to dig in family-style. You can even add additional toppings like pickled onions or hot sauce bottles to let guests personalize their bites.
Make Ahead and Storage
Storing Leftovers
Once cooled, I tightly wrap leftover quesadilla pieces in foil or plastic wrap and store them in an airtight container in the refrigerator. They last well for 4 to 5 days, making this recipe great for meal prepping. When I revisit leftovers, they still taste fresh and flavorful.
Freezing
I’ve frozen portions of this Loaded Sheet Pan Quesadillas Recipe successfully by wrapping individual slices in foil and placing them in a freezer-safe bag. When I’m ready to eat, I thaw overnight in the fridge and then reheat. This makes it super convenient to have a quick meal on hand for busy days.
Reheating
To get that crispy exterior back, I reheat leftovers in a 350˚F oven for 8 to 10 minutes until warmed through and crispy again—microwaving makes them soggy, so avoid that if you can. Using a baking sheet uncovered works best to maintain the crunchy tortilla texture I love.
FAQs
-
Can I use corn tortillas instead of flour tortillas in this recipe?
You can, but corn tortillas are more delicate and might not hold up as well when folded and baked on the sheet pan. If you want to try corn tortillas, consider softening them first by warming, and be gentle while assembling, or opt for smaller quesadilla portions to avoid tearing.
-
How can I make this Loaded Sheet Pan Quesadillas Recipe vegan?
Replace the ground beef with seasoned cooked lentils or plant-based crumbles and swap out cheese for your favorite vegan cheese alternative. Also, be sure to use vegan-friendly tortillas and serve with dairy-free sour cream or guacamole for a fully vegan dish.
-
Is it necessary to use the second sheet pan on top during baking?
Yes! The top sheet pan acts as a weight to keep the quesadilla flat and ensure even cooking. Without it, the tortillas may puff up or the filling might spill over, making slicing messier and the texture less consistent.
-
Can I prep the filling ahead of time?
Absolutely. You can prepare the filling a day in advance and keep it covered in the fridge. This makes assembly quicker when you’re ready to bake, especially handy for busy weeknight meals or entertaining.
Final Thoughts
This Loaded Sheet Pan Quesadillas Recipe has easily become one of my go-to comfort meals—it’s delicious, effortless, and feeds a crowd beautifully. I hope you enjoy making it as much as I do because it’s not only foolproof but also incredibly satisfying. Give it a try, and don’t hesitate to experiment with your favorite fillings and toppings; just remember the weight trick for the best results. Happy baking and even happier eating!
Print
Loaded Sheet Pan Quesadillas Recipe
- Prep Time: 20 mins
- Cook Time: 40 mins
- Total Time: 60 mins
- Yield: 15 quesadilla pieces (serves 8)
- Category: Main Course
- Method: Baking
- Cuisine: Mexican
Description
Loaded Sheet Pan Quesadillas are an easy, crowd-pleasing meal perfect for family dinners or parties. Ground beef, black beans, veggies, and cheese are combined and baked on a sheet pan for a crispy, cheesy quesadilla that’s simple to slice and serve. This recipe is ideal for feeding a group with minimal effort and maximum flavor.
Ingredients
For the Quesadillas
- 2 tablespoons olive oil
- 1 pound lean ground beef
- 1 yellow onion, cored and chopped
- 1 red pepper, cored and chopped
- 1 (15-ounce) can black beans, drained and rinsed
- 1 (5-ounce) can mild green chiles
- 3 tablespoons taco seasoning, plus more to taste
- 1/2 teaspoon kosher salt, plus more to taste
- 1/2 teaspoon black pepper
- 1/4 cup water
- Cooking spray
- 10 medium (10-inch) flour tortillas
- 16 ounces grated cheddar or Mexican blend cheese
For Serving
- Salsa
- Sour cream
- Guacamole
Instructions
- Preheat the oven: Set your oven to 350˚F and position a rack in the center for even baking.
- Prepare the filling: Heat olive oil in a large skillet over medium heat. Add ground beef and cook, breaking it up, until browned, about 4-5 minutes. Add the chopped onion, red pepper, black beans, and green chiles. Cook for another 5-6 minutes until veggies soften but don’t brown.
- Season the filling: Stir in taco seasoning, kosher salt, black pepper, and 1/4 cup water. Cook until the water evaporates and the seasoning evenly coats the mixture, about 3-4 minutes. Remove from heat and adjust seasoning as needed.
- Assemble the quesadilla: Spray a 9 x 13-inch sheet pan with cooking spray. Lay 2 tortillas slightly overlapping in the center and then arrange 6 more tortillas overlapping around the edge, draping over the pan edges. Sprinkle 1/3 of the cheese over the tortillas, then spread the beef mixture evenly to the edges, and sprinkle remaining cheese on top.
- Top and fold: Place 2 more tortillas in the center and fold the edges of the overhanging tortillas over the filling to cover. If there are gaps, patch with extra tortilla pieces. Lightly spray the top with cooking spray.
- Prepare for baking: Cover with foil and place a second, slightly smaller sheet pan or baking dish on top to weigh it down.
- Bake the quesadilla: Bake in the preheated 350˚F oven for 20 minutes. Remove the top pan and foil, increase the temperature to 400˚F, and bake an additional 10-15 minutes until the tortillas are very crispy and golden.
- Rest and slice: Allow the quesadilla to rest for at least 10 minutes before slicing to let it set. Use a sharp knife and a bench scraper or pizza cutter to slice into approximately 15 rectangular pieces about 3 x 5 inches each.
- Serve: Serve warm with salsa, sour cream, and guacamole. Store leftovers in the refrigerator for 4-5 days and reheat in a 350˚F oven for 8-10 minutes to retain crispiness.
Notes
- Leftover quesadillas reheat best in the oven to keep them crispy.
- If you prefer, substitute ground turkey or chicken for a leaner protein.
- To patch holes in the top tortilla layer, use torn pieces of an additional tortilla to avoid gaps.
- If desired, customize toppings with jalapeños, chopped cilantro, or hot sauce.
- Ensure the filling is well cooked and seasoned before assembly for best flavor.
Nutrition
- Serving Size: 1 large quesadilla piece (approximately 1/15th of recipe)
- Calories: 320
- Sugar: 3g
- Sodium: 540mg
- Fat: 17g
- Saturated Fat: 7g
- Unsaturated Fat: 8g
- Trans Fat: 0g
- Carbohydrates: 25g
- Fiber: 5g
- Protein: 18g
- Cholesterol: 45mg

